

A couple of months ago, my wife and I bought a new couch for our upstairs entertaining area. We wanted it to be big enough to fit everyone, and this thing can. 12 people at once so far. The only problem is it covers up ALL of the outlets around 2 of the walls and I used to use those outlets for all kinds of things. Lamps, phone chargers, the main router, a subwoofer… So we’ve created a problem for ourselves unintentionally.
Then I went over to a buddy of mine’s house, let’s just call him Mark, cuz that’s his name. He built a simple wooden table to fit behind the couch that has some outlets built into and flush mounted to the surface so that he can plug things in. I thought “this is brilliant” and so I adapted the design to fit our house, needs, and couch.
Woodworking Skill
Time involved
Project Cost
Difficulty compared to other projects on this site
Here’s what we did.
Required Parts
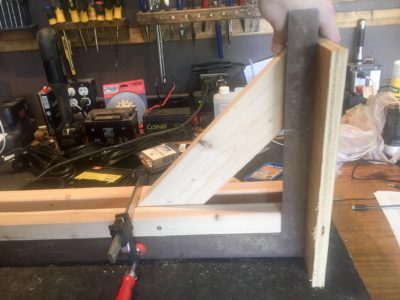
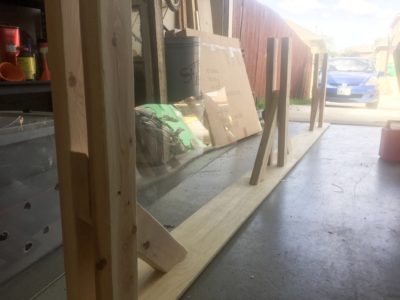
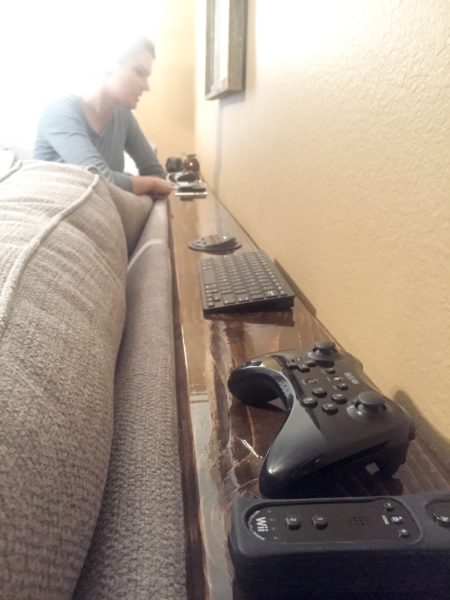
You’ll need two main boards: 6 legs and 4 bracing boards cut and sanded. Cut the 1×8 to the length you want the table to be. The easiest thing to do is measure the back side of your couch, mine is exactly 12′, and cut to that length. Cut 6 legs out of the 2×4. These legs should be 1″ shorter than the height of the back of your couch. The hard frame part, not the cushions (since they will likely stick up higher than the back. Cut 4 bracing boards out of the remaining 2×4. These will have 45 degree ends cut on the miter saw that will run from the legs to the middle of the top section. (see pictures below in assembly step) Ensure square legs with a 90 degree square. Each of the two end legs will be the same. 1 of the bracing pieces will be sandwiched between 2 of the leg pieces. Make sure to take your time and line this up correctly, or the table top wont sit flat. In the picture to the left, I used a 90 degree square and a scrap plywood board to ensure that the 45 degree cuts lined up with both the plywood and the workbench. You’ll have to fiddle with it to get both sides of the board to sit flat. Once it is flat in both places, clamp the three boards together and predrill and screw in 2″ wood screws (2 per side) to hold the leg together. The middle leg is exactly the same procedure, except that you will have a Y shaped leg, since you’ll want 1 brace to come out the left side, and 1 brace to come out the right side. I recommend putting the two brace pieces together into a V shape (should equal a 90 degree corner) and screw through one into the other to hold them in place. Then, place the V upside down on the ground and line up the remaining two leg pieces on either side, forming an upside down Y shape. Put the middle of the V’s crease in the exact middle of the legs and clamp all 4 pieces together. Screw 2 wood screws into each side of each support beam to finish the leg off. Start by placing the top face down on level ground. Roughly line up where the supports will go, upside down, on the top piece. You want each part of the table to be supported so that there are no weak spots, so I put my outer legs 10″ from each end and the middle leg right in the middle of the board. Each leg should be in the exact middle width-wise (~3.5″ in from either side) Again, take your time with each leg and make sure it is square with each side. The legs should be square with the table top, the edge of the leg should be parallel with the edge of the tabletop, and the support brackets should be pointing directly at the other leg brackets. If you took your time squaring up in the leg building stage, this should be relatively easy. Attach each leg to the table top with 2 x 1-1/2″ pocket hole screws to the underside of the table. Attach each side of each bracket in the same manner. You need enough screws to hold the legs in place when you are moving the table, but you dont have to go crazy. All of the weight will be down onto the legs once the table is in position, so you don’t have to use a whole box of screws. Cut the 4.25″ hole for the grommets and sand smooth. In my table, I put 2 power grommets: one with an ethernet port and one without (since its a few dollars cheaper and I never anticipate needing more than one.) I spaced them out on the table, so they can be reached from anywhere and I put them directly in the middle of the section between the leg support brackets. About 1/3 and 2/3 of the way down the table, respectively. Center the hole width-wise in the board and cut a 4.25″ hole with a hole saw, or if your confident in your abilities/don’t want to buy a hole saw, trace the outline of the inside of the grommet on the board and cut it out with a jigsaw. It doesn’t have to be a perfect circle, since the grommet has a plastic lip that will cover imperfections, but do be careful. If its an ellipse, you’ll be able to see the hole around the edges of the grommet and you don’t want that. A hole saw is much safer. To be on the safe side, I cut the hole a little small and then used a dremel tool with a sanding block to enlarge the hole just a bit all the way around until the grommet fit snug. Sand the surface and the legs smooth with 120 grit sand paper, but you’ll want to pay closest attention to the top surface, since it’s really the only visible surface of this table. Everything else is hidden behind the couch. Ideally, you’ll want to make everything look good, but this is a project where you can spend less time sanding everything and just focus on the parts that will show. Get rid of splinters and clearly rough areas everywhere, but feel free to save some time here. Apply your wood stain of choice to everything. Use 2″ or 3″ wide foam brushes for all the larger surfaces, and 1″ brushes to get up inside the legs and support beams. I highly recommend using some rubber gloves, because sticking your hand up inside the frame is going to get messy. Once the stain has set on an area for 5-10 minutes, take a clean cloth and wipe off the excess. You don’t actually want stain to dry on the wood, since it will get tacky and take forever to actually dry. You just want it to soak in and then you wipe it off to create a smooth, evenly colored surface. You’ll likely need a half roll of shop towels, or some old T-shirts. Let the stain completely dry for an hour, and then you can sand the surface with a higher grit level of sandpaper. I recommend going up about 60-100 grit every time you repeat this process for a smoother and smoother finish. Since we started with 120 before staining, go up to around 200 grit. This fine grit will help you smooth the surface but prevent you from actually digging into the stained surface and removing the stain. Try not to do that. Towel off or spray compressed air across the surfaces so there is no dust, and you can begin the polyurethane process. You want to either be in a garage, or outside on a non-windy day. Any small bits of dust or debris that get on the finish will be there forever, so take care and wait till a good day to do this. I’ve rushed many wood projects and ended up with little grass clippings here and there. You’ll have to sand those out and start again, so don’t waste time by starting sooner than you should. Apply polyurethane in smooth, slow strokes so that you don’t introduce air bubbles in the finish. I put one coat over everything, just help seal it and make it look a little nicer, but then I built up 4 layers on the top surface, since it’s the one that shows and the one where cups will be set on. The more layers, the thicker the protection, the longer the table lasts. More than 6 is probably overkill. Generally 4-5 for tables is enough. Wait a few hours between coats for it to dry and use a new foam brush for each application. You’ll need to plug in the power cord, the USB cords, and the ethernet cord to their appropriate connections. Each power grommet has at least a power cord and 2 usb cords (one for each USB plug) and the grommet with the ethernet port has a spot to plug in an ethernet cord below to connect to a router. Plug the power cord into the wall, or another power strip if you’d like to have surge protection. (These grommets are just outlets, not surge protectors.) Plug each of the 4 USB cords into ports on the powered USB hub. If you just want these ports to be for charging devices, all you have to do is plug the USB hub into the wall. I chose to run a long USB extension cord around the baseboards to the front of the room and connect it to the PS4. This allows the ports to function both as charging ports for devices AND as connections to the PS4. The finished table: All our remotes, controllers, keyboards, heaphones, etc! All nice, tidy, and accessible. I can plug in a USB mouse and keyboard to the plugs behind my head and they can be used on the TV. I also have a set of wireless headphones (for when people are asleep) and I can plug the USB dongle in behind the couch and it will auto switch to the headphones and mute the sound system. If you plug in a phone, it just defaults to charging the phone, since there is nothing for a phone to do on the PS4. Plug the ethernet outlet into either the router, or a wall ethernet outlet (whichever you prefer). This gives the outlet on the tabletop access to the network. We’ve populated our table with a plethora of charging cables and plugs. We have short 1′ cords for both microUSB and Apple Lighting connections, and also a couple longer cords, and now I can easily charge anything while sitting on the couch. Also, we have cleared off our messy coffee table of TV remotes, sound system remotes, PS4 controllers, apple remotes, headphones, keyboards, dongles, and a host of other things. All of this can now be neatly arranged on the long table. The whole room is tidier! I hope you've enjoyed this tutorial! Please consider donating on our Patreon page! The more money we raise, the bigger and more elaborate project tutorials we can do for you! How to Build
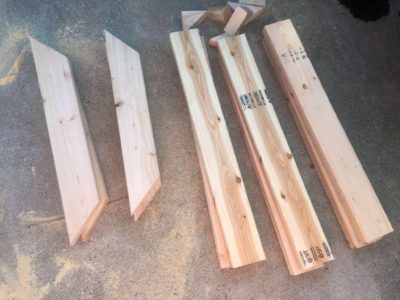
Step 1 : Cut the wood to size
Keep in Mind
A 12′ table is MUCH longer than I expected it to be and I almost didn’t make it up the stairs with it. If you know you have to take the table through tight spaces, make sure you extend a tape measure the length of the tabletop and walk it through your space to ensure you can get the table to where you want it. If you can’t get the tape measure through without bending it, the table can’t be that long. Consider making two tables and nesting them up side by side, which will hardly be noticeable, or just make the table shorter than the couch. Step 2 : Assemble the Legs
Step 3 : Attach the Top
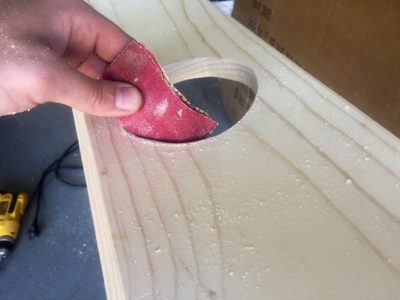
Step 4 : Drilling Holes for the Power Grommets
Step 5 : Routing and Finishing
You could also use a circular saw set at an angle (45 degrees) and make straight cuts down the very edge of table top. Just make straight cuts and you’ll get the same look. Tooltip
Next, you’ll want to take your 45 degree chamfer bit and shave the edge of the table, all the way around. This give a nice, legit finish to an otherwise boring flat table. This is definitely optional, but you’re going to like the way it looks. If you don’t have a router, I wouldn’t fret over it too much.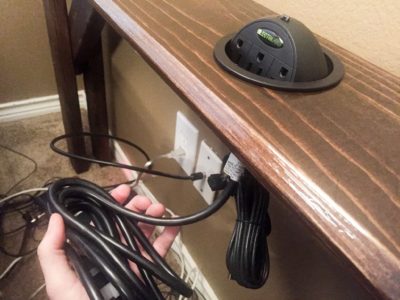
Step 6 : Connecting all the Electronics
Support us on Patreon!
Comments
Hi, found this on Instructable.com and plan to build it. Thanks for providing the guidance.
One question, on that page, you show a link to order the electrical bits. The link doesn’t work and there is no link on your page, Where can I find those pieces? I looked on Amazon with no success.
Thanks,
Steve
Hey Steve! Thanks for letting me know. It looks like the links were removed from Amazon and the product changed slightly. I’ve updated the links here to the newer versions. Should be what you need.