
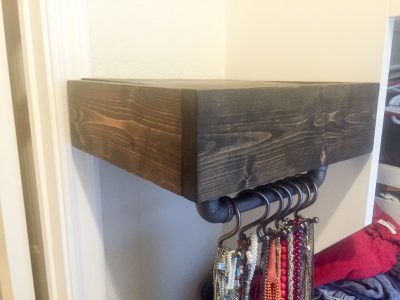
The finished closed shelf holding up some necklaces.
My wife didn’t really have a “good” storage place for jewelry, and she had to go out of town for a few days, so I thought I’d make a place for her to store some rings, earrings, and necklaces that would be a dedicated spot close to where she gets ready in the morning. I scoured the internet for cool ideas and settled on modifying an existing plan that I found. The original shelf is called the “secret floating shelf” located on rogueengineer.com.
The spot where this shelf needed to go was small. About 10″ wide next to the closet door before the wardrobe starts, so it had to be compact, but it also couldnt be very tall or it would impact some other storage spots. This design keeps a compact form factor (just a small shelf 90% of the time) but it has pull down internal storage for smaller items that can be easily accessed whenever you need them.
Note
This is one of the more difficult to get right projects I’ve done for the site recently. Many projects are straight forward, but getting the hinges to work correctly the way you need them to for this is not a simple task. There is some math here. But don’t let it scare you off because it seems hard.
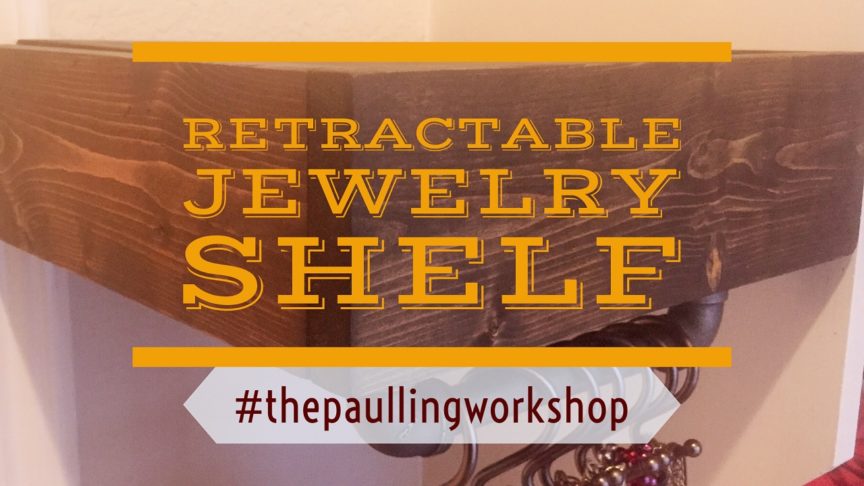
So without further ado, here is the Retractable Jewelry Shelf.
Required Parts
How to Build
The shelf itself isn’t that difficult of a build. The only hard part is getting it to support itself while hanging. But we’ll get there later.
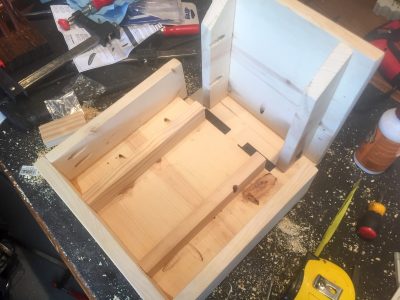
Top and bottom unfinished shelves.
Step 1: To begin: Start assembling the top.
- Cut your pieces. You’ll need 1 – 1x10x11 for the top, 1 – 1x4x10 for the back, and 2 – 1x2x8 strips for the supports.
- Assemble the shelf as shown in the picture. Leave 1″ gaps from the sides for each support. This small space is where the friction hinges will go.
Step 2: Now: assemble the bottom.
- Cut your pieces. You’ll need 1 – 1×9-1/8″x10-1/8″ for the bottom, 1 – 1x4x10-5/8″ for the front, and 2 – 1x4x10 for the sides.
- Assemble the shelf as shown in the picture:

The black pipe connectors towards the bottom of the shelf hold up the pipe.
Step 2.5: If you choose to include the hanging black.
- Drill two 1/2″ holes on the underside of the bottom shelf about 1″ from the front and equal distances from the sides. The pipe will fit through here and be held in place by the 2 connectors.
- Form a U shape from the two shorter pieces, the two 90 degree elbows, and the one 6″ pipe. Slide the two short pieces through the holes and tighten the connectors.
Step 3: Stain and Finish the wood
- Prep everything by sanding rough spots with 100 grit sandpaper, and then finish everything with a smooth 180 or 220 grit paper to give it a real soft touch. You will have your hands all over this thing so the last thing you want is a rough finish. This is likely the most time consuming part of the whole build. Take your time here and don’t rush. So many DIY projects are rushed through this stage and it will look rough if you leave it rough.
- Apply your favorite color stain and let it dry completely. Apply a finish coat of polyurethane (or something else) if you prefer a gloss finish.
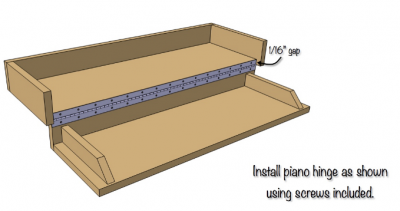
Photo Credit: http://rogueengineer.com/diy-secret-shelf-plans/
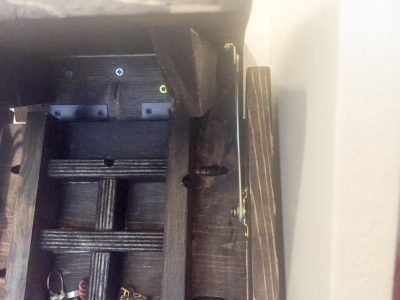
Step 4: Install the piano hinge
- Which ever type of hinge you decide upon, the install is a little tricky. Connecting the top to the bottom is not in the “typical” way you connect two pieces of a wood, like a door. Lay the top on the workbench facing you and then lay the bottom shelf upside down on the top edge of the backside. It sounds complicated, so follow the picture.
- Leave a small gap between each piece the hinge attaches to, make your measuring marks, and drill your pilot holes. Then connect the hinge with the screws provided.
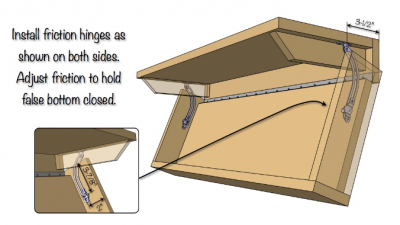
Photo Credit: http://rogueengineer.com/diy-secret-shelf-plans/
Step 5: Friction Hinges
- Here’s the tricky part. Lining up the friction hinges has to be exactly equal from one side to another. Measure carefully here. The measurements here in the picture will be pretty close to what you need, but if you get different friction hinges, they will likely have different measurements on the back of the package. Use those.
- Once you have the hinges positions marked, install on the top shelf, and then install on the bottom shelf. It will be easier to use a long manual screwdriver than a drill driver since the tolerances are tight.
- Once the shelf is hung on the wall, you’ll tighten down the center screw on the friction hinges to determine how much weight they will hold.
Right side friction hinge and interior wall mount screws in the back. Gold screws are into a stud. Black screws are into wall anchors.
Step 6: Mounting to the wall
- Just like any other shelf: Pick a spot, identify where the studs are and either use those with longer screws or use drywall anchors. I recommend using at least one stud in addition to drywall anchors since to use this shelf, you have to pull down on it, which puts a lot of stress on just drywall anchors.
- Level the shelf and screw it into the wall. I used 3″ construction screws into the studs through the back of the top shelf. The bottom shelf will lower to about 60 degrees, so make sure you have clearance below the shelf of about 10″ so you don’t scrap into anything. You don’t have to worry about the lower shelf hitting the wall and scratching anything up because the friction hinges actually pull the lower shelf away from the wall just a little bit to prevent that kind of thing.
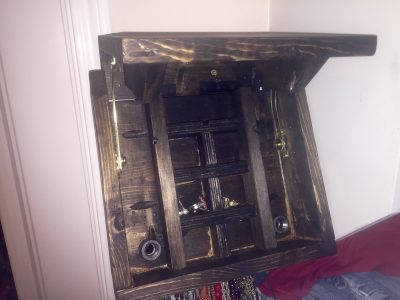
The finished shelf. Open fully.
Optional: You can include extra, smaller pieces of wood inside the bottom shelf to create cavities for storage, rather than just have one large open area to put things that will slide around. I created 6 roughly square spots and 1 larger rectangle at the top to hold trinkets, earrings, rings, and other small items inside, while necklaces dangle underneath on the pipe.
To finish up: Tighten the center screws on both friction hinges to roughly equal tightness. Keep trying different levels of tightness so that the shelf will stay closed when you close it, or open well without having to hang on the shelf. It needs to requires some force to open, but not a ridiculous amount. Once you have that set, you’re good to go! Congratulations!
Parts featured in this article:
Support us on Patreon!
I hope you've enjoyed this tutorial! Please consider donating on our Patreon page! The more money we raise, the bigger and more elaborate project tutorials we can do for you!
Check out the Patreon Page