

 My wife and I love coffee. And not just “good” coffee… I’ll drink any kind of coffee. It doesn’t have to be grown in the Himalayas to make me happy. French press, Starbucks, Keurig’s, percolator over a campfire… I don’t care.
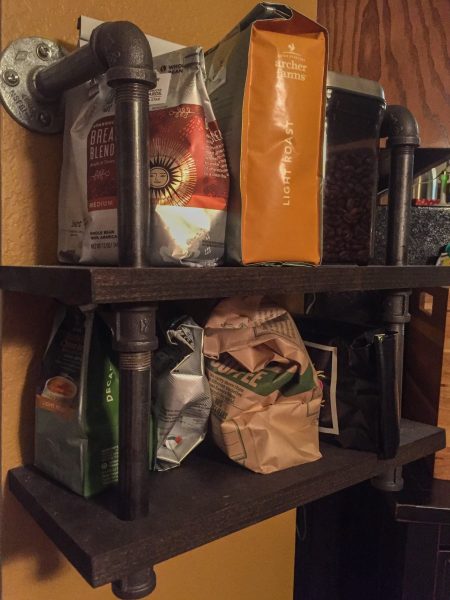
So in our quest to learn how to make good coffee at home (because it’s WAY cheaper to do so), we end up stocking up on a lot of coffee beans and bags and containers. This little project was a way to organize all that next to our coffee bar so that it took up less space and remained visible. I didn’t want to have to stuff all this in a cabinet somewhere to forget about it. Because lets be honest: if you put it in a cabinet in the kitchen, its gone forever. Like socks in a dryer.
Anyway, here’s how to build the thing:
Required Parts
Its a pretty simple build, like most of my projects. You need the following things:
- 1 – 1″x8″x4′ board – I used pine, and you’ll like have to buy at least 6′ boards. If you get 8′, you can make 2 shelves.
- 2 – 3/4″ black pipe flanges – these are the two things that hold the shelf to the wall. (at the top)
- 2 – 3/4″ black pipe 90 degree elbows
- 2 – 4 1/2″ long 3/4″ black pipe section
- 4 – 5 1/2″ long 3/4″ black pipe section
- 4 – 3/4″ black pipe connector – these hold up the shelves
- 3/4″ drill bit – to make holes through the wood for the pipe.
- Dark wood stain
- Sandpaper
- 8 screws to hold the shelf to the drywall 0r studs (I recommend small drywall anchors)
You will also want coffee and coffee containers and any other coffee related items to put on the shelf. (This shelf can be for anything really. We just use it for coffee.)
How to Build
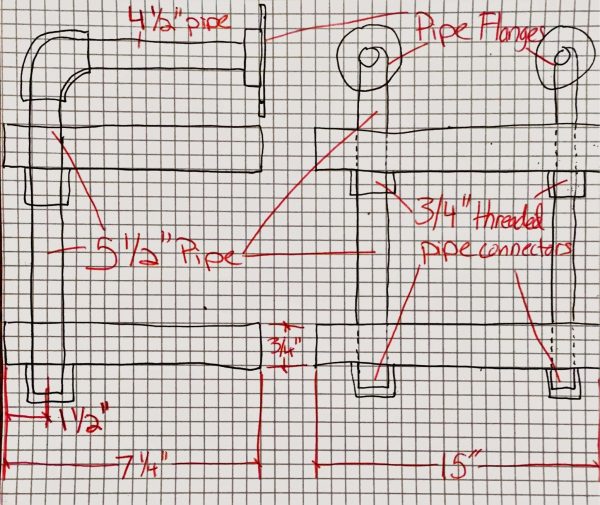
Coffee Shelf Schematic
Start with getting the wood ready. Cut it down to size : 7 1/4″ wide by 15″ long is what I used and it holds a pretty good amount of coffee. You can definitely make yours longer if you want more space but I was limited in how much wall i had between the edge and the window over the coffee bar.
Stain the wood whatever color you’d like. (I prefer darker minwax stains and I did not use a poly finish here, but you can. I tend to only use polyurethane finish when its going to be something that gets wet. Like the workbench.
Take each pipe piece and go over it with paper towels or a rag. They will have this black powdery finish and some of that will come off on your hands and wall if you don’t remove it. Just scrub em down a bit for each part.
Time for the most crucial step: When you are going to cut the hole for the pipe to pass through, you must do two things very carefully or the whole shelf will look funny.
- The hole MUST be a very tight fit for the pipe. You want no wiggle room and really want to make it so you have to press the pipe through the hole. Its got to be juuuuuust big enough for it to fit. The tension in the hole on the pipe is what makes the shelf sit level since this design has no rear support. The only thing holding up the back of the shelf is this hole and the pressure on it. I recommend drilling the hole exactly the same size as the pipe and then using sand paper to slowly increase the diameter of the hole. This will be tedious but its crucial to getting this right.
- The center of the hole MUST be located at exactly the distance that the pipe extends from the wall. 1 1/2″ from the front side was the dimension for me, but you need to check you setup before drilling. Put together the flange, the horizontal 4 1/2″ pipe, the elbow, and the first vertical pipe. The center of that vertical pipe must line up with the center of your hole, which will make the end of the pipe flange and the end of the board both touch the wall at exactly the same distance. If the board is not touching the wall, you have a weird gap. If the board is touching the wall but the flange is not, you wont be able to attach it. They must both touch the wall at the same time. Take your time here and get it exact.
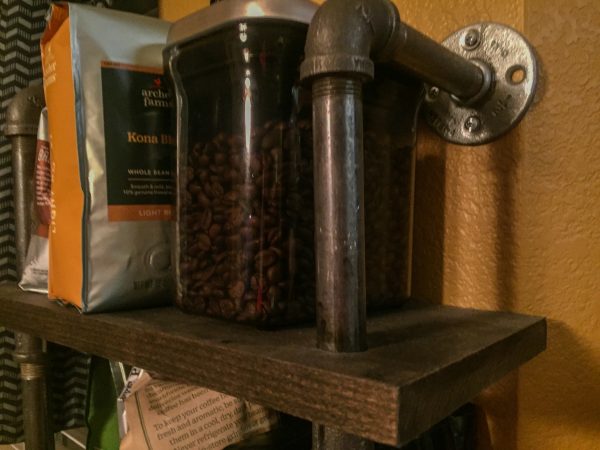
Top shelf and wall connection.
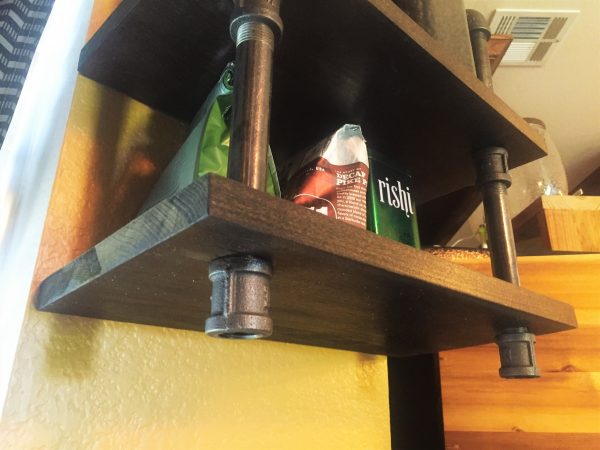
Bottom shelf and shelf supports.
Start putting everything together.
- Starting with the flange, attach the 4 1/2″ horizontal pipe, then the elbow, then the 5 1/2″ vertical pipe, then the first board, then the connector, then another 5 1/2″ vertical pipe, then the second board, then the final connector.
- Repeat the process for the second pipe through the other hole.
Once everything is lined up, screwed in tight, and cleaned up of black dust, its time to mount to the wall.
The flanges each have 4 holes, meant to hold a lot more than just a light shelf, and I think 8 screws is kind of overkill for something like this, but I noticed it looked weird when only some of the holes had screws into the wall, so I went ahead and did all 8. I used small 10lb wall anchors for each one and accidentally overlapped with a stud for a few of them, so I just used the screw straight into the stud for those. No need for a wall anchor. Do whatever works best for your wall placement here.
Thats about it. Dust everything off one final time and start putting your coffee up on the shelf!
For us, top shelf is normal coffee and bottom shelf is specialty flavors and decaf.
Parts featured in this article:
Support us on Patreon!
I hope you've enjoyed this tutorial! Please consider donating on our Patreon page! The more money we raise, the bigger and more elaborate project tutorials we can do for you!
Check out the Patreon Page