
Today’s project is a simple one. A basic introduction to both FreeCAD and QR codes. You’ve probably seen QR codes around, posted on the wall, online, or on the product manual of some device you bought. They can be used for a tremendous number of things and are essentially an easy gateway to download an app, navigate to a website, or give out your phone number. I’ve even made some that allow guests instant sign in to the WIFI network at the house. In this tutorial, I’m going to create a simple QR code that links directly to this website.
Step 1: Generate your QR Code
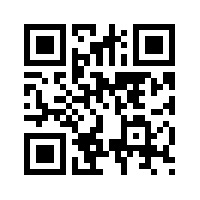
If you scan this QR code, it’ll bring you to my site!
Use QRStuff to generate your QR code.
Choose the option “Website URL” and put in yours: https://www.thepaullingworkshop.com
Choose “Static” and pick your foreground color. I chose black, because it really doesn’t matter, since our end result will be determined by the color of our filament in the 3D printer, but if you just want a QR code file for printing on paper later, pick a fun color.
Over on the right, click “Download QR Code” and you’ll download the PNG filetype of your code.
Step 2: Extrude Codes
The next step is to make our image something that is in 3D, so it can be printed with a height. We are going to use a free service online at www.embossify.com, and that service requires that we have a .jpeg, so open up your .png QR code in paint (or any other image editing software), choose File–>Save As… and resave the file to a .jpeg. You don’t need to edit anything on the actual file.
Once you have a .jpeg, open up www.embossify.com and upload your .jpeg.
The default size is Width of 120mm and Height of 5mm, which is just fine for a drink coaster, but feel free to change it to whatever you want. Also, we can scale this up or down later in our next step.
Important! Make sure you choose “Thicker the… Darker” option. You want the QR code to stand up, not the white space around it!
Choose “Low Resolution” Instant Download and you’ll start downloading your .stl file.
A .stl file is the file type read by most 3d printers/slicer programs, but the problem with our current setup is that it will 3D print a QR code with a height of 5mm, but there will be no base below it to hold all the dots together, so as soon as it finished printing, all those dots would pop off individually and we’d have no finished product. So we need to add a base.
Step 3: Add a Base Layer
Adding a base layer is very easy, but we’ll need a free program to help us out, as there are no default windows tools at the moment that can do this. Maybe in the fall when the Windows Creators Update comes out, they will have something for this.
We’re going to use a program called FreeCAD, which you can download here. https://www.freecadweb.org/wiki/Download


 Import your QR code .stl file you downloaded from embossify by dragging and dropping the file onto the freecad screen.
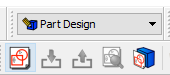
 Open the “Part Design” toolbar and click the left button shown here labeled “Create New Sketch”. A sketch is a 2d drawing that can then be later pushed and pulled into 3d to create something useful.
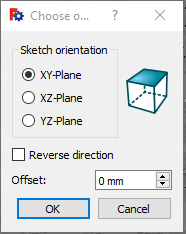
 Creating a sketch in the XY plane will put your sketch on the same layer as the imported QR code, and will line up with the bottom of the code.

 Choose the rectangle tool, and then draw a rectangle from -60,60 to 120, -120. The edges of your QR code.

 Choose “Pad a selected Sketch” from the modify menu.
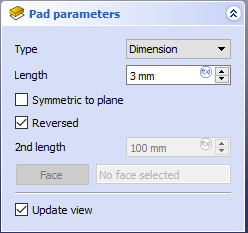
 Set “Type” to Dimension, “Length” to 3mm, and make sure “Reversed” is Checked. Reversed is basically saying -3mm, so it expands 3mm down from the plane of origin, away from the 5m up that was extruded from the QR code. So total height is 8mm, or .3 inches.
 To save the file, you need to actually use the Export option in the File menu, and you cant do that until you have chosen all the Models that you want to export. Make sure the Model menu is selected on the left and highlight/select both your imported STL and “Pad” (the base you just created) by holding Shift and clicking on both of them.

 Choose File –> Export, and save as .STL mesh.
Windows does have a program called 3D Builder that can open the finished .STL file and you can view, rotate, and export to 3d printing services directly from the program. If you want to look around at it, feel free.
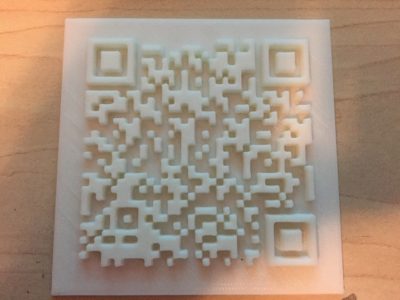
The finished print.
Step 4: Print
Your file is ready to go to a 3D print service if you don’t have a 3D printer at home. These services allow you to email them the .STL file, and they will mail you your part in a few days. Cost is generally pretty low for simple, small objects, and for this example, I’ll use a company called ShapeWays to get a quote. Shapeways can take your object and 3D print it in a huge number of colors and materials, including metal, but they can get expensive.
Turns out, a basic white plastic version big enough to act as a coaster on my coffee table was about $20, and I didn’t want to spend that, but luckily I have access to a 3D printer at my local makerspace here in Dallas. A 2kg roll of ABS filament at Microcenter costs just $15, so I grabbed a roll of that and my .STL file and headed to the makerspace.
If you’re going to 3D print something yourself, you need to import your .STL file into a programm called a Slicer. This takes your file and literally “slices” it up into layers, so that the printer knows exactly what each layer needs to be when printed. If you have a 3D printer, or have access to one, you likely know how to do this step, so I’m not going to try to explain it here because its different for each printer, but once you have it sliced, you can send it to your printer directly and start the print.
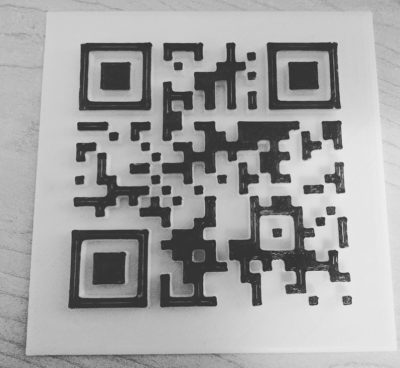
Take a sharpie and lightly color in the tops of all the dots. Make sure you get em all as each on contains data!
Two hours later, I had 2 coaster sized prints! Now, you can get fancy and pause the print when there are just a few layers left and switch colors to a black plastic, but I didn’t have any, so I did the whole print in white and just took a sharpie at the end and colored black over the top surface of the QR code. A few minutes of drying, and you’re done!
Now when people come over, they can simultaneously scan the code and browse the site AND have a place to put their drinks! I’ve also made a QR code that automatically signs into the guest wifi network at the house and there are coasters in the living room and in the guest bedrooms. Again, you can make useful QR codes for just about everything, and now you know how easy it is!
Support us on Patreon!
I hope you've enjoyed this tutorial! Please consider donating on our Patreon page! The more money we raise, the bigger and more elaborate project tutorials we can do for you!
Check out the Patreon Page