

I’m gonna start out by saying this is a pretty ambitious project, and I just want to go ahead and warn yall that this is gonna take awhile if you wanna make one for yourself, but hopefully this walk through will make the process a lot easier for someone to replicate vs having to figure all this out on your own.
A quick history: My wife and I went to an art museum recently, the Crystal Bridges Museum of Art, in Fayatteville Arkansas a few months ago and saw an amazing string art installation by a guy named Gabriel Dawe. He has a series of installations called the Plexus Series and each one of them is a unique and colorful installation of thousands of individual strands of thread woven throughout the space that create really amazing, real world illusions. It’s honestly hard to look at a picture of them and fully comprehend how pretty these things are. They change as you change where you look at it from. The light reflects in different ways and the colors transition from one to the next, and I spent about 30 minutes just looking at the one installation.
So when I got home, I looked him up and started watching his youtube videos to see how he does it. Very little information is given about the process, but you can glean some crucial information from the videos, so I took that and created a similar process that I think worked out pretty well. So here it is.
Required Parts
The list of things you need is pretty simple and this is a relatively inexpensive project. The main cost here is time. This project took me a total of about 15 hours: 4 to make the mounts and lights, and 11 to plan the pattern and weave it. (It could take less for you, since I had no instructions, but it’s still a weekend project) I did this while my wife went on a girls trip for the weekend and I wanted to make her something cool for when she got back.
How to Build
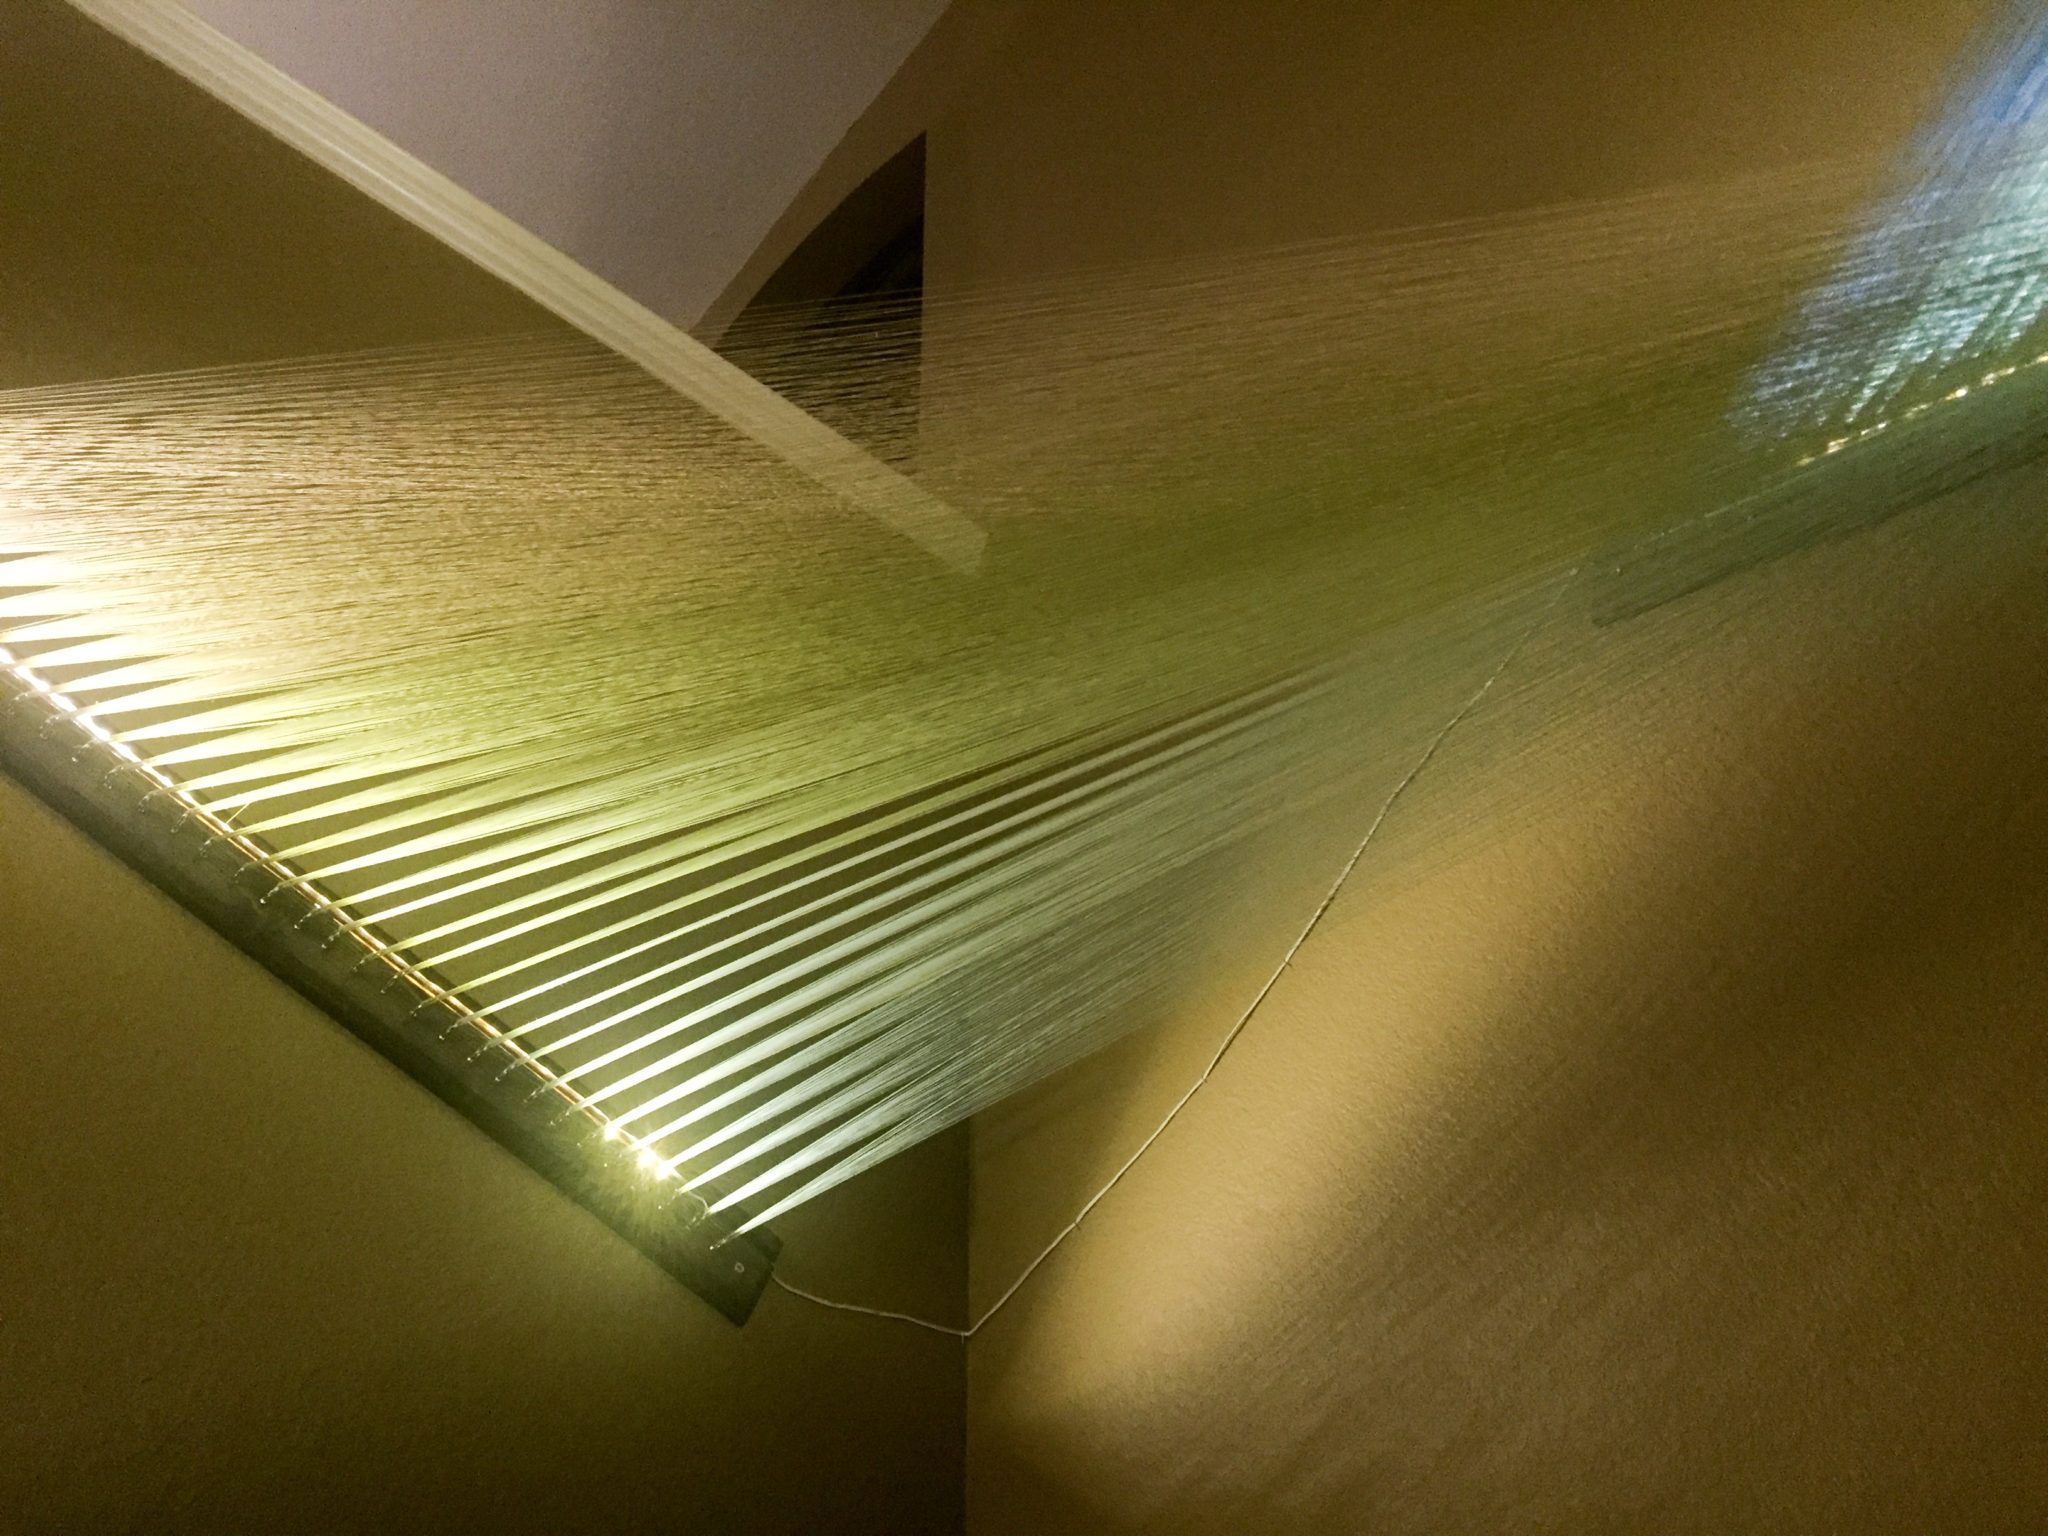
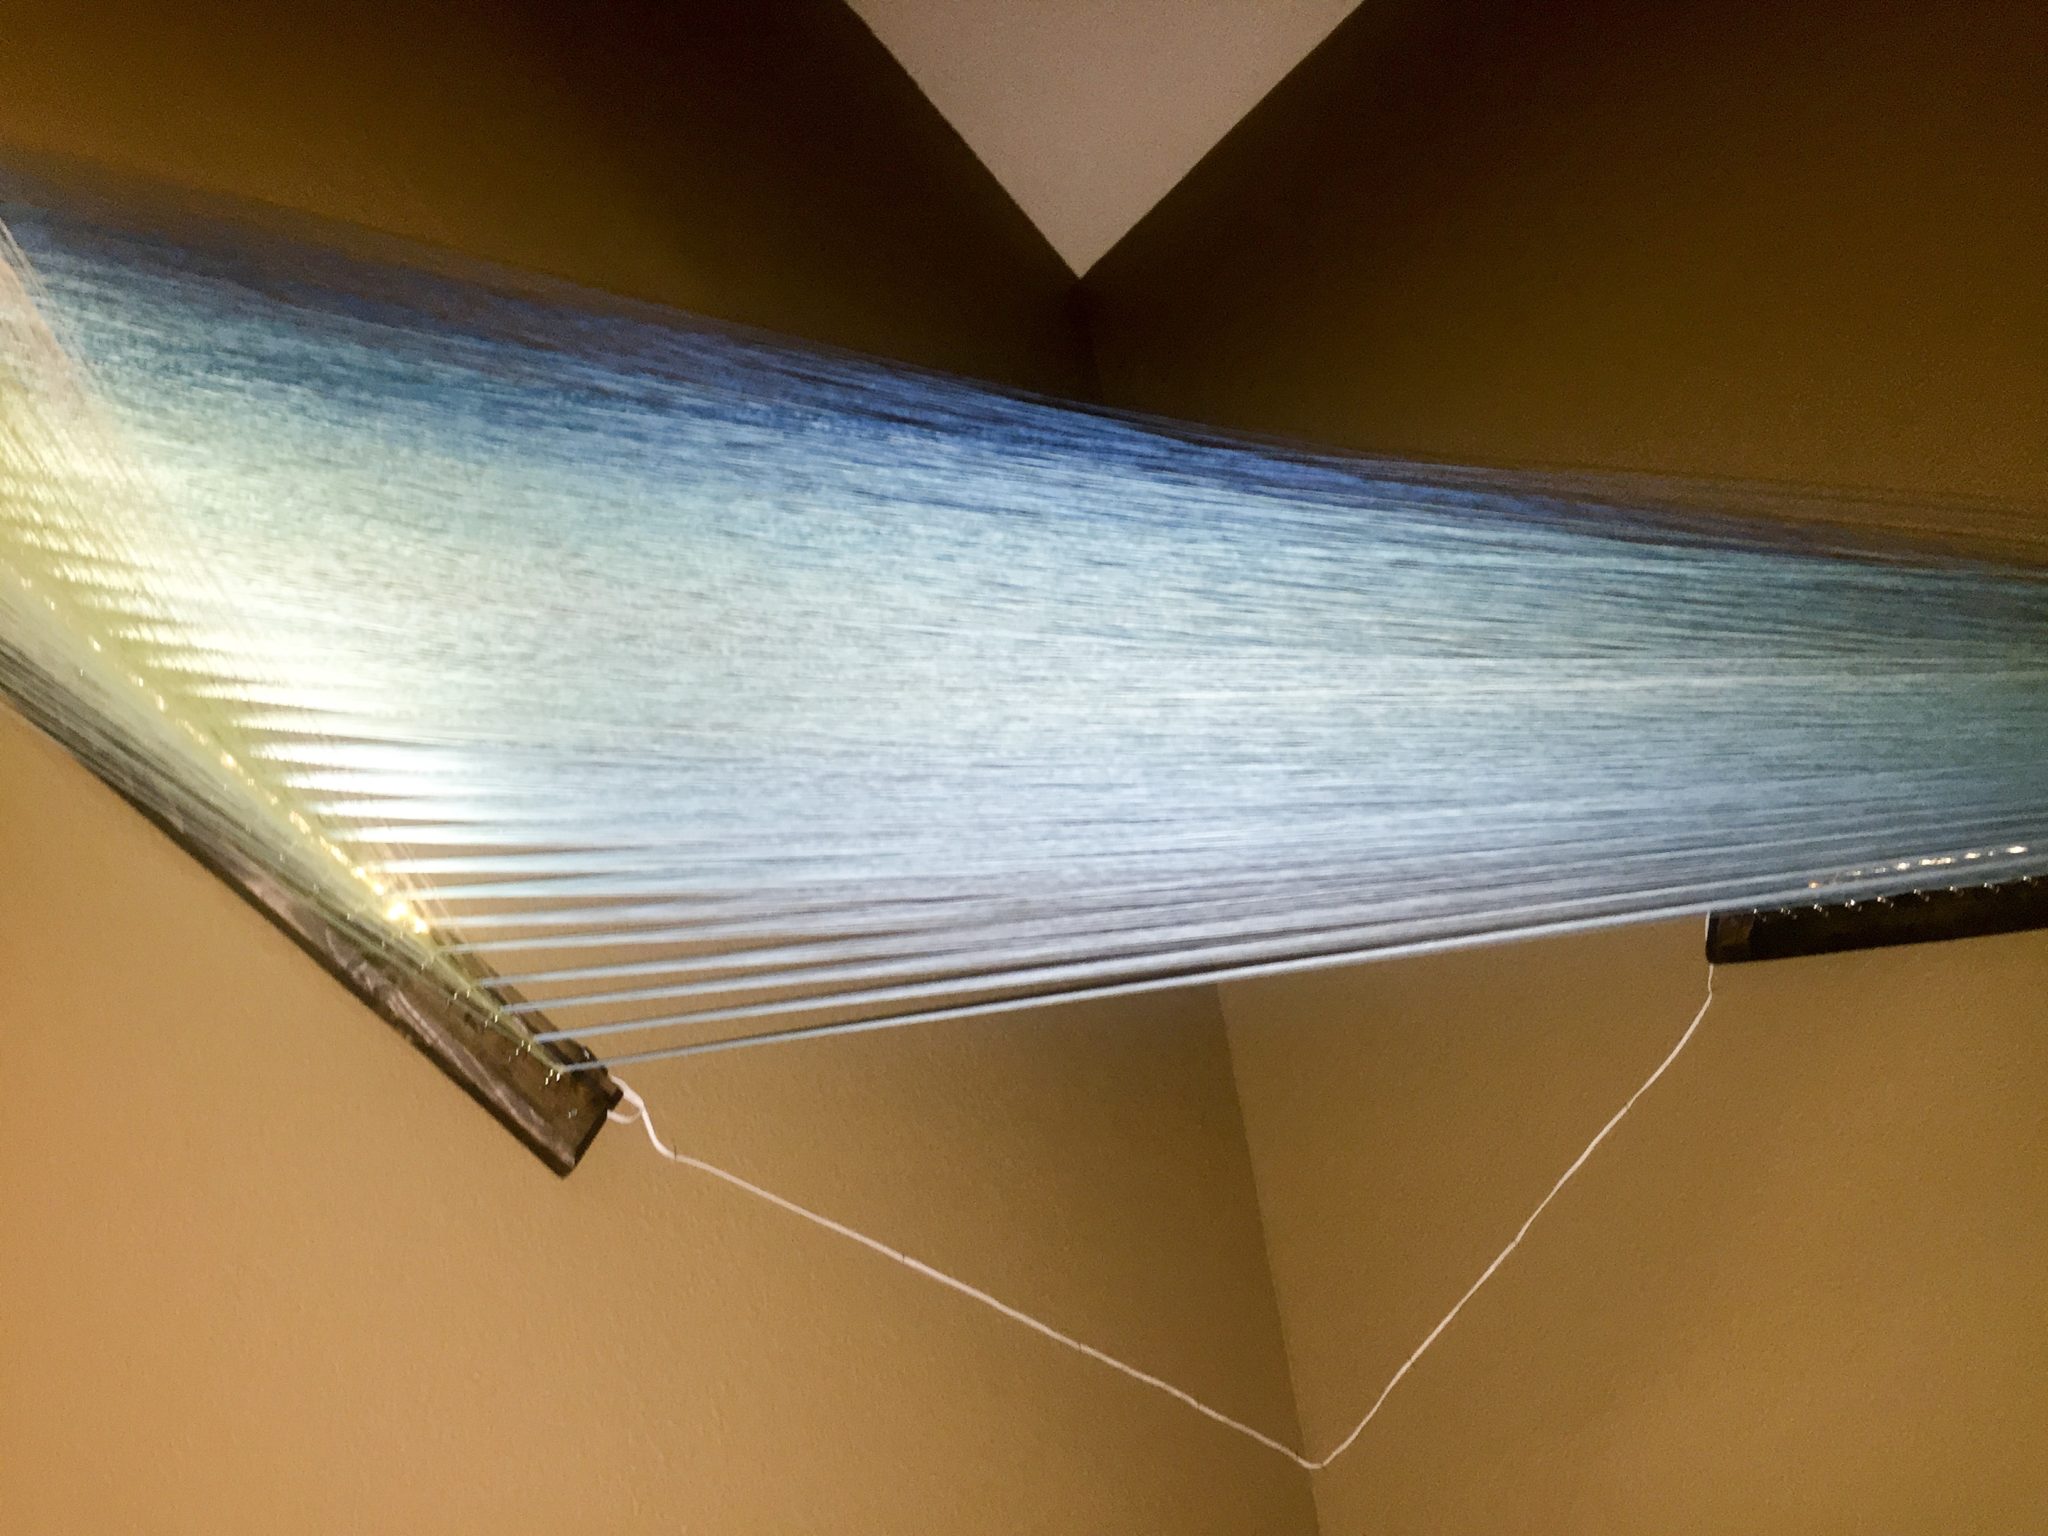
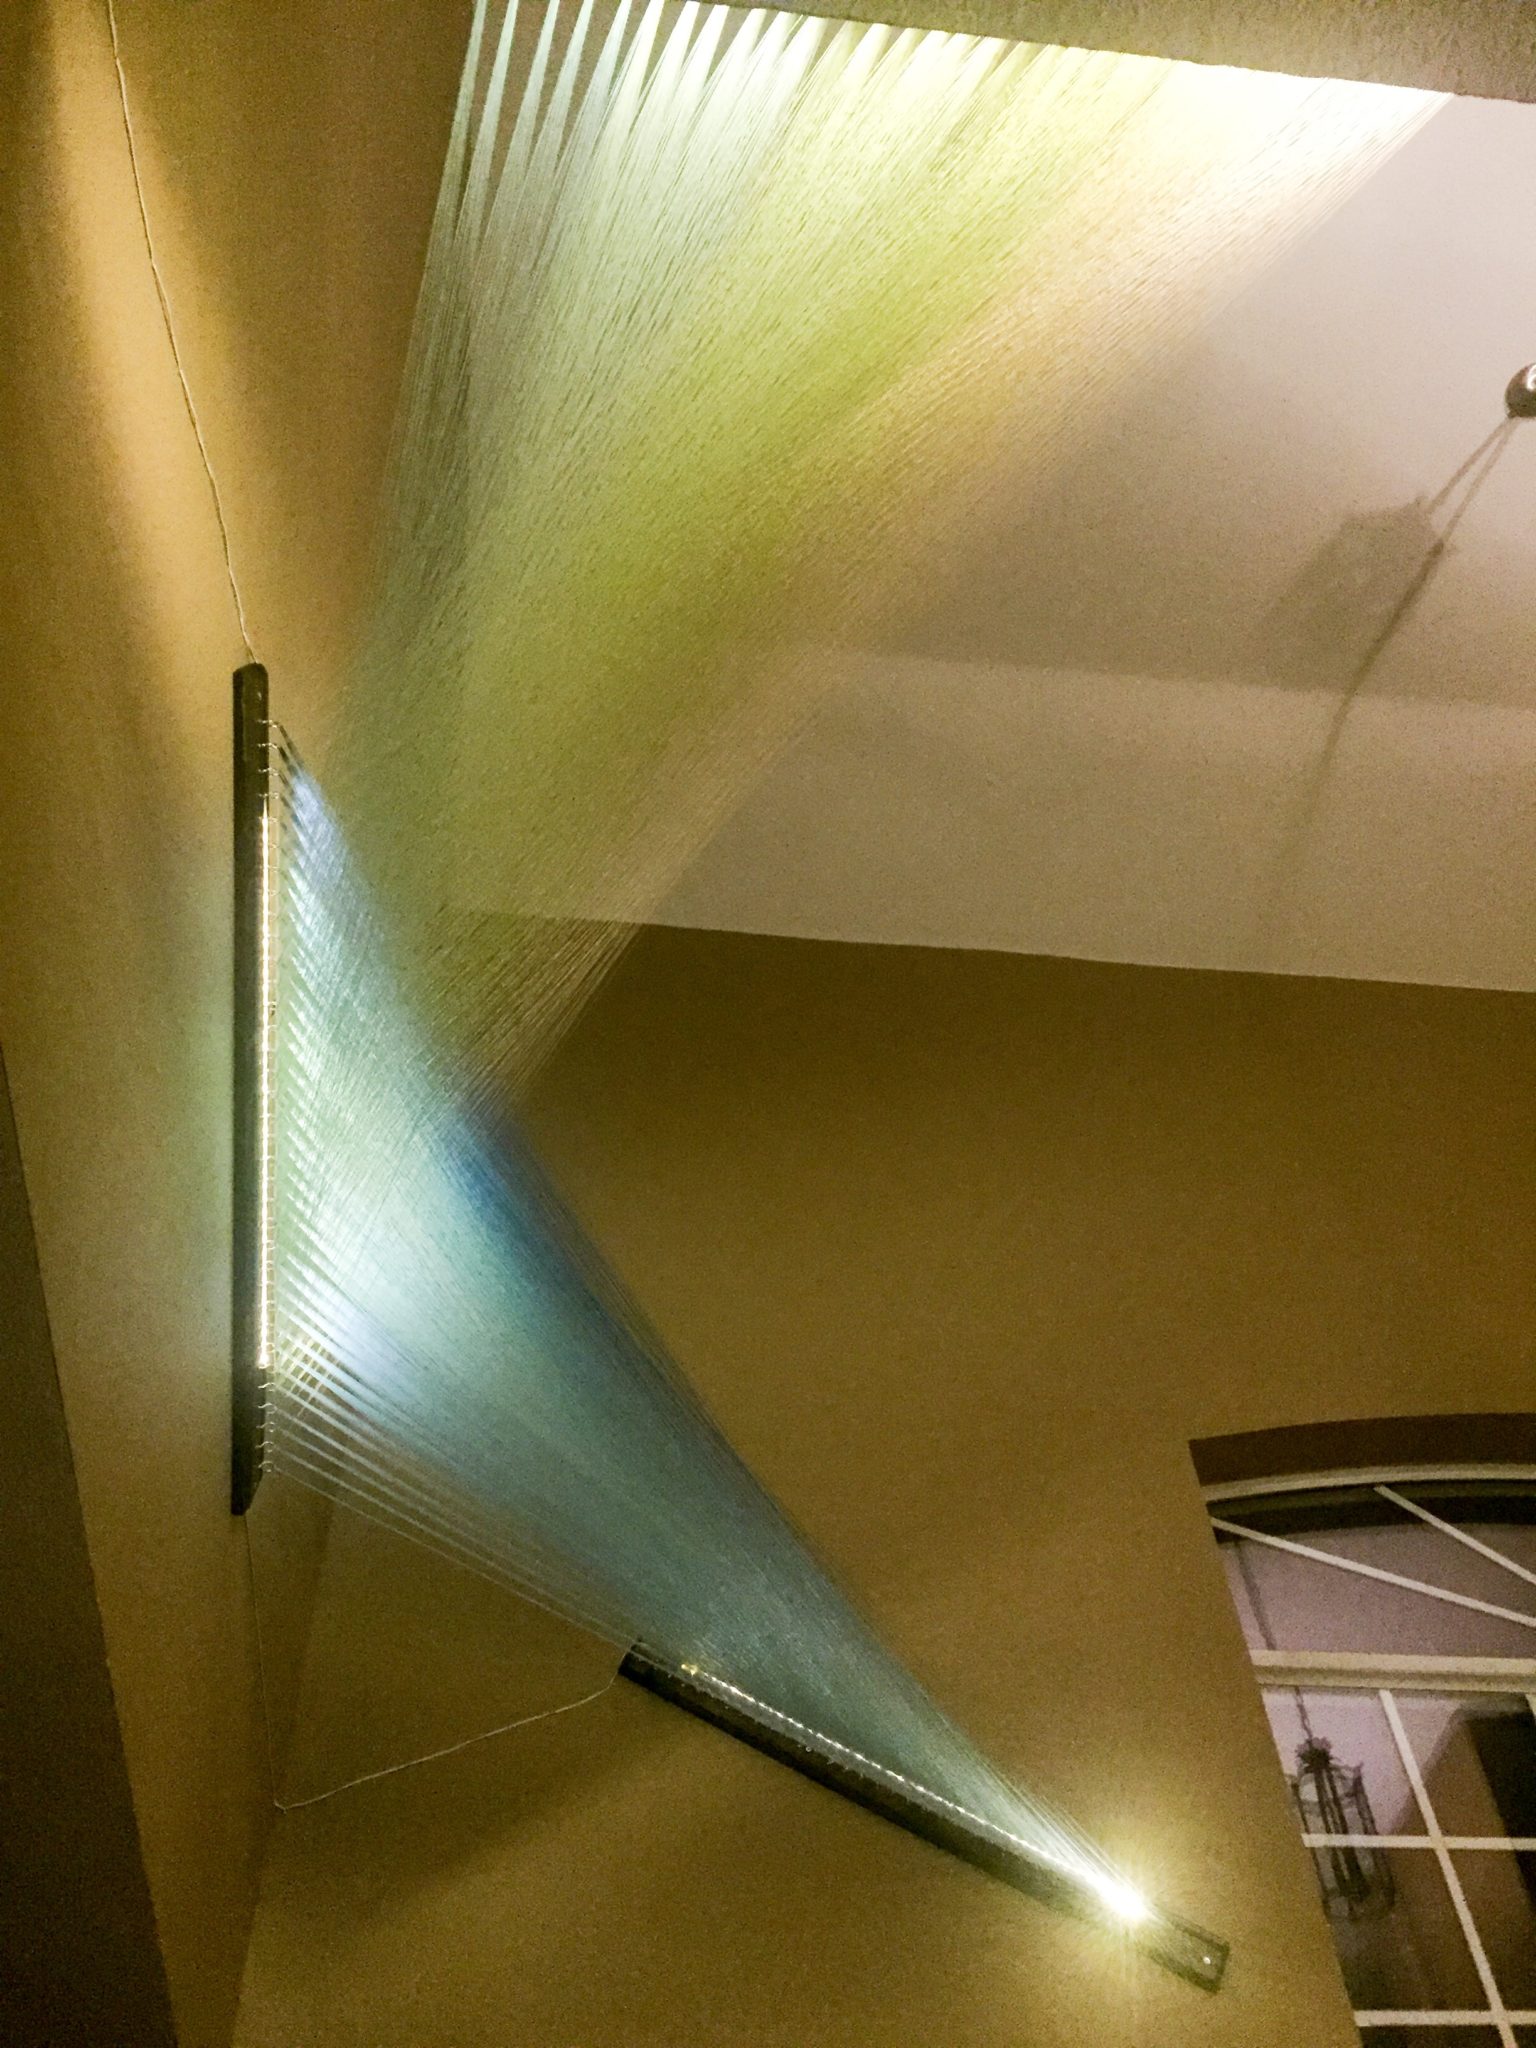

I wanted to start with the pictures above so you could get a sense of what this will look like before we start. So here we go.
- Start by getting your 3 wall mounted boards ready. Cut them down to size (38″ long).
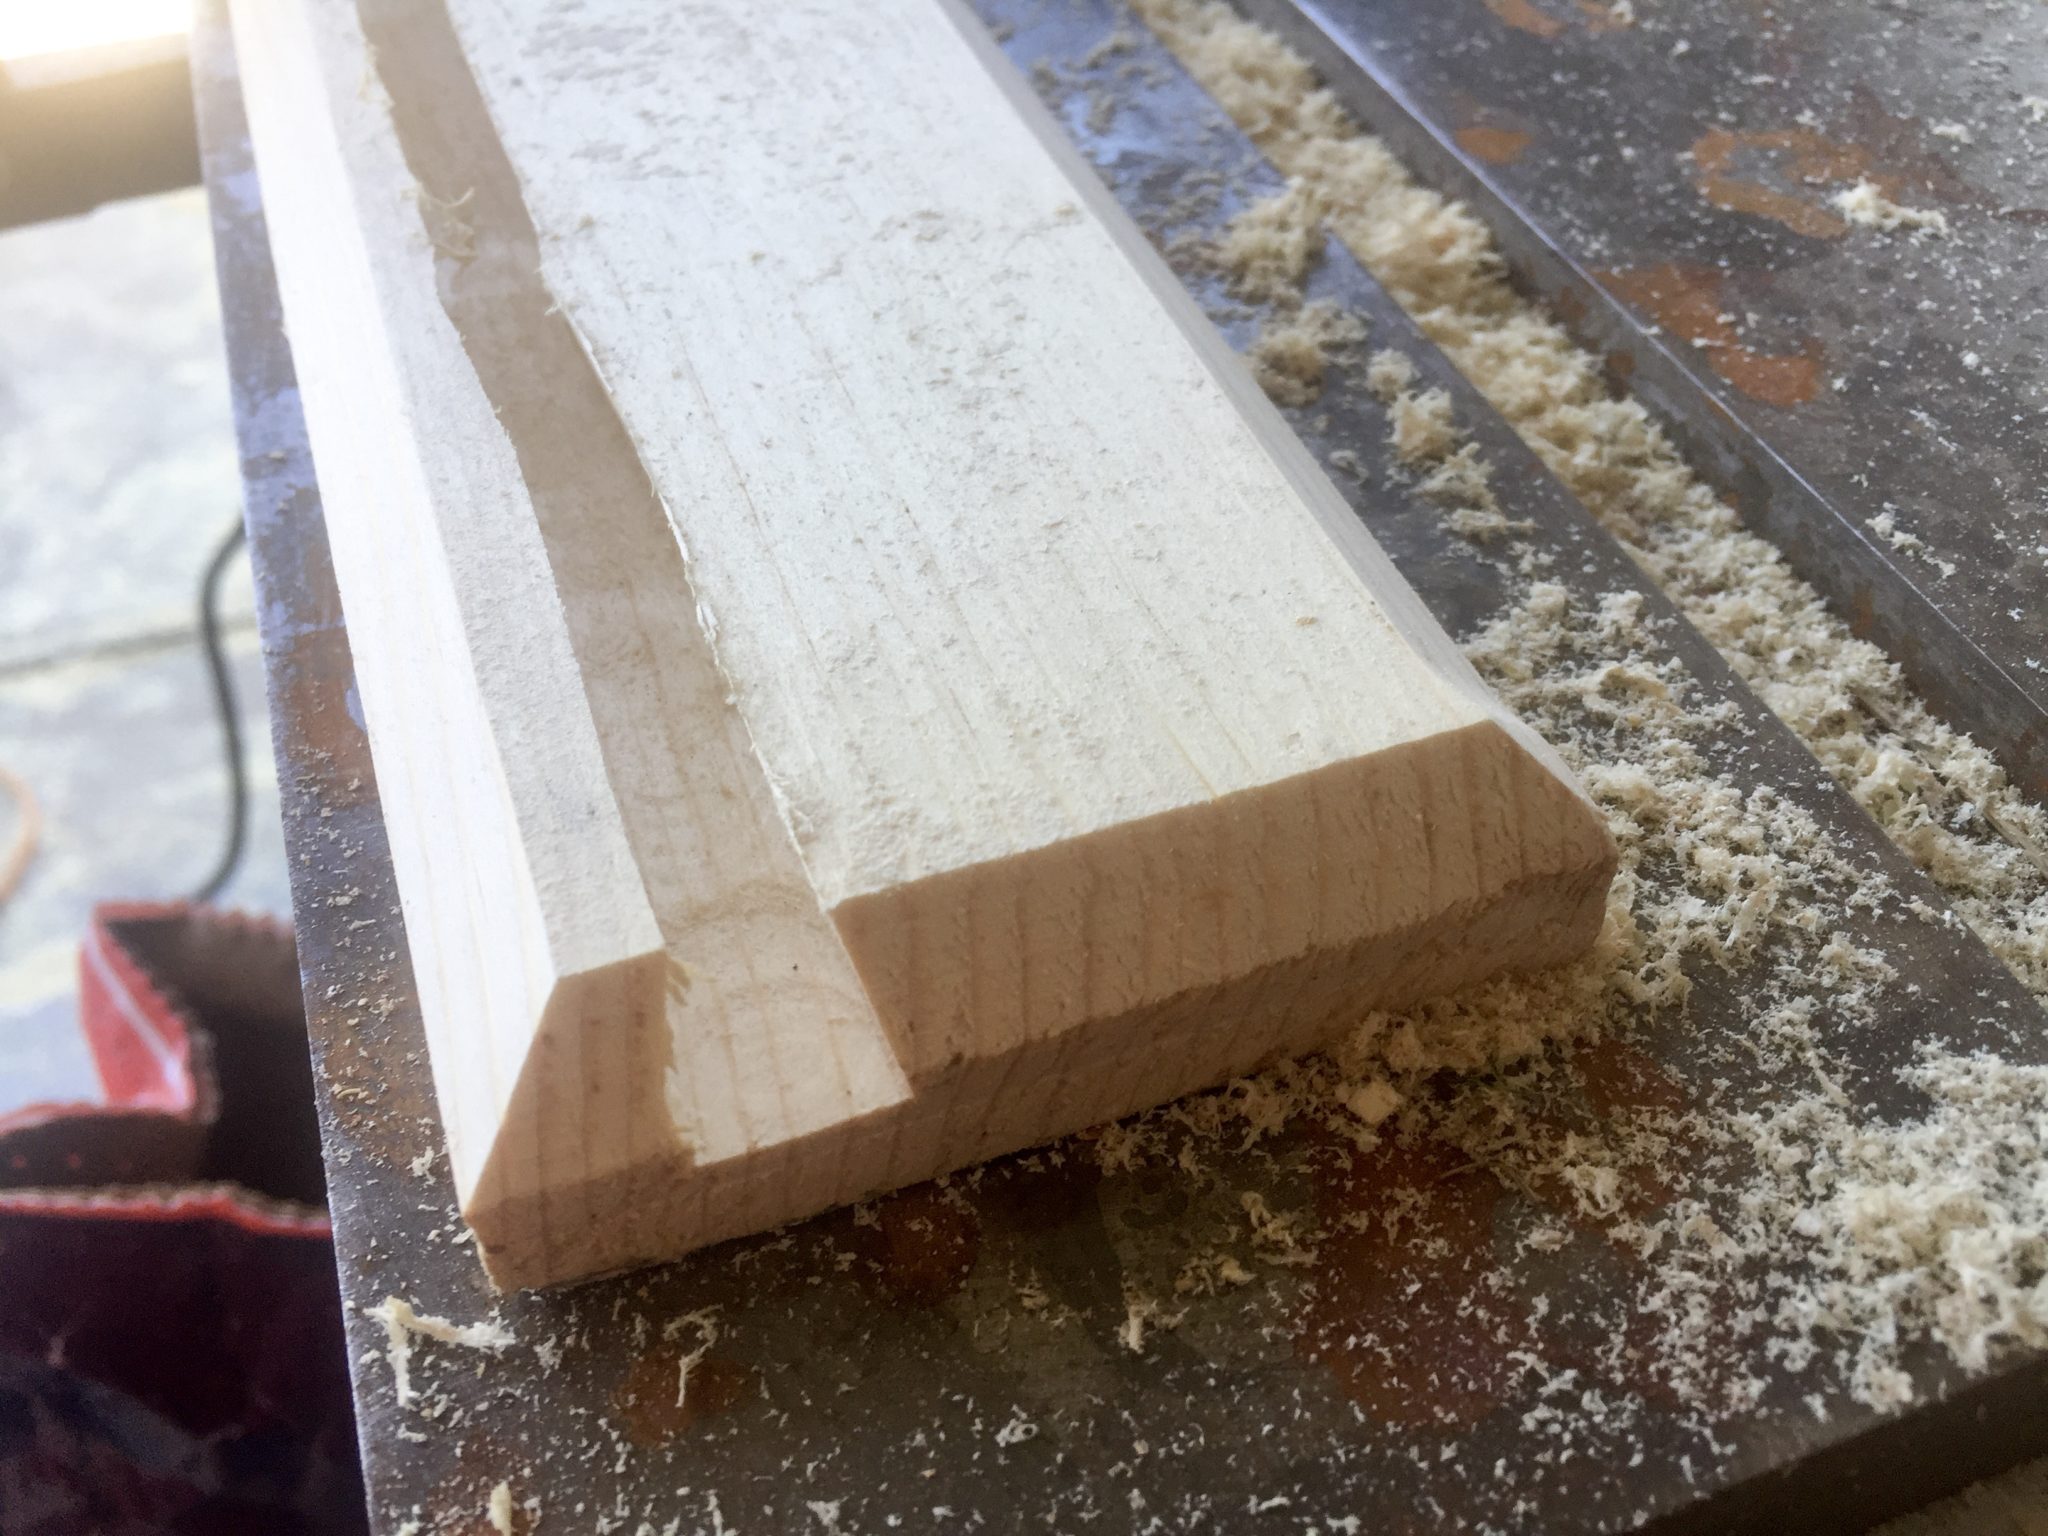
- Use your 45 degree router bit to smooth the outside perimeter of the boards. This gives them a nice finished look.
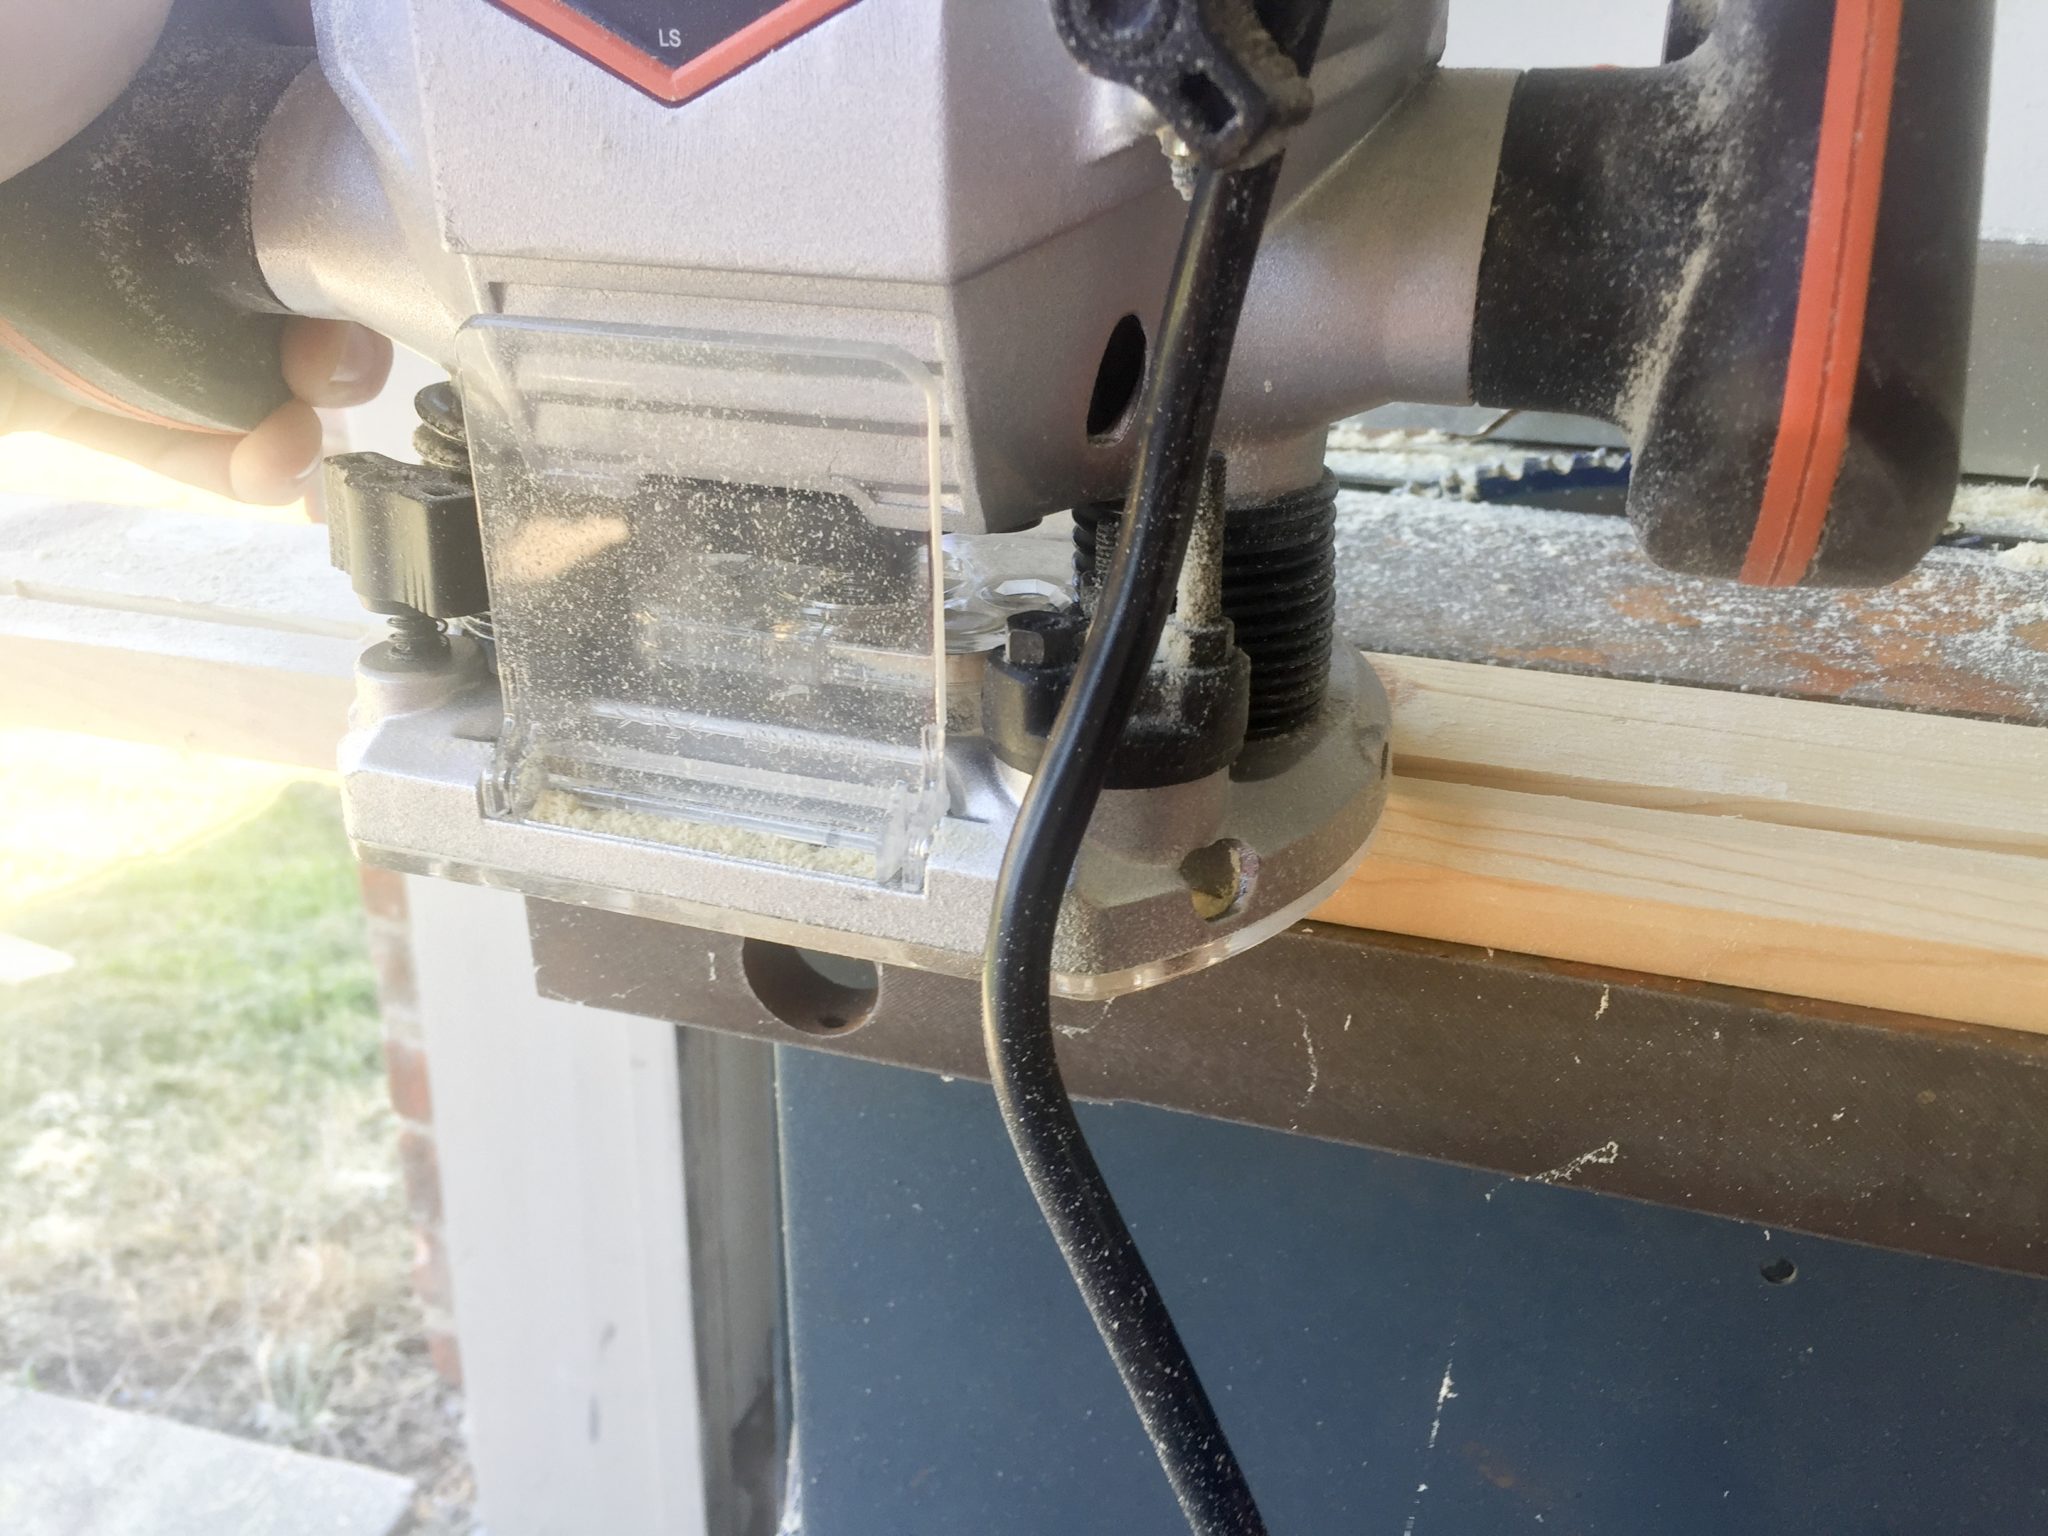
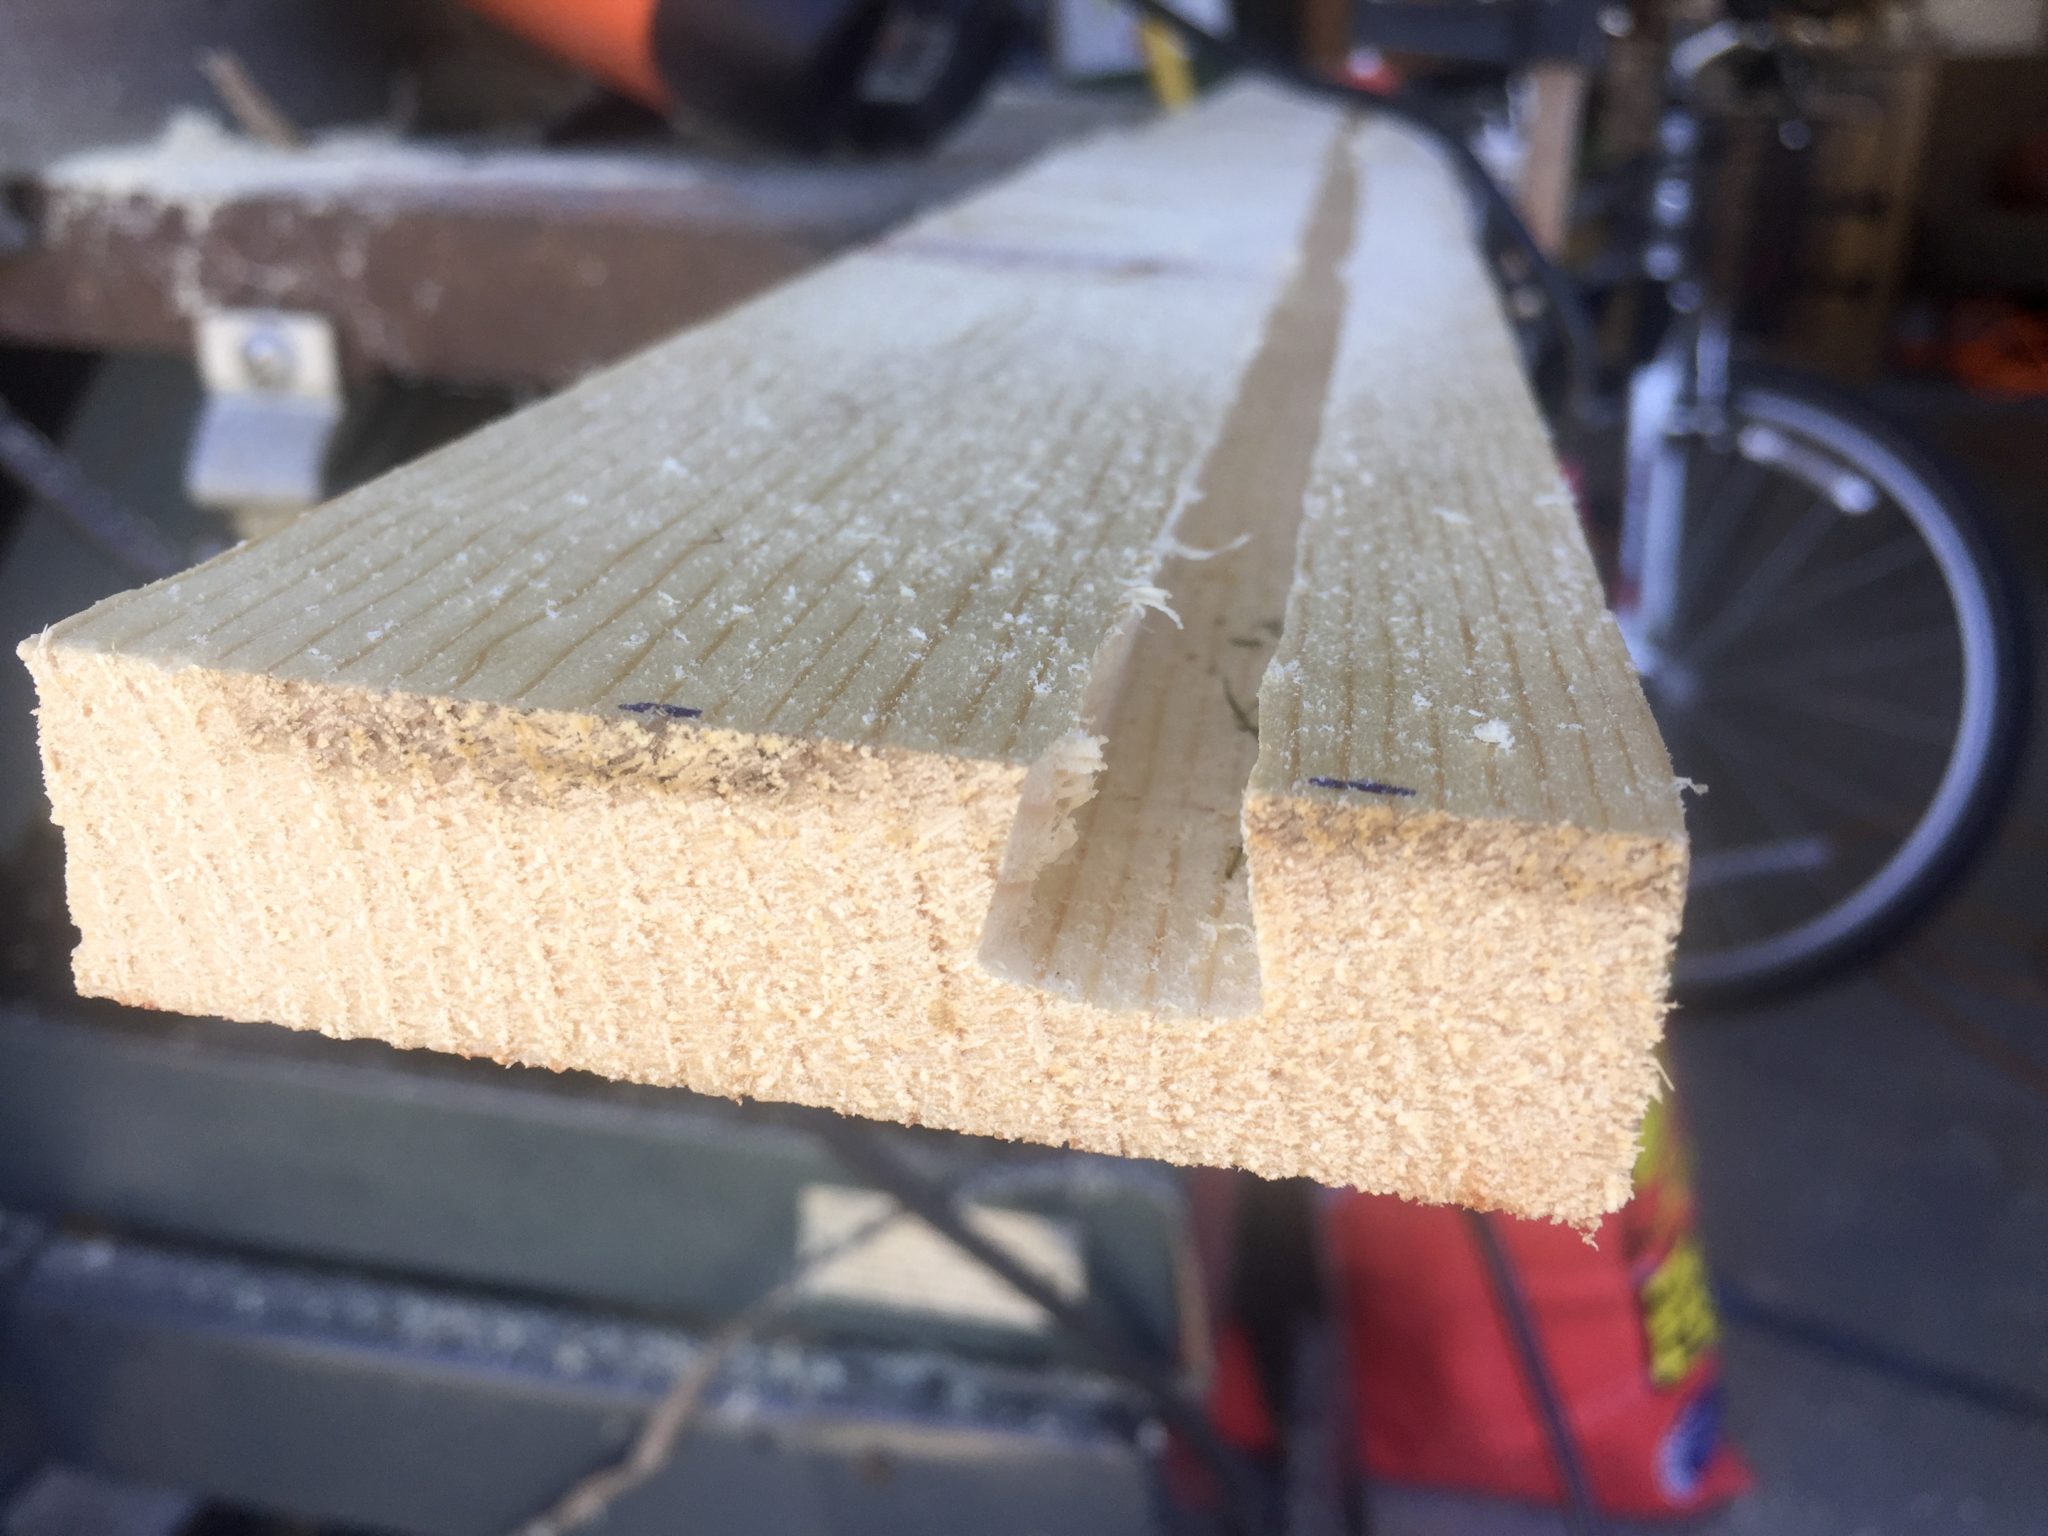
- Use your dovetail router bit to cut a groove all the way through the board 1″ from one of the edges. This is where the LED strip will sit. Having it recessed allows the light to come out onto the strings but keeps the actual LED hidden, so it’s not blinding.
- Sand everything smooth and apply stain/finish.
- Drill 36 small pilot holes in the middle of the board running lengthwise down the board, equally spaced 1″ from each other and 1″ from the ends.
- Screw in 36 7/8″ hooks, all facing the same direction, which will likely have to be adjusted later. Once you get the boards on the wall, you want the opening facing down. (towards you)
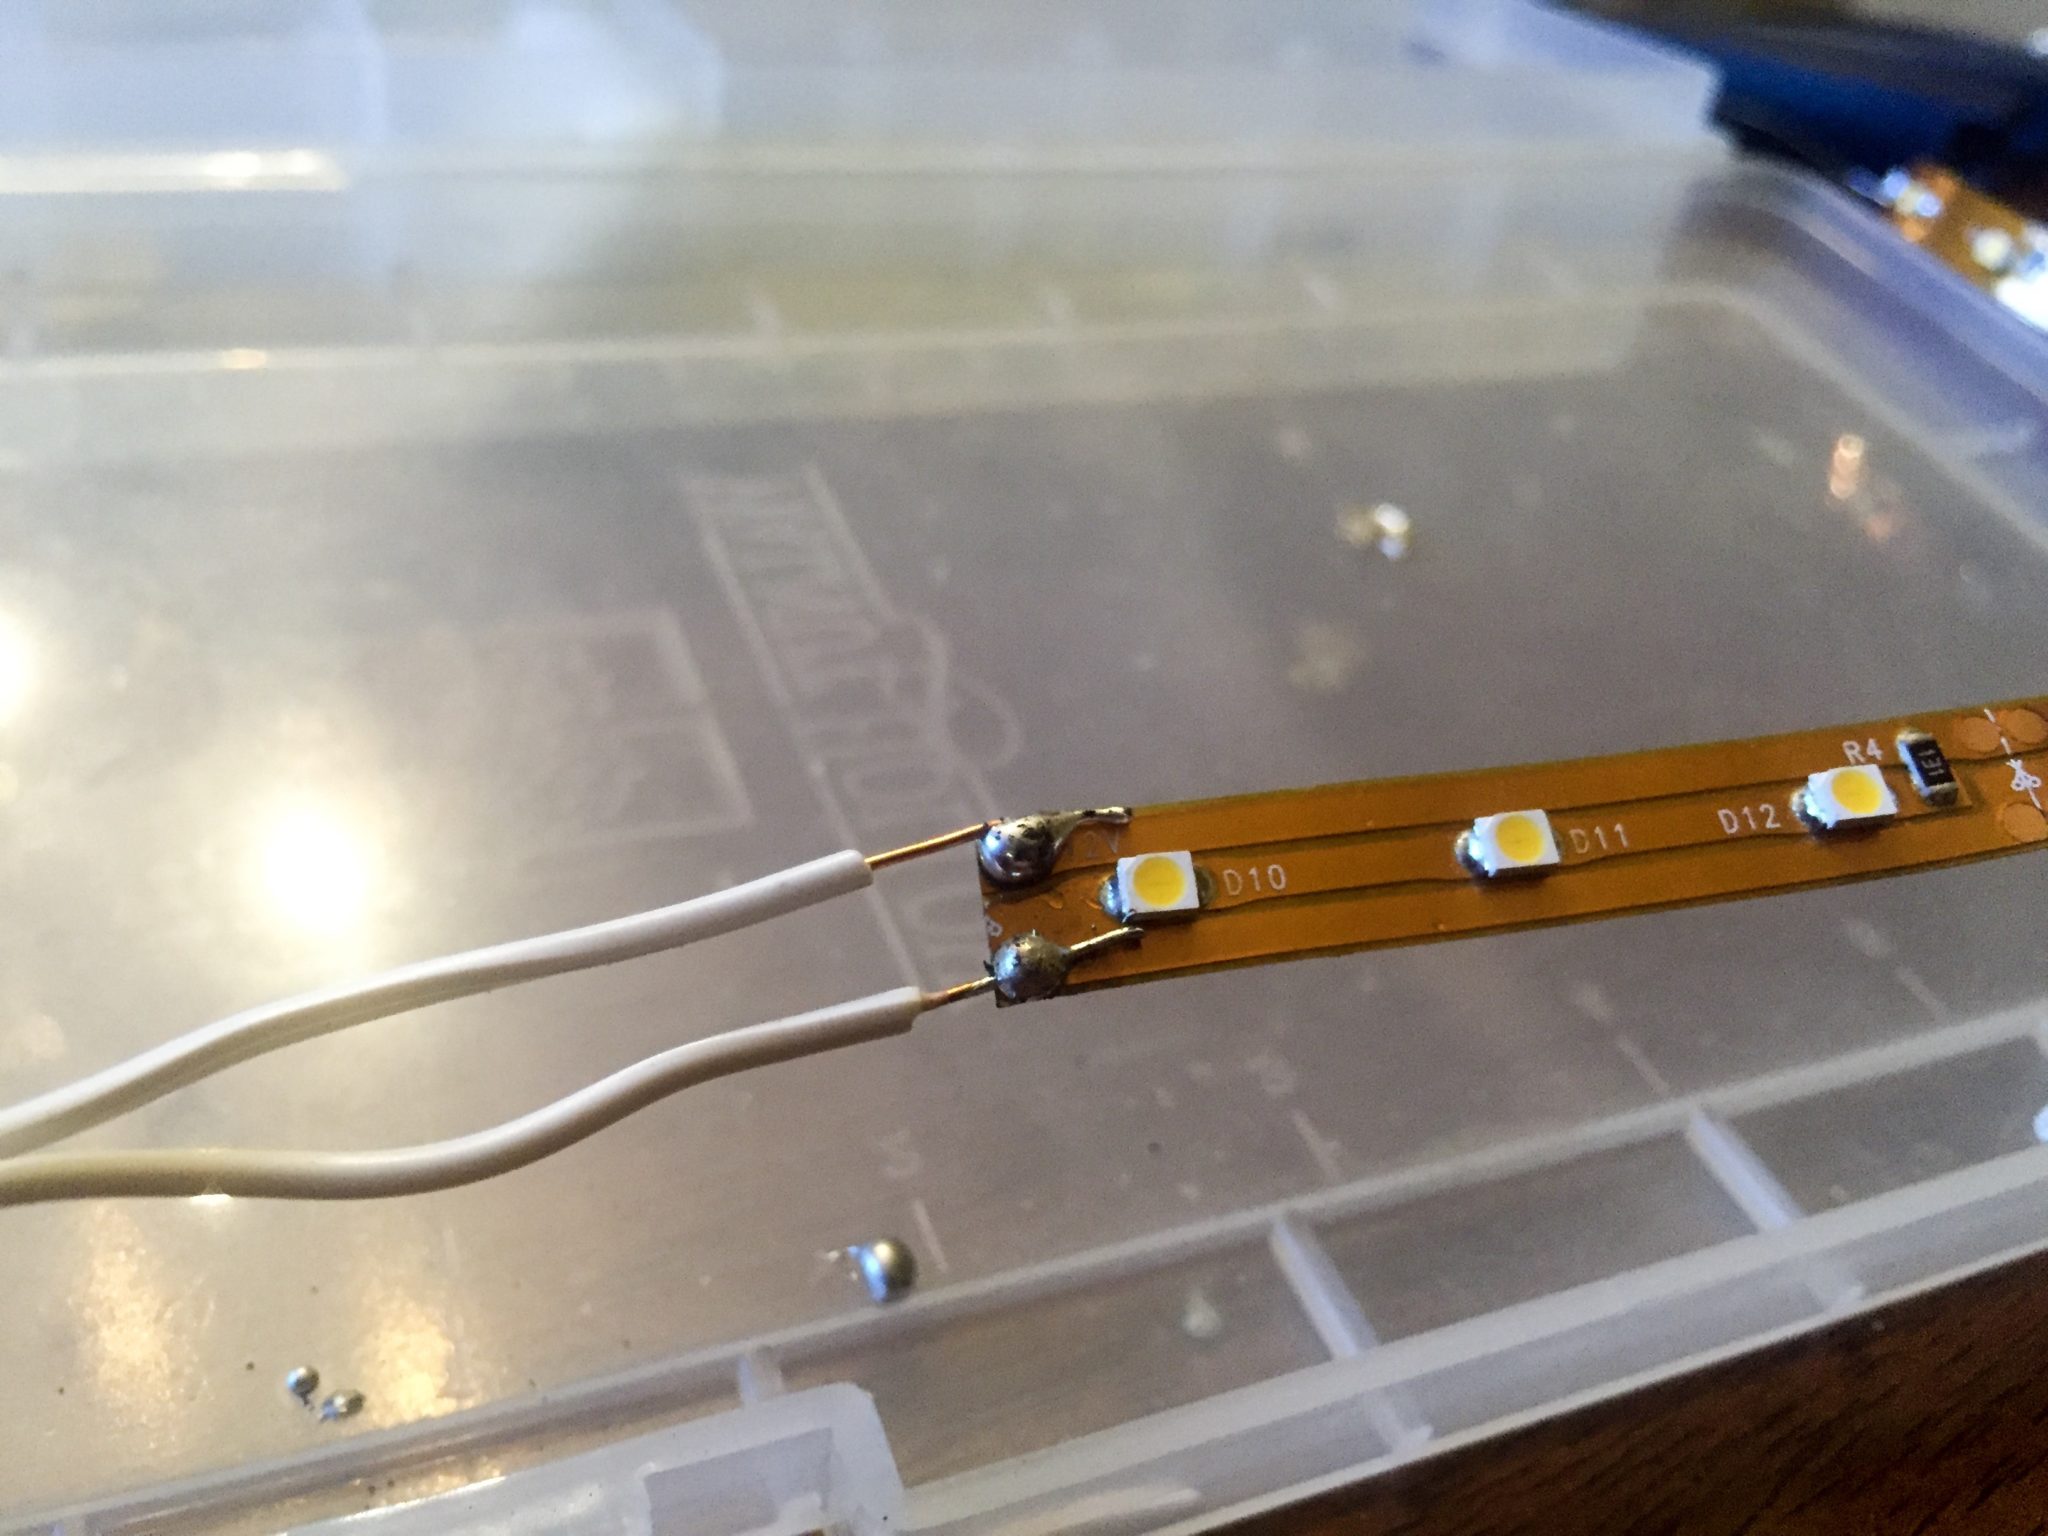
- To install the LEDs, cut strips just shy of 3′ and slide into the dovetail groove on the boards.
- Solder a wire at the end of each strip and leave enough extra wire to reach the next set of wires on other boards. For now, leave them dangling.
- Solder the RF remote to the + red input of the power supply and select a location for this. Lucky for me, my installation is sharing a wall with an upstairs bedroom, so I plugged in the power supply to a wall outlet in that room and drilled a small hole through the wall fed a wire through the opening into the foyer where the LED strips could be connected. That way, my power pack is hidden. If you can’t do this, consider running a cord down the corner of the wall and into a place where you can hide your power brick.
- Once the boards are ready and you have your spot ready to install, go ahead and find the closest studs to where you are mounting and mark them. You’ll want to screw through your boards into the studs for maximum strength. The more you angle the boards on the wall, the more interesting your pattern will be. If they are all straight, your pattern is boring. They don’t all have to be angled the same way. Mine are: 45 degrees going from top left to bottom right.
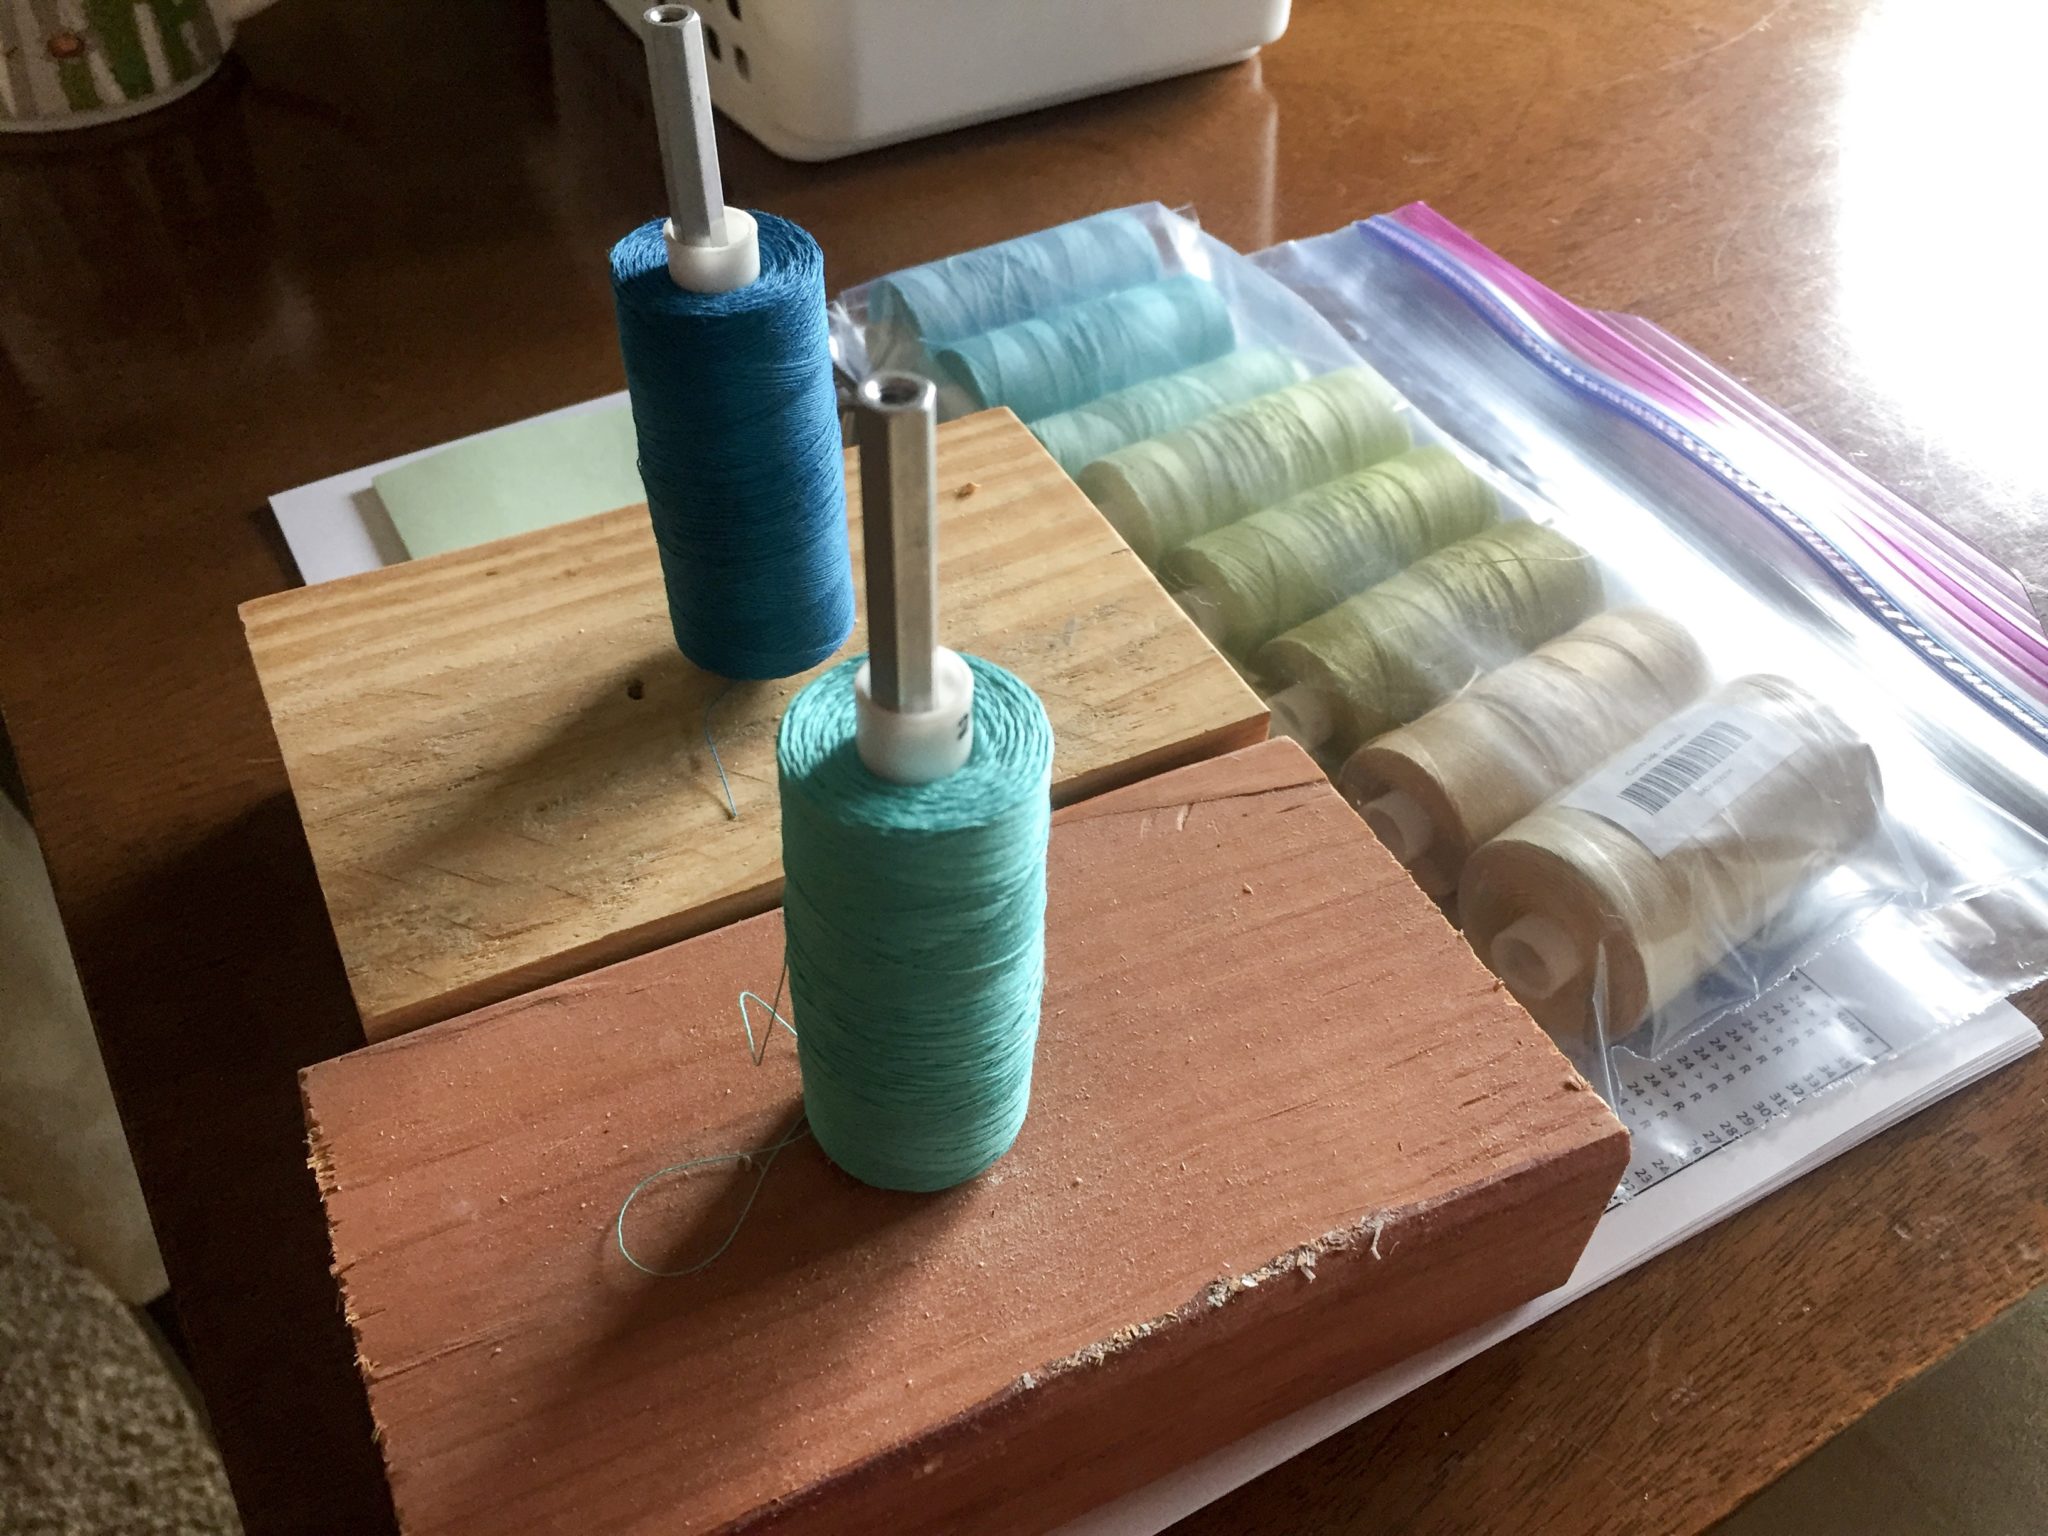
- Now lets make your “sewing needles”. Basically, you’ll need a long pvc pole tipped with the drip irrigation spikes, which is secured with duct tape. Through the end of the drip irrigation spike I drilled a small hole through which I thread the string through. The pvc needs to be long enough to comfortably reach your hooks. I used 8′ poles (since I had them already) and stood on a coffee table to give me a little extra height.
- For the bobbin, you only need an extra 2×4 and a nail or screw, but I had a threaded rod so I used that. The bobbin sits on the floor underneath you, and the thread comes up near the bottom of the pvc pole, is held tight in your left hand, and goes through the top of the spike at the top of the pole. With this setup, you can easily loop the string over the hooks, back and forth, without getting too tired. Your neck is going to hurt from looking up so much though.
- Now to begin weaving: I had a Left/Middle/Right designation for my three boards, and if you pull up the excel sheet showing my pattern I created, you’ll see the term L1 for Left – 1st hook. (M4 – Middle 4th hook, etc.) Also, it really helps you keep track of where you are if you put post it notes below the hooks and label them 1-36. Basically, my pattern is as follows
- Start with color 1 and tie the beginning string to M1. (Top left). Loop over M1 and connect to R1, then move to R2 and come back to M1.
- Move from M1 back to R3, then over to R4 and back to M1. Continue with M1 until you get all the way to R24. (each color on each hook will have 24 connections)
- Once you have the top layer finished, move to M2. Continue the same pattern, but this time, begin connections at R2 and proceed to R 25.
- Each color will have 12 hooks on M board and on the last one, M12, your connections will be to R12 – R36. (Each color will span 12 L hooks, overlapping each other color by 6 hooks.)
- The tricky part here is that you will introduce a second color in the middle of the first, on M7. (halfway through 1-12)
- Once you finish color 1 M6, start color 2 M7 first, beginning with connections R1-R24, and then go back to color 1 M7 connection to R7-R30
- Next will be color 2 M8 connection R2-R25, then color 1 M8 connection R8-R31.
- Continue this until M12, where you will end color 1. Tie off the end of the string of color 1 to R36 securely and tightly.
- Thread color 3 up in the same stick you used with color 1 and tie the beginning of color 3 to M13 (the first hook for color 3)
- For each new color, weave the new color first and then finish with previous color, so they overlap correctly. For color 3, start at M13 and connection to R1-R24, then color 2 should be M13 connecting R7-R30.
- Continue all the way down M board with the 5 colors, each new color being introduced at hook 1, 7, 13, 19, 25.
- You will end the last 5 hooks with just the last color, just as the first 5 hooks only had the first color.
- Congrats! You’re halfway done.
- Start again with color 6 on L1 and now you work your way down the M board like you did R board previously.
- Begin with C6 on L1 connecting M1-M24.
- Progress to L2 connecting M2-M25
- Continue until introducing C7 at L7 connecting M1-M24, then C1 at L7 connecting M7-M30
- Continue down L2, adding in C8, C9, and C10 and hooks 13, 19, and 25, and tie off the end of each color to M36 securely and tightly. (Each color will span 12 L hooks, overlapping each other color by 6 hooks.)
- The last step is to connect the wires for the LEDs. Try to get the wires running across the wall as straight as you can and staple them into place. Run them all to a meeting place and either solder them together or use a wire twist cap to secure the connections. All + wires should meet the + wire coming from the power supply, and all – wires should meet the – wire coming from the power supply. This way, they are all wired in parallel and operate independently. The one remote will control all three light strips.
- If you like, paint the wires on the wall the same color as the wall, if you have touch up paint, to help them blend in. They aren’t that bad, but it can be distracting.
- Enjoy your new, very unique art installation!
Parts featured in this article:
Support us on Patreon!
I hope you've enjoyed this tutorial! Please consider donating on our Patreon page! The more money we raise, the bigger and more elaborate project tutorials we can do for you!
Check out the Patreon Page