
For many modern phones, wireless charging is now a reality. A large amount of current Android phones have this ability (iphones do not yet…. sad day) and if yours does, you can build this super cool bedside or desk dock for your phone. You only need a few parts and block of wood.
Inductive Charging
It’s labeled “inductive charging” because this method uses a magnetic field ‘induced’ from one coil to another. The first coil is located in the base of the charger; the second in the back side of your phone or tablet. The second coil in your phone takes power from the magnetic field and converts it back into electric current to charge the battery. This particular build makes use of the Qi standard, created by the Wireless Power Consortium for inductive electrical power transfer and is currently the most compatible wireless electricity standard.Before we dig in, lets quickly look at the pro’s and con’s of wireless charging and why you might want to tackle this project.
- Protected connections – constantly plugging and unplugging your phone charging cable weakens the port over time and may eventually cause the port to break.
- Electrical Separation – there is a much lower risk of electrical faults (think short circuits and lightning strikes) due to the air gap physically between connections. A lighting strike may fry the transmitter, but your phone will be safe.
- Increased Convenience – no need for cables, especially handy when you can just set your phone down on your desk while working or while going to bed.
- Slower charging – wireless charging has a lower efficiency, so devices take a bit longer to charge than they would with a cable. This isn’t as much of a concern if you have time, like at night, but if you need a quick burst during the day, this isn’t the best way to top up.
- More expensive – generally, the premade wireless transmitters are more expensive than just buying a cable, but this particular build puts the price right about the same as a good cable.
- Potentially Inconvenient – its hard to use the phone while its resting on its charger and you will lack the freedom a cable can bring if you watch a youtube video in bed while the phone is charging.
Required Parts
Let’s get started. For parts, you’ll need the following:
A wireless inductive coil and circuit board
The heart of the build. This board contains all the electronics you’ll need, except a power cord. Alternatively, you can get a bit better results by using a 3 coil board, which increases the price, but it provides a much larger surface area for the charging to work on. With the single coil transmitter, your phone must be lined up directly opposite the coil. This was fine for me but may be an annoyance you’d rather not deal with.
A micro USB power cord
I assume you already have one since it should be the same that powers your phone or tablet, but you can get another if you’d rather not use your primary cord. This project works really well with a longer cord, like 10′, so you can place it just about anywhere.
Tools
- 2×4 scrap wood – the main body of the project. You’ll need a block as long as your phone.
- Forstner Drill Bits – for hollowing out the inside of the 2×4
- A drill press or a drill – you’ll need to be very accurate with your cuts. you have to get just to the inside edge of the board, so using a drill press creates much more certainty that you won’t drill too far into the wood
- A chisel – this helps to clear out any rough edges and woodchips
- Sandpaper – 120, 160, 220 grit
- Fine Steel Wool
- Rubber feet – I used some left overs from a previous project, but sitting the block on some feet makes it look more finished and separates it from the surface it rests on.
- Silicone Caulking and/or a caulking gun – I used white, but in retrospect I think clear would have been better.
Stain and Finish
Optional
Plexiglass and plexiglass cutting blades – I cut a small sheet of plexiglass to sit between the feet and the bottom of the charging block so that the led’s inside would shine through and create a neat color under the block. You can either do this, use a thin sheet of wood to seal it up completely, or just leave it open on the bottom. No one will see it.
Specs on the Inductive Coil and Circuit Board
The board uses the Qi standard. It operates at DC 5V/1.5A. Efficiency >70%. Working distance: 5mm.This will work in the following phones.
- Samsung S7 / S7 Edge / S6 / S6 Edge / Note5 /S6 Edge Plus
- LG G3 / G2 US version
- Nexus 4 / 5 / 6
- HTC Droid DNA /HTC 8X
- Lumia 920
- Iphone users can attach a QI wireless receiver that plugs in the lightning port and wraps around back to fit inside of a case.
How to Build

Step 3: Trace the outline of the board, USB connection, and inductive coil onto the block. Try to line the coil up so that it will be directly across from the coil in your phone.
- Start by cutting down your 2×4 to the exact size of your phone. For me, the 2×4 was just a bit wider, which was perfect, so I only needed to cut it down to length.
- Sand the edges till they begin to get smooth so its easier to work with but don’t worry about perfection yet.
- Lay the chip, USB plug, and coil on the block in the rough places you’d like them to be mounted and trace their outlines. These are your marks for the drill press.
- Put a forstner bit into your drill press and set the depth to stop just shy of poking through the other side. The working distance of this chip is 5mm, which isn’t much, so you need to get the coil as close as you possibly can to the other side of the block. You will have hollowed out almost everything at the end.
- Start with the coil outline. Begin cutting out holes and work your way around the inside, making sure to get just a bit wider than the outline so the chip will fit down inside.
- Next, cut the outline of the PCB chip. This will need to be a bit shallower than the depth you cut for the coil. I set mine to 1″ (about halfway through). The chip will then sit in the middle of the board just below (once its turned over) the coil.
- Last, cut the slot for the cables and the USB port to a depth of 1/4″. I went a bit deeper than this on mine, and I should’ve been more conservative because there is now a gap between the bottom plexiglass and the USB plug, which I’ve had to fill with silicone, which is less ideal.
- Once you have the holes cut out, smooth everything out with sandpaper on the insides and do a dry run to make sure your coil can successfully charge through the top layer of wood. Secure the coil with tape temporarily so it stays in the top and turn it on. It will start transmitting power shortly after and make absolutely sure it works on your phone. I was confident it would, siliconed the coil in place, and only discovered later that it was still too far from the phone to charge. Learn from my mistakes.
- Once you are sure it works, set the coil down in the hole and apply beads of silicone around the edge so that it’s held in place permanently.
- Do the same with the PCB board and then use small screws or nails to mount the USB board to the wood. There are two small holes for them. This felt a little flimsy to me so I also used some silicone here to secure it.
Be very careful not to get silicone in the USB port or you won’t be able to make a connection without some tedious silicon removal.#LearnFromMyMistakes
- If you are adding a plexiglass bottom, trace the size of the block on the plexiglass, cut it with a skilsaw with plexiglass blades to the correct size, and use a forstner bit to drill 4 screw holes through it. Don’t use regular drill bits because they will cause the plexiglass to crack. Soften the plexiglass by vigorously scraping both sides of the glass with sandpaper. This will mar the surface and allow light to diffuse much more evenly underneath.
- Apply stain to the wood and let soak in for 15 minutes. Wipe off all extra stain that has not been absorbed for an even coat.
- Once the stain is dry, begin applying layers of polyurethane to finish. Let each layer of polyurethane finish drying before applying the next. Lightly sand poly between coats to get a glass like smoothness. Each layer should be sanded less and less, with gradually increasing sandpaper grit. Start with 160 and move up to 220 and 400 if you really want a smooth surface. I applied 6 coats of poly over the course of a few days (each coat just takes a few minutes) and finished the last layer with a wipe down of 0000 steel wool for incredible finish.
- Plug in the power cord (any micro USB) and the coil will activate. Place the finished power block anywhere you want for a gorgeous, minimal phone charger.
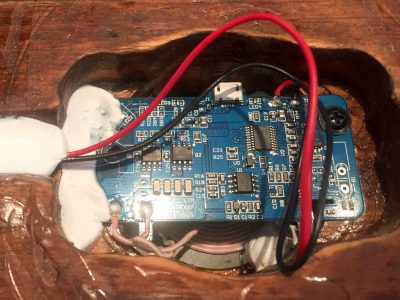
Steps 9 & 10: Apply caulking to coil and board to permanently mount them in the holes.
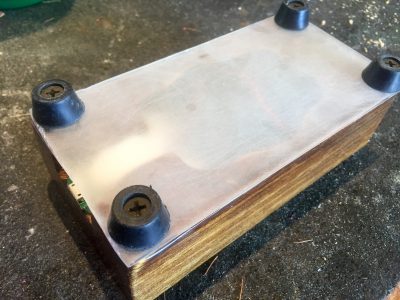
Step 11: Scratch up the plexiglass and screw rubber feet through holes into the wood.
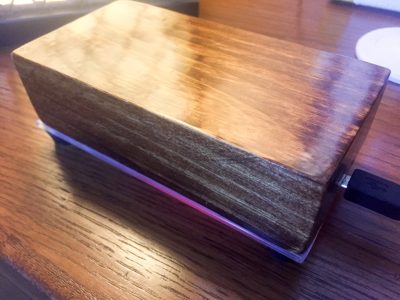
Step 14: The finished charger. Plugged in and lit on bottom.
Support us on Patreon!
I hope you've enjoyed this tutorial! Please consider donating on our Patreon page! The more money we raise, the bigger and more elaborate project tutorials we can do for you!
Check out the Patreon Page