
Another day, another cryptocurrency… If you’ve been watching the news about all this, you might be starting to feel a little burnt out, or overwhelmed, because everyone is trying to find the latest and greatest to invest in, suss out the quickest way to make money off of all this, and being depressed over their “missing out” on the meteoric rise of Bitcoin last December. My personal viewpoint is that A) The technology behind all of these coins is brilliant and will eventually be world changing, and B) The hype surrounding all of it changes the valuations so quickly, that it all feels unstable, and I’ve ceased spending money on it. I still participate in mining: currently bitcoin and ethereum, and now burstcoin (which I’ll explain why next) but what I see happening is that a few, well-timed investors will make off with millions while lots of small players will lose quite a bit of invested money. These coins do inherently have value, in the context of the system that they run in, but the rapid rise and fall of value of those coins related to U.S. dollars is only governed by the people who are willing to spend X amount on their ‘perceived’ value. That’s a crucial distinction to make. And it means that every dollar someone makes, is a dollar that someone else has lost. Don’t let it be yours.
So Burstcoin: What Is It? Why is it being talked about when there are literally thousands of alt-coins (non-Bitcoin coins) out there? Well first, a little background.
Burstcoin has the same goal as all the others, to become a usable form of currency for things, but it does so in a (currently) very unique way. It uses a new algorithm for verifying transactions called proof-of-capacity. When a digital transaction takes place, that transaction has to be A) Universally true, ie. the same for everyone, and B) Verified, ie. you do or do not have enough money in your account to complete it. This is true for all currency, not just cryptocurrency.
Before Burstcoin, there were two ways to validate a transaction: Proof-of-Work and Proof-of-Stake. In short, Bitcoin uses Proof-Of-Work, which asks users on the network to individually verify a transaction using complex math. And it is super complex. So complex that millions of high powered machines are running all the time in the hopes that they can be the first to solve the math, and so get paid with the block reward, which is new Bitcoin created at that time to slowly introduce more money into the system. So complex that it now takes 0.2% of the entire worlds energy production to run all the computers on the Bitcoin network. Bitcoin, as an entity, uses more electricity than 140 third world countries.
Because of that, some really smart people have been working on new methods of validating transactions. Proof of Stake has the same end goal, but instead of asking everyone to compete for a math problem answer, the system chooses a computer on the network to create the new block (transaction) depending on its previous wealth. There is no block reward and no new money is generated here, because all of the money the system will ever have is generated at the beginning, and the computer’s account is given the transaction fees.
Burstcoin has a radical new method of validating : Proof-of-Capacity. This system relies upon already solved math problems, which calculated at the beginning by your computer, and then stored on a hard drive. Instead of commit large amounts of power to calculate an always changing target, your computer spends a few days generating millions of solutions, and then stores them on a disk, and then each time a new problem comes up, it checks to see if it has the answer already, which spins up your disk for a few seconds, and then goes back to sleep. So instead of a computer competing with its speed and power, its now competing with a much more economical resource: storage. Your chances of solving the computation are much greater if you have more space storing more pre-solved equations! There is a new block every 4 minutes, in which your computer quickly searches the index file of what you have, which is a very clever way of reading the data you have stored without actually looking at each file, and then your computer says “yay i have it!” or “nah not this time” and goes back to sleep.
What does this mean for you? Well, it means you don’t need a big fancy powerful graphics card to mine it! You don’t have to keep up with the power trends or spend extra on inflated GPUs because everyone is getting into crypto mining. You just need hard drive space, even from an external drive!
How to Get Started Mining Burstcoin!
First things first: you need the software, which you can download here: Burst Coin Wallet Find your OS, then download QBundle. Install it, then come back here.
As its loading for the first time, you’ll see it say “Synchronizing the Blockchain” which means that its downloading and storing every computation ever made on the network, so you are on the same page as everyone else. This takes a while but does not take much space.
Step 1: Create a new account
Click “Dont have an account? Click here to create one!”. You can either use the automatically created passphrase or choose your own. These need to be EXTREMELY secure. Ideally 12 words, but you can add more or special symbols, anything really. And then write it down somewhere and save it in a txt/notepad file somewhere. If you lose this password, you lose access to the account forever. There is no password reset. I’ve heard so many horror stories of people who bought Bitcoin 10 years ago and forgot the password to their wallet. DONT DO IT!
Once your in the wallet interface, you’ll see the following things: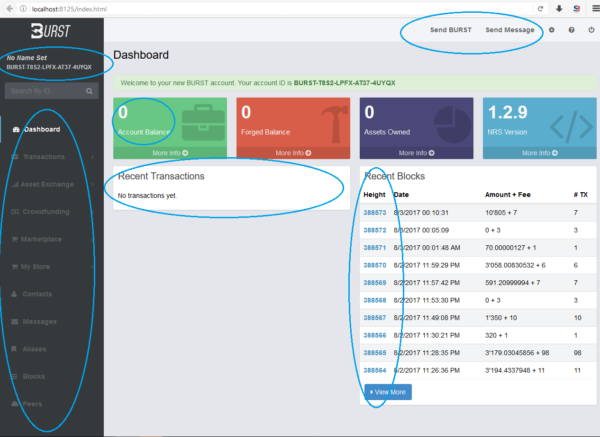
- Top Left: your wallet’s name
- Top Right: Send Burst / Message
- Along the Left: advanced Burst wallet functionality
- Center: Your recent transactions (this should be empty at this point)
- Bottom Right: The 10 most recent blocks on the blockchain.
Step 2 : Activate Your Account
- You want to mine solo. Or just store Burst in the account without mining. This is NOT recommended unless you have a LOT of storage, and is unlikely for anyone reading this tutorial. To do this, click on “No Name Set” in the top left corner and call it what you want. This is public, fyi. Save, and you’re done.
- You want to mine in a pool. This is highly recommended, because its rare that a single computer by itself will be the one that gets the block reward. Instead, participating in a pool of computers shares the “win” and every computer that “helped” gets a small share. We’ll dig more into this in a second, but first…
Step 3 : Get 1 Burst to Start
Admittedly, this took me the longest to figure out, because how do you start mining in a pool if you have no money, and if I’m not mining in a pool, I can’t make money… But there are resources out there for newbies like us where generous souls will send you a single Burst coin, for no reason other than to help out. I found a forum deep in the recesses of the Burstcoin Wiki, where I posted my address and someone was willing to send me a coin, but I’ve found out that the easiest way is to visit this website: Burstpay Faucet
Those kind folks are willing to send a single coin to new accounts after they verify that you have 0 Burst and 0 Transactions. So go apply there, and wait for your coin to come in!
In the meantime, we can start setting up your storage!
Step 4 : Plotting Your Drives
Plotting is simply the act of
A) dedicating X amount of space to the storage of solved problems
B) asking your computer to process and store the results on that X amount of space
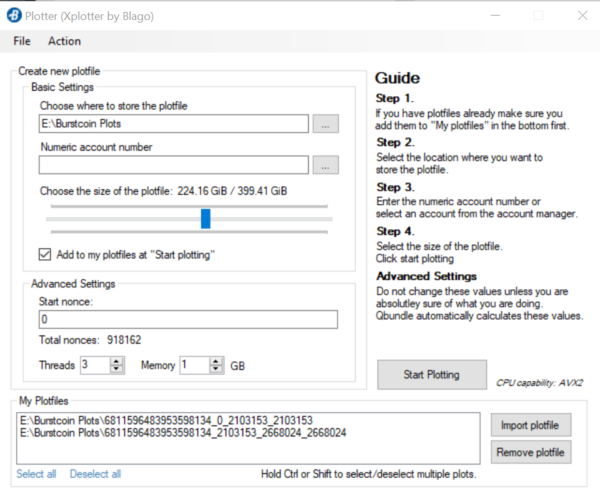
In the QBundle Software, Select Tools–>Plotter from the top menu and you’ll see the following:
Choose the drive location where you want to store the files. I highly recommend NOT using your primary windows drive for this, as filling that up can slow down your computer drastically. Use an external or secondary internal drive. Make a new folder on that drive, something like “Burstcoin Plots” and select it as the save folder.
Copy your numerical account number into the second field. That associates each plot with your account, so when your computer solves it, it knows what account gets paid, because they are linked.
Choose the size of the plotfile. Use these handy online calculators to guesstimate your average rate of solving the current has based on your plotfile sizes. I started with 500gb.
The first time you do this, your starting “nonce” will be 0. And then you’ll create “nonces” to fill up your allotted 500gb. Nonces are the smallest form of solved hash. If you decide to add more storage later, say a second 500gb, your starting nonce will be 1 more than the last number of the first group. So if you store 80,000 nonces in the first 500gb, your next starting hash will be 80,001. The program will handle this calculation for you, don’t worry.
Set your “threads” and “memory”. If you have a dual core, you can put 2 threads. If you have a quad core, put 4. For memory, I recommend half of whatever you have in your computer. If you have 8gb total, use 4.
Note: if you still need to use your computer after starting this up, halve those values again. Use 1 thread and 2gb of ram. It’ll take longer, but your computer won’t be so busy doing this that you can’t do anything else. Or set it to full power and go to bed. My computer churned through 500GB plot files in about 3 hours at half speed.
Step 5 : Joining a mining pool
The more people that join this mining community, the more competition you have, and the chances that your computer is the only one to solve the problem at hand gets smaller and smaller. So you want to join a mining pool. This is a group of like minded individuals who agree to certain terms to wealth sharing. Instead of the 1 person who solves the problem getting all the reward, they agree they will share the reward with everyone else in the group, so that when someone else gets it, they will also get some reward later on.
The pool I am currently a part of is called Burstcoin Space.
Don’t let the complex nature of that page freak you out. That’s just a lot of visual ways to track what is happening in real time. Those charts are showing who is participating, how much space they contribute to the pool, and who is submitting correct hash solutions.
Each pool has different terms and conditions, and you’ll have to make your choice on how you want to share your profits and be shared with, and there are risks and rewards for each type. I’ll try to cover some of these terms here.
Transaction Fees : Typically 1-3%. The pool owner takes a small cut of the total profit. This is very normal.
Current Miner Split / Historic Miner Split : My pool is 60%/40%. Meaning that 60% of each block profit goes ONLY to the miners who successfully solved a hash. That may only be 10 out of 100 people. But the 40% historic split means that 40% of that hashes profit gets split among the other 90 people who participated in the most recent 500 hashes. So everyone in the pool makes a little something if the pool wins as a whole. I think that’s nice. Many pools don’t have historic sharing, but if youre a small timer, taking a small cut each time is better than waiting for one big cut hopefully sometime in the future.
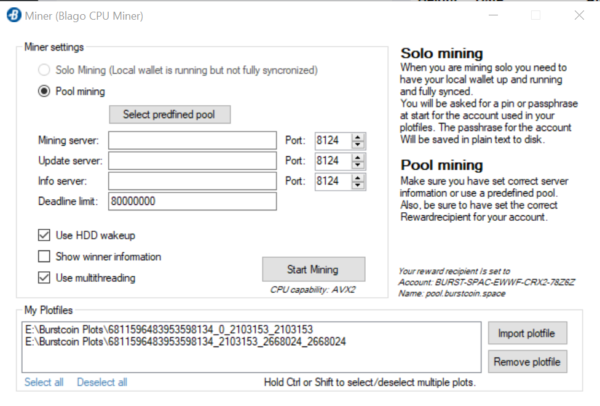
Here’s how you join the pool: Run the miner (under Tools–>Miner) and the first time you do this, it will ask you to install the miner. Once that is done, open up the folder you just installed it to and open “miner.config” in notepad. Each pool will have its own specific settings for this page. Mine look like the following:
Now, for a big one that I missed the first time: You have to tell the miner where to send reward earnings when you get them. Each pool has a wallet address. Burstcoin Space is :BURST-SPAC-EWWF-CRX2-78Z6Z.
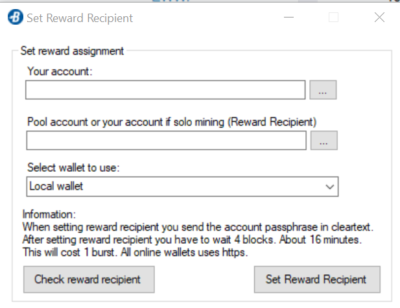 Open Tools–>Set Reward Recipient and put in your personal wallet address and the pool’s wallet address. This tells the miner where to send the money and who is responsible for sending it (you are!).
After that, open up the miner again (under Tools–>Miner) and put in the same information here that you just put in the config file. Make sure your plotfile(s) are showing at the bottom, and click “start mining”.
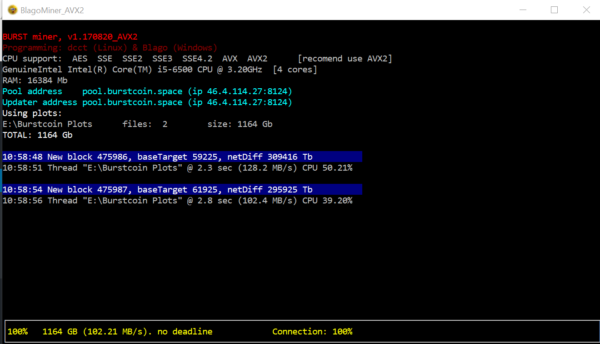
A black command line looking screen will pop up and that’s it! You’re mining burstcoin! Feel free to minimize this screen, as its just a bunch of info about what the current block is looking for and if your computer has it or not, but don’t close it or the mining will stop.
After the first time, you don’t need to open up the wallet to start the miner. You can pin the miner.exe file from that folder you just installed it to to the start menu, and run it from there each time you start your computer.
One more note about mining pools: They each have a minimum payout threshold per day, so if you’re not seeing your wallet balance increase, it’s because you haven’t hit that minimum threshold. The Burstcoin Space pool has a minimum of 250 burst. So if you’ve accumulated less than that while mining for them, you won’t have it sent to your personal wallet yet. Just be patient and let it run. This will take a while. Months maybe, depending on how much storage you have connected. But you’re still making Burstcoin.
Congrats on getting setup to mine Burstcoin! Welcome to the very first cryptocurrency of it’s kind. I’m personally very excited about mining this on my own computers as it takes very little energy and effort to run a miner, is in the very early days of development and adoption, and has a ton of potential to increase in price. Everyone is looking for the “next Bitcoin” and is kicking themselves for not getting on that bandwagon in the early days. Well, this is the early days of this tech, and with a little luck and very little investment, maybe we will now be a part of that next wave! Good luck to you!