
Apple’s airplay system is great for streaming music around the house to big speakers, but expensive because you need to buy their Airport Express Router or an AppleTV to make use of it. Those devices are great, but they offer a lot more functionality that what I need. I just need an access point to be able to send music to my speakers. Most of my systems are not connected to TV’s and I’ve got a very powerful router already. So this is what I’ve landed on.
This project is one I’ve been working on for a while now, trying to come up with the best way (faster, most reliable) to get this working. I’ve tried various implementations of airplay protocols embeded in a raspberry pi system, but in the years since the first one, the process has become much more streamlined and easily accessible. So today we are going to make a raspberry pi system that plugs into a stereo system, connects to your home wifi, and can receive audio wirelessly from your iPhone, iPad, or laptop with iTunes. It utilizes a free software package called “Shairport”, and the implementation we are going to be using is called “Shairport-sync”. This is a slightly better version of the base software because it allows you to play to multiple rooms at once, and the audio will be synced between them, creating a whole home music system! Pretty neat. Also, I’ve just learned that an iOS update coming in March of 2018 will include multiple airport sources from the mobile interface! As of now, the only way to do multiple locations at the same time is to use iTunes.
I will say, however, that this is a relatively long procedure for a raspberry pi project. Don’t be intimidated! I know this looks like a lot, but just go through each step one at a time and at the end you’ll have a wifi accessible music station!
So let’s get down to it.
Required Parts
Components
Software
System Add-Ons
To really sound great, you’ll want to connect this to a large audio system, like a receiver or bookshelf system. I have a few of these connected to different things, but my favorite is an inexpensive little amplifier with some bookshelf speakers I got at a garage sale.
Also, it’s really nice to have outdoor speakers on the patio that I can send music to wirelessly. I previously did an project where I used an inexpensive bluetooth board but having the speaker system on the airplay system is easier to switch between.
Step 1: Buy, setup, and login to your Raspberry PI
This step I’m going to breeze past, because I’ve written about this, along with countless other people, in the past, and if you’re reading through this tutorial, you’ve probably already gotten this far. So get logged into the terminal on the pi and let’s move on.
Step 2: Update everything
Open terminal and type the following commands, one line at a time, pressing ENTER after each line:
$ apt-get install build-essential git xmltoman
- these may already be installed.
$ apt-get install autoconf automake libtool libdaemon-dev libpopt-dev libconfig-dev
$ apt-get install libasound2-dev
- for the ALSA libraries
$ apt-get install libpulse-dev
- for the PulseAudio libraries
$ apt-get install avahi-daemon libavahi-client-dev
- if you want to use Avahi (recommended).
$ apt-get install libssl-dev
- if you want to use OpenSSL and libcrypto, or use mbed TLS otherwise.
$ apt-get install libmbedtls-dev
- if you want to use mbed TLS, or use OpenSSL/libcrypto otherwise. You can still use PolarSSL with apt-get install libpolarssl-dev if you want to use PolarSSL, but it is deprecated as it’s not longer being supported.
$ apt-get install libsoxr-dev
- if you want support for libsoxr-based resampling. This library is in many recent distributions; if not, instructions for how to build it from source for Rasbpian/Debian Wheezy are available at LIBSOXR.md.
$ apt-get install libsndfile1-dev
- if you want to use the convolution filter.
Step 3 : Download Shairport Sync
$ git clone https://github.com/mikebrady/shairport-sync.git
Next, cd into the shairport-sync directory and execute the following commands:
$ autoreconf -i -f
Step 4: Determine if it’s a systemD or a systemV installation:
If you wish to have Shairport Sync start automatically when your system boots, you need to figure out what so-called “init system” your system is using. (If you are using Shairport Sync with PulseAudio, as installed in many desktop systems, this section doesn’t apply.)
There are a number of init systems in use: systemd, upstart and “System V” among others, and it’s actually difficult to be certain which one your system is using. Fortunately, for Shairport Sync, all you have to do is figure out if it’s a systemd init system or not. If it is not a systemd init system, you can assume that it is either a System V init system or else it is compatible with a System V init system. Recent systems tend to use systemd, whereas older systems use upstart or the earlier System V init system.
The easiest way to look at the first few lines of the init manual.
Enter the command:
$ man init
In a systemd system, the top lines of the man page make it clear that it’s a systemd system, as follows (from Ubuntu 16.04):
SYSTEMD(1)                          systemd                         SYSTEMD(1)
 NAME
 systemd, init - systemd system and service manager
 ...
Other init systems will look considerably different. For instance, in an upstart system, the top lines of the man page indicate it’s using upstart system, as follows (from Ubuntu 14.04):
init(8)                                    System Manager's Manual                                   init(8)
 NAME
 init - Upstart process management daemon
 SYNOPSIS
 init [OPTION]...
 ...
In a System V system, the top lines of the man page are as follows (from Debian 7.11):
INIT(8)               Linux System Administrator's Manual              INIT(8)
 NAME
 init, telinit - process control initialization
 SYNOPSIS
 /sbin/init [ -a ] [ -s ] [ -b ] [ -z xxx ] [ 0123456Ss ]
/sbin/telinit [ -t SECONDS ] [ 0123456sSQqabcUu ]
/sbin/telinit [ -e VAR[=VAL] ]
If your system is definitely a systemd system, choose –with-systemd below. Otherwise, choose –with-systemv.
Step 5: Choose the location of the configuration file
A final consideration is the location of the configuration file shairport-sync.conf. This will be placed in the directory specified by the sysconfdir configuration variable, which defaults to /usr/local/etc. This is normal in BSD Unixes, but is unusual in Linux. Hence, for Linux installations, you need to set the sysconfdir variable to /etc using the configuration setting –sysconfdir=/etc.
Sample ./configure command with parameters for a typical Linux systemd installation:
Here is a recommended set of configuration options suitable for Linux installations that use systemd, such as Ubuntu 15.10 and later, and Raspbian Stretch and Jessie. It specifies both the ALSA and PulseAudio backends and includes a sample configuration file and a script for automatic startup on system boot:
$ ./configure --sysconfdir=/etc --with-alsa --with-pa --with-avahi --with-ssl=openssl --with-metadata --with-soxr --with-systemd
- Omit the –with-soxr if the libsoxr library is not available.
- For installation into a System V system, replace the –with-systemd with –with-systemv.
- If you intend to use Shairport Sync with PulseAudio in the standard user mode, it can not be a system service, so you should omit both –with-systemd and –with-systemv.
Step 6: Build and Install the Application:
Enter:
$ make
to build the application.
Assuming you have used the ./configure settings suggested above, you can now install the application:
$ sudo make install
The user and group shairport-sync will be created if necessary, and a runtime folder will be created at /var/run/shairport-sync if you have chosen –with-systemv. In addition, a main page, a default configuration file and automatic power-on startup script will be installed.
Step 7: Complete installation into to a systemd system
If you have chosen the –with-systemd configuration option, then, to enable Shairport Sync to start automatically at system startup, enter:
$ sudo systemctl enable shairport-sync
or Complete installation into a System V system
If you have chosen the –with-systemv configuration option, enter:
$ sudo update-rc.d shairport-sync defaults 90 10
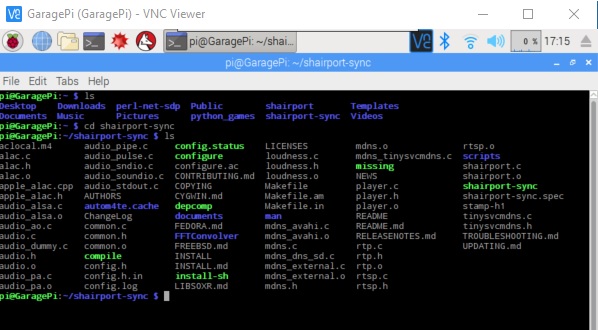
When it’s installed and running, you should be able to see all the files where they need to be.
Step 8: Configuring Shairport Sync
There are two logically distinct parts to getting Shairport Sync to run properly on your machine: (1) starting and stopping it and (2) ensuring it has the right settings.
(1) Starting and Stopping: Starting and stopping Shairport Sync automatically is taken care of differently in different versions of Linux – see the previous section for an example of installing into a systemd or a System V based system.
If you are using PulseAudio in the standard “user” mode, you can not start Shairport Sync automatically at boot time – it must be started when the user logs in to a GUI session. Various GUI tools exist to enable you to build a Startup Application. However, there does not appear to be a similar tool for terminating the program when you log out. Also, it the GUI switches to another user, the user’s PulseAudio session is disconnected from the output device.
(2) Settings: To get the best from Shairport Sync, you’ll need to (a) give Shairport Sync a service name by which it will be seen in iTunes etc. and (b) specify the backend you wish to use – alsa for the ALSA backend, or pa for the PulseAudio back end. If only one backend is included at compilation, or if the backend is ALSA, there is no need to explicitly specify the backend.
For the ALSA backend you may need to (c) specify the output device to use and (d) specify the name of the mixer volume control to use to control the output level. To get values for (b) and (c) you might need to explore the ALSA output devices with a program like alsamixer or similar.
Shairport Sync reads settings from a configuration file at /etc/shairport-sync.conf (note that in FreeBSD it will be at /usr/local/etc/shairport-sync.conf). When you run $sudo make install, a sample configuration file is installed or updated at /etc/shairport-sync.conf.sample (/usr/local/etc/shairport-sync.conf.sample in FreeBSD). This contains all the setting groups and all the settings available, but they all are commented out (comments begin with //) so that default values are used. The file contains explanations of the settings, useful hints and suggestions. In addition, if the file doesn’t already exist, a default configuration is installed, which should work in almost any system with a sound card.
Settings in the configuration file are grouped. For instance, there is a general group within which you can use the name tag to set the service name. Suppose you wanted to set the name of the service to Front Room, give the service the password secret and use libsoxr interpolation, then you should do the following:
general =
 {
 name = "Front Room";
 password = "secret";
 interpolation = "soxr";
 // ... other general settings
 };
(Remember, anything preceded by // is a comment and will have no effect on the setting of Shairport Sync.) No backend is specified here, so it will default to the alsa backend if more than one back end has been compiled. To route the output to PulseAudio, add:
output_backend = "pa";
to the general stanza.
The alsa group is used to specify properties of the output device. The most obvious setting is the name of the output device which you can set using the output_device tag.
The following alsa group settings are very important for maximum performance. If your audio device has a mixer that can be use to control the volume, then Shairport Sync can use it to give instant response to volume and mute commands and it can offload some work from the processor.
- The mixer_control_name tag allows you to specify the name of the mixer volume control.
- The mixer_device tag allows you specify where the mixer is. By default, the mixer is on the output_device, so you only need to use the mixer_device tag if the mixer is elsewhere. This can happen if you specify a device rather than a cardwith the output_device tag, because normally a mixer is associated with a card rather than a device. Suppose you wish to use the output device 5 of card hw:0 and the mixer volume-control named PCM:
alsa =
 {
 output_device = "hw:0,5";
 mixer_device = "hw:0";
 mixer_control_name = "PCM";
 // ... other alsa settings
 };
The pa group is used to specify settings relevant to the PulseAudio backend. You can set the “Application Name” that will appear in the “Sound” control panel.
Raspberry Pi Settings
The Raspberry Pi has a built-in audio DAC that is connected to the device’s headphone jack. An updated audio driver has greatly improved the quality of the output – see #525 for details. To activate the updated driver, add the line:
audio_pwm_mode=2
to /boot/config.txt and reboot. Apart from a loud click when used for the first time after power-up, it is quite adequate for casual listening. A problem is that it declares itself to have a very large mixer volume control range – all the way from -102.38dB up to +4dB, a range of 106.38 dB. In reality, only the top 40dB of it is in any way usable. To help get the most from the DAC, consider using the volume_range_db setting in the general group to instruct Shairport Sync to use the top of the DAC mixer’s declared range. For example, if you set the volume_range_db figure to 40, the top 40 dB of the range will the used. With this setting on the Raspberry Pi, maximum volume will be +4dB and minimum volume will be -36dB, below which muting will occur.
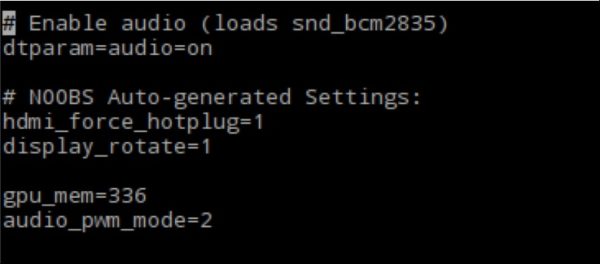
Snippet of the /boot/config.txt file. Notice I also use this Pi as a vertical display in the garage to view schematics while working on the workbench.
From a user’s point of view, the effect of using this setting is to move the minimum usable volume all the way down to the bottom of the user’s volume control, rather than have the minimum usable volume concentrated very close to the maximum volume.
Another setting to consider is the general drift_tolerance_in_seconds setting: you should set it to a larger tolerance, say 10 milliseconds – drift_tolerance_in_seconds=0.010; – to reduce the amount of overcorrection that seems to occur when using the Raspberry Pi’s built-in DAC.
Additional Command Line Arguments
As previously mentioned, you can use command line arguments to provide settings to Shairport Sync as before, though newer settings will only be available via the configuration file. For full information, please read the Shairport Sync main page, also available at http://htmlpreview.github.io/?https://github.com/mikebrady/shairport-sync/blob/master/man/shairport-sync.html.
Apart from the following options, all command line options can be replaced by settings in the configuration file. Here is a brief description of command line options that are not replicated by settings in the settings file.
- The -c option allows you to specify the location of the configuration file.
- The -V option gives you version information about Shairport Sync and then quits.
- The -d option causes Shairport Sync to properly daemonise itself, that is, to run in the background. You may need sudo privileges for this.
- The -k option causes Shairport Sync to kill an existing Shairport Sync daemon. You may need to have sudo privileges for this.
The System V init script at /etc/init.d/shairport-sync has a bare minimum : -d. Basically all it does is put the program in daemon mode. The program will read its settings from the configuration file.
Examples
Here are some examples of complete configuration files.
general = {
 name = "Sam's Stereo";
 };
 alsa = {
 output_device = "hw:0";
 };
This gives the service a particular name — “Sam’s Stereo” and specifies that audio device hw:0 be used.
For best results with the alsa backend — including getting true mute and instant response to volume control and pause commands — you should access the hardware volume controls. Use amixer or alsamixer or similar to discover the name of the mixer control to be used as the mixer_control_name.
Here is an example for for a Raspberry Pi using its internal soundcard — device hw:0 — that drives the headphone jack:
general = {
 name = "Mike's Boombox";
 };
 alsa = {
 output_device = "hw:0";
 mixer_control_name = "PCM";
 };
Here is an example of using soxr-based resampling and driving a Topping TP30 Digital Amplifier, which has an integrated USB DAC and which is connected as audio device hw:1:
general = {
 name = "Kitchen";
 interpolation = "soxr";
 };
 alsa = {
 output_device = "hw:1";
 mixer_control_name = "PCM";
 };
For a cheapo “3D Sound” USB card (Stereo output and input only) on a Raspberry Pi:
general = {
 name = "Front Room";
 };
 alsa = {
 output_device = "hw:1";
 mixer_control_name = "Speaker";
 };
Finally, here is an example of using the PulseAudio backend:
general = {
 name = "Sam's Computer";
 output_backend = "pa";
 };
Metadata
Shairport Sync can deliver metadata supplied by the source, such as Album Name, Artist Name, Cover Art, etc. through a pipe or UDP socket to a recipient application program — see https://github.com/mikebrady/shairport-sync-metadata-reader for a sample recipient. Sources that supply metadata include iTunes and the Music app in iOS.
Metadata broadcasting over UDP
As an alternative to sending metadata to a pipe, the socket_address and socket_port tags may be set in the metadata group to cause Shairport Sync to broadcast UDP packets containing the track metadata.
The advantage of UDP is that packets can be sent to a single listener or, if a multicast address is used, to multiple listeners. It also allows metadata to be routed to a different host. However UDP has a maximum packet size of about 65000 bytes; while large enough for most data, Cover Art will often exceed this value. Any metadata exceeding this limit will not be sent over the socket interface. The maximum packet size may be set with the socket_msglength tag to any value between 500 and 65000 to control this – lower values may be used to ensure that each UDP packet is sent in a single network frame. The default is 500. Other than this restriction, metadata sent over the socket interface is identical to metadata sent over the pipe interface.
The UDP metadata format is very simple – the first four bytes are the metadata type, and the next four bytes are the metadata code (both are sent in network byte order – see https://github.com/mikebrady/shairport-sync-metadata-reader for a definition of those terms). The remaining bytes of the packet, if any, make up the raw value of the metadata.
Latency
Latency is the exact time from a sound signal’s original timestamp until that signal actually “appears” on the output of the audio output device, usually a Digital to Audio Converter (DAC), irrespective of any internal delays, processing times, etc. in the computer.
Shairport Sync uses latencies supplied by the source, typically either 2 seconds or just over 2.25 seconds. You shouldn’t need to change them.
Problems can arise when you are trying to synchronise with speaker systems — typically surround-sound home theatre systems — that have their own inherent delays. You can compensate for an inherent delay using the appropriate backend (typically alsa) audio_backend_latency_offset_in_seconds. Set this offset (in frames) to compensate for a fixed delay in the audio back end; for example, if the output device delays by 100 ms, set this to -0.1.
Resynchronization
Shairport Sync actively maintains synchronisation with the source. If synchronisation is lost — say due to a busy source or a congested network — Shairport Sync will mute its output and resynchronise. The loss-of-sync threshold is a very conservative 0.050 seconds — i.e. the actual time and the expected time must differ by more than 50 ms to trigger a resynchronisation. Smaller disparities are corrected by insertions or deletions, as described above.
- You can vary the resync threshold, or turn resync off completely, with the general resync_threshold_in_seconds setting.
Tolerance
Playback synchronisation is allowed to wander — to “drift” — a small amount before attempting to correct it. The default is 0.002 seconds, i.e. 2 ms. The smaller the tolerance, the more likely it is that overcorrection will occur. Overcorrection is when more corrections (insertions and deletions) are made than are strictly necessary to keep the stream in sync. Use the statistics setting to monitor correction levels. Corrections should not greatly exceed net corrections.
- You can vary the tolerance with the general drift_tolerance_in_seconds setting.
Step 9 : Finishing Up
If you’ve made it this far, congratulations! At this point, you should be done, and you should be able to do the following:
- See the raspberry pi on the network identifiable by an IP address
- See an airport connection listed in either iTunes on a computer or in the airport menu in iOS on your iPhone and iPad, which should be labeled whatever you named it in the settings from above.
- Connect to the shairport pi and play music, which should come out of the speakers attached to the pi.
I recommend setting the amplifier connected to the pi to medium high, so that you have a high range of volume control on your iOS device. If the speakers are turned up, your iPhones volume control can go from super quiet to the level the amplifier has set.
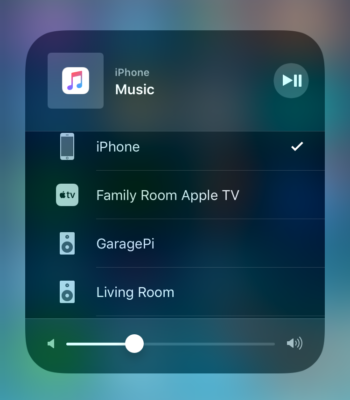
When you pull up the Airplay menu on your phone (in the quick access area by swiping up from the bottom), you’ll see your connections listed! I have GaragePi and Living Room setup below, and if I click on it, my music immediately starts playing out of that speaker system!
Support us on Patreon!
I hope you've enjoyed this tutorial! Please consider donating on our Patreon page! The more money we raise, the bigger and more elaborate project tutorials we can do for you!
Check out the Patreon Page