
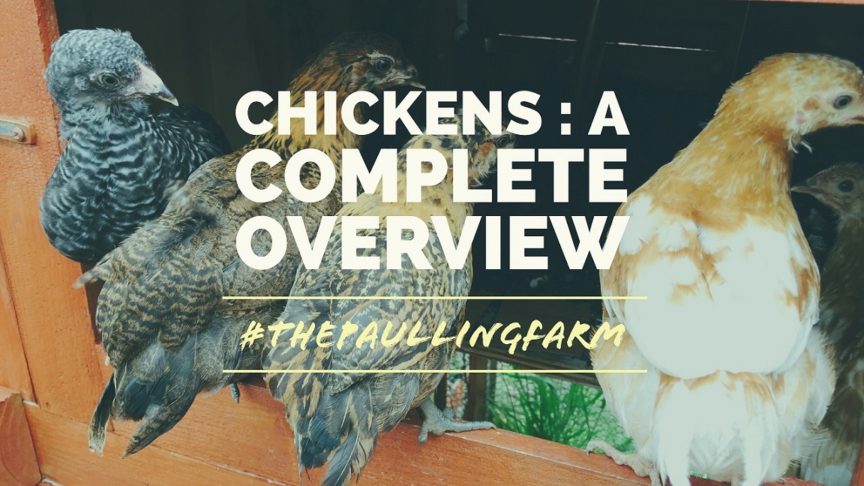
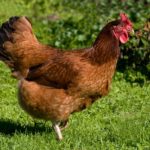
My wife and I started our flock of backyard chickens about 4 years ago. Each year has been a different adventure with different challenges and new things to learn. I wanted to write up a long, detailed list of as much stuff I can remember so that you, a reader who is likely interested in starting up your own flock, can benefit and hit the ground running with some new knowledge. Keeping chickens is a fun, relatively easy livestock keeping experience and is generally the recommended animal for starting out with livestock on your homestead. You don’t need a lot of space, experience, or money to get started, and the benefits are great!
So let’s get started:
Things You’ll Need
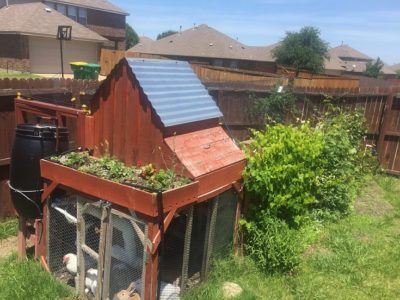
The early days of our coop – before our predator proof roof
Coop – the coop is the primary initial cost, and must be designed well to ensure you enjoy your chickens and don’t end up resenting owning them. It needs about 2 sq ft per hen. It must have the following things.
- Ventilation – Chickens can withstand a surprising amount of cold, but summer heat down here in Texas is another story. If the coop is air tight, that heat can build up and the chickens will literally bake and dehydrate overnight. Don’t build an oven. I recommend openings on the front or side, away from your common wind direction so its not drafty, and cover the holes with 1/4″ metal mesh paneling. I have a large hole in the front, which is also a door for cleaning, and small holes in the very top of the roof, with small overhang so water has a hard time getting in.
- Protection – A coop is where chickens are most vulnerable. When chickens are sleepy, they are incredibly defenseless. Even my most wary chickens have been easy to capture and hold at night when taking them down from their roosts to examine them for injuries or illness. I don’t personally “lock up” at night, as some do, but I do have my coop connected directly with my run, which is very protected. (Wire ceiling, wood fence around, electric fence border). I have personally had a number of our livestock get snagged at night, most recently by a crafty fox, which necessitates the furthering of the security system to patch holes and stop intruders, and you’ll likely experience a lot of the same early trials of figuring out how animals evade your defenses. We even put in an outdoor security camera to see if I could spot where the intruder was coming in at. No luck so far, but also no return of the intruders.
- Insulation – This one is pretty easy. The coop needs to maintain stable temperature, so really just don’t built it entirely from wire mesh and you’ll be fine. You need a solid roof, (see watertight below), and most walls should be solid, but you’ll need a door for cleaning and a door for egg gathering.
- Watertight – Everything is fine until the first big rainstorm of the year and you find you have lots of places that pool water and become breeding grounds for flies. This is literally the worst, so eliminate as many places as you can where water can enter the coop. Chickens tend to poop quite a bit at night and this buildup in the coop, combined with water, can create thousands of flies. Avoid this at all costs. Also, a wet bird easily becomes a sick bird, and you need places for them to retreat during a storm. You should also have at least one covered place for them to huddle during a storm in the day out in the run.
Roosts
- Chickens will roost on anything and will fight over who gets to be at the top. This is called the “pecking order” and is where the phrase comes from, as the hens will literally peck and smack each other around until they finally agree on who gets to be at the top. It’s a good idea to design your roosts in such a way that there are multiple tiers, so society order can function, rather than putting all the chickens at the same level with one big long roost. Use at least a 1″ dowel rod, but a 2×4 on its side is a bit easier for them to grab a hold of and is just as cheap. Also, make sure you don’t put roosts directly under one another as the top chickens will end up pooping on the chickens below. That is a terrible situation for both you and the bird, so stagger them diagonally in the space.
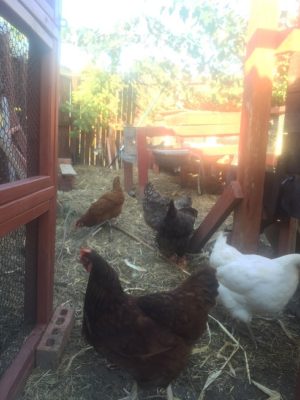
The run – A view in from the front door
The Run
- In addition to a place to sleep (the roosts in the coop), you’ll need a place for chickens to roam freely during the day. This is usually a fenced off area specifically for chickens, to keep them safe and accounted for, and has ample room for each chicken to stretch and wander without being crowded by other hens. Ideally, you want 8-10 sq ft per chicken, but go as big as you can, because most chicken breeders end up with more chickens than they planned for. I know I did. Our run is 22′ x 8′ = 176 sq ft, or room for about 17-22 chickens, but we’ve topped out at 8. Also, I have extra room back there because I also keep my quail and rabbit pens in the same area, only elevated with areas for the hens to crawl underneath and look for bugs. So it’s less open space. You want this space to be large enough, but also manageable in terms of security and cleanliness. The more space you have, the more bedding material you need to lay down and the more places for predators to break in.
Nesting Boxes / Brooding Hens
- Not every chicken needs its own nesting box. They rarely lay at the same time, and chickens naturally head to the same spot everyday to lay, so getting them trained to use the nesting boxes is crucial. Interestingly, chickens will see other chickens laying in a spot, see the eggs left there, and assume that is where they are supposed to lay, so you can teach your chickens to use the boxes by getting some fake, wooden eggs from hobby lobby and bait them into using the boxes with those. Don’t be surprised if all of your chickens try to lay in the same box at the same time. I’ve seen them pile on the same spot! Its ridiculous when there are two open boxes right next to them.
- Also, don’t let eggs pile up. Once a hen sees about a dozen eggs in a pile, she starts becoming “broody” and will stop laying eggs for about a month and will instead sit on them, daily, for a month, until they hatch. Broody hens are hard to deal with, as they are far more aggressive and will also drink and eat far less during the day since they hardly leave the eggs. They literally sit for a month, trying to hatch the eggs. It can be tragic when this draws on and on because the eggs aren’t fertile, never hatch, and the mother hen eventually passes because she hasn’t been eating or drinking for two months. The easiest way to break a hen of “broodiness” is to separate her physically from the space where she sits, and don’t let her get back there. Put her in a separate area, penned off, for a couple weeks and see if it breaks her of the habit.
Food & Water
- Feeding chickens is easy. You need regular lay pellet (about $15/50lbs) and chicken scratch (a mixture of corn and other grains that is more of a treat, priced about the same) You can add almost all of your kitchen scraps to their diet, with a few exceptions. (meat, dairy, avocados, etc.) Also, if you allow them to free range in your yard, they will eat a lot of the bugs as well! (But don’t let them in your newly planted garden. Little seeds wont make it through the scratching.
- Water is also easy – keep it clean and keep it plentiful. Chickens need full time access to clean water all the time, just like any animal, and this part of the job needs to be taken most seriously. I started with a 5gallon pail setup with some nipple drinkers, but this would only last a few days for a flock of 5 and that made it hard to schedule vacations or trips for more than a weekend, because someone needed to tend the water. (Feed can be easy, a full 15lb feeder can last a flock of 5 for a week or so). I’ve since upgraded my watering system to a plastic 50 gallon drum, mounted up on stilts above the coop, with a PVC pipe loop through all of the pens, with regularly spaced nipple waterers, and an aquarium pump circulating water throughout and a temperature activated 150w heater in the main tank. This baby can last for 3 weeks without intervention in the winter, as long as the power stay on.
Bedding
- Straw and hay are excellent bedding materials in the run. You may dream of a green field where the chickens can frolic to their hearts content, but you need an area that is specifically designed to keep them in and predators out. Leaving them in an open field all the time is a recipe for disaster. (We’ll get to that). Eventually, the area inside the run will be all scratched up and you’ll be left with just dirt, so a thick mat of straw can really help cut down on flies, water build up/mud, and smell from poop.
- When the straw is spent (I usually replace every 6 months), you can just gather it up and put it in the compost bin. Its an excellent source of carbon in compost piles!
Shade
- Like we mentioned earlier, chickens can easily overheat in the summer, so having a place for them to rest during the day that is not in the coop is ideal. A simple shaded spot, or planted shrubbery, potentially over a place they can dig in the dirt, is all you need.
Egg Access
- Your coop needs a simple door just above or behind the nesting boxes so that you can easily access the eggs in the morning without having to go all the way in the run. Most chicken coop designs will have this feature built into the plans, but make sure yours does. This is the most used feature of the coop and you need a good, solid one that doesn’t leak all over the chickens in the rain (my first attempt did) and where you can easily grab the eggs.
Decoration
- Its easy to build a simple chicken coop, and if you stick it out behind the shed, then whatever, it’s a coop. But if you live in a normal residential neighborhood with a typical backyard where people hang out and kids play, then you need something that looks good and that is fun to be around. Think about how you can incorporate surrounding garden beds, or a quaint barn red paint color, or a wooden fence instead of wire meshing everywhere. Sure, you can get away with all the “cheapest chicken coop ever!” builds you see all over the internet using pallet wood, or you can spend a little more and build something you’re proud of and that people will admire.
- My main goal when building the coop, as with any project, was “will my wife like it?”. Im going to enjoy the animals if they live in a cardboard box in the corner and poop on everything, but she wants to see order and beauty in the design, with well thought out, meaningful spaces. So what did we do? In front of the coop is a long garden bed, which is in front of a long, cedar, 4′ high picket fence, painted red to match the coop. In that bed are 4 grape vines, 2 raspberry thickets, and 2 blackberry bushes that trail up and over the wire ceiling. These cover the ugliness of the wire during the growing season and provide fruit that hang down and is easily collected as I walk through the coop. Any uncollected fruit simply drops into the run to be eaten by excited animals. To the side, two espaliered apple trees and a peach tree. Up next to the coop we have a small raised bed full of strawberries, and all open space around fruit is populated with perennial flowers that come back year after year for easy upkeep. All of this is unnecessary for chickens, but really makes the whole experience more fun.
Heat
- Just kidding. Don’t heat your coop. Chickens are just fine in the cold, even in the snow. They have thick undercoats to protect them from the cold. You need to be way more attentive to hot summer months and stuffy, non ventilated coops than you do to cold. Just make sure it’s not drafty and the water doesn’t freeze and you’ll be ok.
- You do, however, need heated, protected spaces if you are raising baby chicks or hatching eggs. Chicks need to be hatched at 100 degrees F, and in an environment that decreases by 5 degrees each week they get older, until they match outside temps. We have a brooder in our garage that holds around 8 chicks until they are about 8 weeks old. Above hangs a big 150w heat lamp (about $10 at home depot) that gradually gets further away, keeping the temperature consistent during the early stages of feather development. Baby chicks, as with all baby animals, are very sensitive to temperature and this will be the number one reason small animals don’t make it. Pay careful attention to this.
Woodworking Skill - If you build your own coop
Daily Time involved
Monthly Time involved
Project Cost
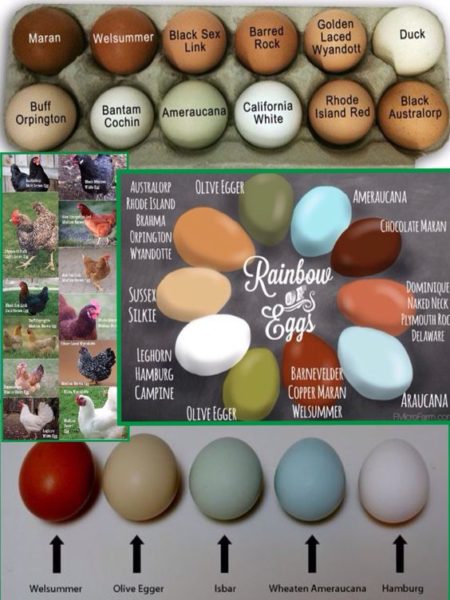
Various breeds and their general egg colors
Egg types and color:
Its going to be really hard to tell a difference in taste between different breeds of chickens, but some chickens have more or less yolk, or white. The primary differences between breeds is size and color. Various shades of brown and white and cream are the most common, but some breeds lay “rainbow eggs” aka “easter eggs”. The most famous breed here is the “ameraucana”, of which we have 3, that primarily lay blue or green eggs. Its just for fun, but it is fun!
Duck eggs and quail eggs, along with different varieties of fowl, do in fact taste different. We don’t have any ducks (yet!) but our quail eggs are much more “rich” and make great bite sized fried eggs. They are much higher in protein than regular eggs, but it freaks some of our friends out to have such tiny eggs, so we give them regular chicken eggs. Here is a pretty great little graphic that is circulating around Pinterest at the moment that shows you some of the variety.
While we are looking at egg color, we should examine different common breeds:
There are lots of breeds, and lots of different ideal breeds for different purposes, so I’m just going to go over some of my backyard chicken favorites.
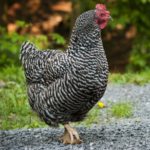
Barred Rock
Barred Plymouth Rock:
This breed is speckled all over white and black and is both a great layer (200-250 eggs per year) and an equally great pet around children. These, more so than most, have a friendly, calm nature and can be trained to come when called and be comfortable around young ones. They are a hardy breed that does better with being cold. They also have a longer than average life expectancy, so they can become long term pets if raised right. These are currently my favorite breed.
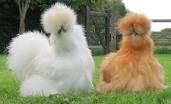
Silkies
Silkies:
These are the silliest looking birds with lots of fluffy feathers up near their head. Sometimes I wonder how these little guys can see at all. They are especially known for being good pets and are actually affectionate and will love to run up and jump in your lap to sit.
They aren’t the best egg layers, but they are fantastic and silly pets.
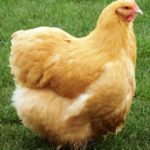
Buff Orpington
Buff Orpington:
These are one of the best “mother” chickens and can be used if you’d like to have a hen raise her own chicks, rather than going from incubator to brooder to coop. They don’t even have to be her eggs! You can buy fertilized eggs (like I do since I cant own roosters in my city) and simply trick her into becoming broody with a mass of eggs in the nesting box. She will sit, hatch, and care for the chicks with an insanely cute amount of mothering. They lay about 175-200 eggs per year, about average.
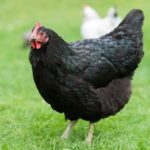
Australorp
Australorps:
I personally havent been able to find this breed around where I live, but these birds are especially known for being quiet and calm. They are almost easy to forget in the backyard!
They lay roughly 250 eggs per year and are a great choice in crowded neighborhoods.
Rhode Island Red
New Hampshire Red / Rhode Island Red:
Generally considered a multi purpose bird : both a good egg layer and large, meaty bird for eating. Withstands cold conditions much better than the average and can be trained to be very tame. They lay very large, brown eggs.
Average Start Up Costs (for 4 chickens)
- Heat Lamp $10
- Chicks $4
- Waterer $20-30
- Straw bale $10
- Starter feed $15/50lbs
- Feeders $15
- Chicken Coop $200 min
Average Startup Cost (4 chicks) $300
Yearly cost per 4 chicks
- 4 chicks each eat 1/4 lb feed a day = 1 lb food
- 1 – 50 lb bag lasts month and a half
- 365/50=7.3 bags a year
- 8 bags of feed * $15 per bag = $120/year for feed costs
So monthly, you spend roughly $10-15 on feed/water/hay, but you get:
- 90-120 eggs (depending on the month) = $45-60 (at $0.50/egg)
- 3 cu. Ft. of compost = $10
- 16 lbs manure = $5
Total of $60-75 / month in value + satisfaction of growing your own healthier food, raising livestock, learning responsibility….
What To Expect From Your Chickens
Laying eggs:
- Chickens start laying around 5-7 months old, starting with small, weak shelled eggs, and only every few days, and then gradually get more and more consistent. From that point on, they will lay nearly 1 egg a day, or about 5-6 a week, for the next few years. As chickens get older, egg production will taper off to nearly nothing after about 4 years.
- Each type of chicken breed will lay a different amount of eggs per year, and those estimates are pretty accurate and curated from years of observation by farmers, so if egg production is your primary concern, check over those breed lists and find some hens in those types. There are a lot of breeds, and learning all of them isn’t necessary, so don’t feel overwhelmed. Most places that sell hens, like pet shops/feed stores/small farms, specialize in hens that lay higher numbers, or in hens that are fun to own, like silkies.
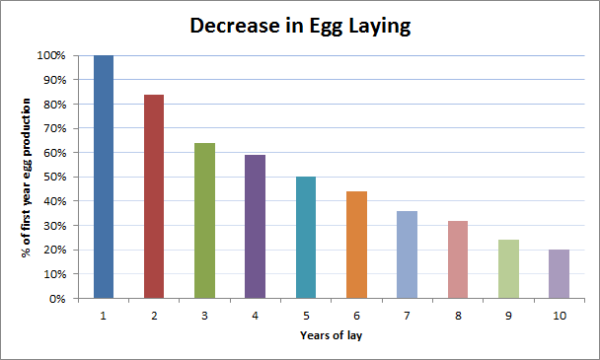
Egg laying production – yearly decrease
Chickens stop laying for three reasons:
- They are too old – older hens produces fewer and fewer eggs, but generally produce larger ones. In a home flock, this doesn’t really matter so much, so feel free to get 3-5 years out of a good laying hen. Eventually, they will stop, and you have to decide what to do with them at this point.
- They are broody – Hens who become broody will stop laying because they have switched into hatching mode. Remove all the eggs near the broody hen and potentially separate her from the space which she has claimed ownership of. She won’t let other hens lay there, and she will become really aggressive to intruders. You should probably wear gloves when handling her as she will definitely peck.
- They stop laying for the winter – Hen laying is directly affected by available daylight. When the days become shorter in winter, egg production will stop and molting will begin. Molting is where the hens will shed their feathers in an attempt to grow a thicker, warmer coat for winter, and if they have started this process, you should not try to interfere or force longer laying seasons because molting takes a LOT of energy and they shouldn’t both molt and lay. If you are interested in forcing a longer laying season, which many people do if they live in moderate climates (where hens don’t really need a thicker batch of feathers), simply put a 60w bulb in the coop on a timer to increase the number of hours of “daylight” the hens get. They need 14 hours at minimum, and 16 is more like summer months, so set your timer according to where you live to give them so many hours extra at the end of the day, or wake them up a few hours earlier, all depending on your sunrise/sunset hours. If you don’t need the heat of a regular bulb, use LED bulbs or LED rope lights in the top of the coop to save on electrical costs.
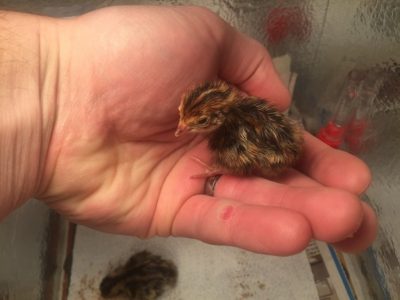
Recently hatched baby
Meat or Companionship:
- You’ll need to be considering how to handle your homestead animals at that point. Many people raise a flock in the spring, collect eggs for a year, and then fill their freezer with chickens for the winter, just to start over again in the spring. I personally haven’t been doing that, as we grow attached to our chicks and many of them start to become friendly and will come when called. Hardcore farmers raised to not waste anything will say “Don’t let your livestock become pets, they serve a purpose” and I fully understand that mentality and will one day process our chickens when they stop laying, but our house has become a bit of a petting zoo for the local kids and friends of ours who will bring their kids over to come learn about the animals and experience them up close in a safe place. It’s just as rewarding to explain what a chicken does to a 4 year old while the chicken is perched up on your arm like an eagle as it is to gather eggs in the morning for breakfast.
Poop:
- There will be a lot. About 4 lbs per month per chicken. It adds up fast, and you will have to deal with it. A good pair of rubber gloves and boots is recommended. But if you’ve filled the run with straw, you have to deal with it less often, and it’s much easier to gather up in bundles and throw on the compost bin. Chicken manure is VERY rich is nitrogen, which makes it an excellent addition to the compost, but it’s way too “hot” to put directly in the garden as it will literally burn your plants and kill them. It needs time to decompose. A compost bin requires carbon sources (straw/hay) and nitrogen sources (manure) and you’ve got both!
Pests:
- There will also be a moment in the spring where flies all of a sudden explode out of nowhere, in a ridiculous number. They are pretty much harmless to humans (but are gross and annoying) but they can be dangerous to your animals, so you need to work on getting rid of them. I regularly employ the classic bait bottle technique, which works really well, but the best thing for me (and I think you’ll see this pretty regularly all over the internet advice threads) is Diatomaceous Earth. DE for short. This is a very light, white powder made from crushed up sea creature shells that is about the same consistency as white flour. Its very easy to spread, and a light dusting over everything that might have chicken poop or water on it. Its not a chemical or pesticide, and its all natural. In fact, many people straight up eat it themselves to control internal issues (I don’t). I do, however, mix it in with my chicken and rabbit feed to keep pests from making a home in the bag and ruining the whole sack. DE is incredibly sharp at a microscopic level and gets in all the joints of an insect’s carapace, which kills them off rather quickly. I regularly spread this around the coop, inside and out, even when there isn’t much of an issue, and I will rub it into the feathers of the chickens and quail in case any mites have taken up residence there. The chickens love it and will begin to play in it. I do recommend that you wear safety goggles and a breathing mask when spreading it, as its so fine that it easily gets caught up in the wind and flies away, which can really irritate your tear ducts or your breathing for the next couple hours. Its not dangerous, and getting wet quickly nullifies its usefulness, but it can be really annoying to cough on it for a while. Water is its enemy and once its wet, its done for, so you’ll need to wait for everything to dry and then reapply.
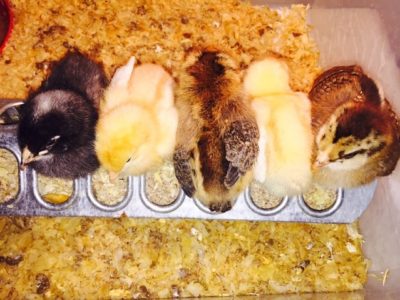
Recently Hatched Chicks
Making Money from your backyard chickens:
From what I’ve experienced and from talking with larger scale farming operations, you need to be pretty dedicated to actually make money from your chickens. I don’t try to do this, but it can be done. Our chickens are for food, fertilizer, and enjoyment, and I am more than willing to just pay the cost of their monthly feed to justify owning them. If you’re interested in making a profit, here are some things you can try:
- Selling extra eggs: Farm fresh eggs from a humane source go for nearly $6 a dozen at a local farmers market. See if you have a Saturday morning one near you you could sell at. Take what you gather and sell till you run out!
- Selling hatching Eggs: If you have a rooster, you can sell fertilized eggs. This probably won’t make much more than just selling the eggs for eating, but if you have rare or specialized birds, you can probably sell them for more.
- Hatched chicks: An investment in an incubator (mine was right at $100) can easily be returned in a hatch or two by selling baby chicks. I get mine for about $5 a bird in the spring. Alternatively, instead of selling them, hatching your own chicks can save you lots of money as well. You’ll only need to buy your first years birds and then each year after that you can hatch your own replacements! I hatch all of our quail (since we can keep male quail).
- Selling Fresh Chicken Meat: If you hatch your own chicks, you’ll have plenty to choose from, and probably too many roosters. Chickens only need to grow about 8 weeks to get to full butcher weight. Selling meat generally has more issues with specific laws in any given place, so do some research into that. But if you get to a larger scale operation, this could definitely net you some extra cash. Or you could just sell birds straight to a local butcher without doing all the carving yourself.
Additional Things to know:
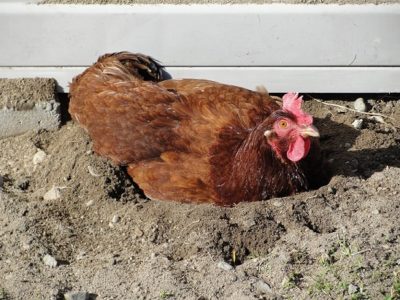
Dust Bath for Hens
Dust Baths
- Chickens absolutely love dust baths. A place where they can roll around in loose dirt or sand is an important part of a chicken run. Chickens will dig down and fluff up dirt into their feathers to get rid of small pests, like mites, that may take up residence there. We have a spot for this purpose, but occasionally Ill set out a planting tray full of DE for them to use just to make sure pests are getting killed.
Companion Planting
- There are some plants that chickens love to have around and can be beneficial to plant in the run.
- Lavender, mint, oregano, parsley, and sage are all great herbs to have nearby. These can repel mosquitoes and other pests, some make great green snacks for the chicks, and some provided a much needed fragrance to the area.
- Chickens will naturally dig around everything they can find so I’ve found it helps to add a 1′ tall ring of wire around the plants if they are actually in the run. This keeps the plants close by but protected from scratching and overeating while the plant is getting established. Small plants are going to be eaten entirely, so pick plants that are bushy and large.
Predators:
- You will eventually have to deal with predators. There will always be something trying to eat your chickens and you need to have a game plan in place to protect them, and you need to know eventually one of them will likely end up a meal for some wild animal. Owning livestock is hard emotionally and you have to go into knowing this knowing that it’s likely some of them will die.
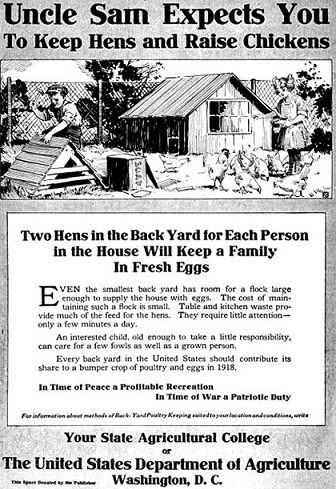 Keeping backyard chickens is becoming a trend again in suburban communities, and with a little upkeep, nearby neighbors will hardly notice you have them. They are quieter than dogs and all you have to do is manage the manure situation. In fact, during WWI, it was your american duty to keep a small flock at home. Political motivational posters circulated that said “Uncle Sam expects you to keep hens and raise chickens! Two hen in the back yard for each person in the house will keep a family in fresh eggs!” – Newspaper add from 1918
Support us on Patreon!
I hope you've enjoyed this tutorial! Please consider donating on our Patreon page! The more money we raise, the bigger and more elaborate project tutorials we can do for you!
Check out the Patreon Page
Comments
Great article Sam! When are you coming home to build one for me????