
If you’re here, its probably because you have a motorcycle that won’t start. Today’s “how-to” is going to look at what to do with a motorcycle that won’t stay running, and I’ll use one of my bike’s, a Hyosung GT250R, as an example of how to take out the carburetor and clean it.
Before we dive into that, you should eliminate some easier, try this first, steps.
If your bike runs on gas, you need three main things for it to work: Air/Fuel mixture, Spark, and Compression.
Spark/Ignition:
Make sure your key is “on” and that the kill switch is in the “run” position. If the bike side stand is down, you must be in Neutral to start it, otherwise the stand is a secondary kill switch. For you experienced riders, this feels dumb to check, but it’s sometimes easy to overlook the simple things.
The first place to look for spark issues is the spark plug. Remove them through the cylinder head (one of mine is easy to reach, the other is hard, so pull the easy one first) and examine them. Plug them back into the plug cap and hold the plug up to a head bolt or some other metal and turn the engine over for a second. You should see a spark traveling from the electrode to the metal. If you see a spark, you can move on. If its weak, try replacing the plugs or adjusting the gap with a tool. Your specific gap setting is in the user manual.
Check the plug wires and caps. The bike will usually still run rough if these are bad, and they are easy enough to replace. If your bike runs well at high RPMs and dies at low, then you likely have a Regulator/Rectifier problem. (I will likely cover this in another post. My bike recently started dying when I slowed down to a stop at lights, and the battery would quickly drain to 0. Turns out my R/R had gone bad and wasn’t allowing the bike to recharge the battery as I drove. Once the battery ran out of juice, that was it. 3 miles from the house and I would be stuck.)
Compression:
Compression testing is probably the hardest of the three, and a bit beyond the scope of this article and normal DIYers. If your cylinders have low or no compression, your engine will not fire properly at all. The air/fuel mixture needs to be compressed properly to raise its temperature to the point where it can become combustable. Without compression, you will have no ignition. You may need new piston O-rings, or a new piston, or gaskets in the engine. All of those are more expensive fixes, so we want to focus on cleaning the carburetor first to see if we can get rid of a more simple, and common, problem.
Air/Fuel Mixture:
This one is likely where you will have the most problems, and is what we are going to be dealing with today. Bikes, along with other small motors like weed eaters and lawnmowers, have very small carburetors, with even smaller passageways for gas and air flow. Modern day gasoline has a mix of 10% ethanol, which degrades much more quickly than regular gas and leaves behind hard deposits inside the passageways, constricting or blocking flow. If your bike is running rough, there is a very good chance its because it sat for a while in the garage and fuel became “stale”. Also, when fuel breaks down over time, it loses octane and will not combust properly. Sometimes draining the current gas from the tank after winter with a $5 hand pump from harbor freight and replacing it with new gas can be enough to purge the system. New fuel, along with some starter fluid sprayed directly into the intake in short bursts, can be sufficient for some.
Ideally, you will treat gas stored in the bike with a gas stabilizer, which prolongs the life of gasoline, sometime up to 6 months. If you are leaving the bike for winter, or dont ride very often, I recommend you get some of this inexpensive stuff and keep your bikes gas treated all the time. If you don’t go through a tank a month, you’re asking for trouble. And that’s how I got where I am today: needing to clean my carbs.
Cleaning your Carbs:
Now that we’ve checked the basics and the simple to over look things, lets get to the nitty gritty. This process involves taking the carburetor entirely out of the bike, then removing the jets from the body of the carbs to clean them thoroughly.
Note: Carburetors are very specifically tuned at the factory and there are a number of screws on the body that should come out to take it apart, and there are some other screws that shouldn’t be turned at all because they change things like air/fuel ratio and can make the bike run rough. Be careful and learn which screws are which on your bike.
Parts You’ll Need:
Carburetor Cleaner Spray : 1 can usually is enough for a couple cleanings. Amazon link here will supply it, but it’s generally a few dollars cheaper at an auto parts store
Carburetor Jet Wire Cleaners : These can really help scrub the inside of the jets, which are tiny, tiny orifices. These also help you not scratch the soft brass that most jets are made of.
Berryman’s Chem Dip : This is much more aggressive at cleaning metal and will chew through anything not metal, but is generally way more effective at removing stubborn gunk. A can of this will last forever, and its not much more expensive.
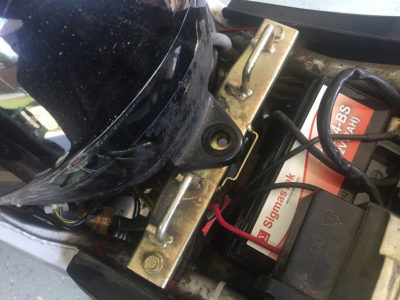
 Step 1: Remove the seat and gas tank
The tank will have one bolt under the seat holding it to the bike. Remove this and set it aside. Mine has a bolt + 2 rubber washers: one on top and one on bottom.
Then, before you can take the tank off, you have to disconnect the electrical wire and 2, 3, or 4 gas/vacuum lines that connect to the carburetor and cylinders. If you lift up the back of the tank, you’ll see tubes connecting. Just hold down the snap ring to release pressure and pull the hose carefully. If there is gas in the line, it will come out, so maybe use a rag to keep it from going every where.
Once these are all remove, you can pull the gas tank up and towards the seat and it will come off the bike. Set it aside.
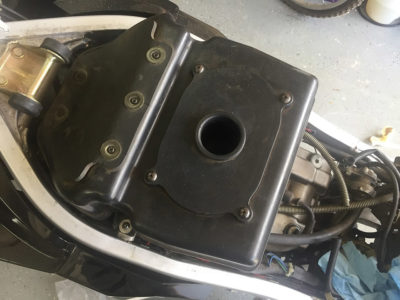
 Step 2: Remove the air box and filter
You don’t need to remove the filter directly, but there are a couple things you need to undo to get the whole assembly out of the bike.
My bike has two screws on the sides that connect to the frame, one on each side, and then there are two rubber grommets on bottom that have tightening rings (seen in the right picture) that also need to be loosened before they can come off. I had to take off a side fairing to get a long screwdriver up in there to loosen these. These seal the connection to the top of the carburetor, so be careful not to just pull them out without loosening. Use a flashlight to see the screws better. They can be very dark and hidden.
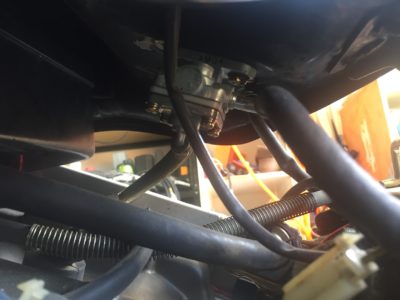
Step 3: Remove the Carburetor from the Bike
Now that the airbox is gone, we see the top of the carburetor exposed.
There are a couple of key things to loosen here to get these out.
- Remove the gas lines from the top. I just undo the one hose in the top right of the left picture here and the one in the bottom right of the left picture.
- Remove the throttle cable. This cable loops around a curved piece and must be detached as well.
- Remove the clutch cable. Bottom left picture here. This must be first undone with a phillips head screw to loosen the connection, then the cable must be rotated up to come out of the holding slot.
- Just like the airbox, we must now disconnect the two rubber grommets underneath the carburetor that goes straight into the cylinders of the engine. Use a long screwdriver to loosen these as well so you don’t put stress on the rubber boots when you pull the carburetor out.
When you finish unhooking all of these parts, pull straight up on the carburetor. You may have to wiggle them a little bit to get them unseated. My bike has enough room here to pull the whole thing out of the top, but my other, older bike does not, so you may have to twist and turn the carburetor a specific way to get them out of the bike.
Take these to a spot for cleaning. Should be well ventilated. You will still have some gas in the carburetor that will leak out if you hold it upside down, so be careful.
Step 4 : Open up the carburetor
Be more careful that I was when learning to do this. These screws are very soft metal, and very easy to strip.
I begin each screw I need to remove with a pair of pliers and a shot of WD-40. Don’t start with just a screwdriver. These screws are usually very tight and need to be worked a bit to prevent stripping. My set of carburetors have 8 total screws that need to be removed. Try to lay out everything that you remove carefully so you can remember where it came from. Some pieces are interchangeable, but most are not.
One specific screw to be looking for is the “pilot screw”. This screw determines how much air and fuel gets to the engine when no throttle is applied. It’s very important not to mess with this setting, as it is factory set. You may decide to remove this screw later to clean underneath it, but you must count the number of revolutions to unscrew, and then reinstall it later with exactly the same number of revolutions. I like to see how many revolutions until totally closed, and then back out. My screw is 5 half-revolutions (2.5 rotations) until closed. So I reinstall it all the way in, then back out 5 half turns.
Step 5 : Get to cleaning!
Your carburetor is very susceptible to gunk buildup, because the passageways inside them are very specifically sized for gas and air flow, and even partial blockage can cause your bike to run rough, or not at all.
The large hole in the middle of the floats is my main jet, and is the one most in use when I am more than 25% throttle. If you can start the bike and idle, but it dies when you try to give it gas, this is blocked. Carefully unscrew both of these and spray carburetor cleaner through the holes until it comes through cleanly, and then allow them to sit in a shallow container of carburetor cleaner liquid for a few minutes while you work on the other parts.
The smaller jet to the left of the main jets is my pilot jet. This is the “idle” jet. Its called pilot, just like a pilot light on a burner. It means that its responsible for always pushing small bits of gas through, even when no throttle is applied, to keep the bike running. If you can’t start, or can start only with full choke and then it dies when you turn off choke, this is gummed up. This jet is the bane of my bikes existence. This jet is a tube with a whole bunch of smaller holes, each of which is susceptible to gum up from gas break down.
Step 6 : Spraying jets
Carburetor cleaner is very caustic, so please be careful when shooting this stuff around. It will destroy your eyes, so wear safety goggles. You probably shouldn’t get it on your skin, but I’m not wearing gloves in this picture just to take a picture.
You can see the empty butter container I use for spraying jets behind my hand. Press the straw of the cleaner into the jet and spray carefully. If its clogged, it may shoot back, so make sure your face isn’t behind it. For some really clogged jets, soak them in cleaner for 10 minutes to see if that loosens the clog. You can also spray compressed air into the jets to try to blow out the blockage.
Once you get all the jets cleaned, double check your carburetor settings, since you’ve got them off the bike and open.
Check your float height and inspect the following parts for damage or clogging. Mine is supposed to be 17 mm.
- Pilot Jet, Main jet, Main air jet, Pilot air jet, Starter jet
- Gaskets and O-rings
- Floats
- Jet Needles
- Valve Seat
- Needle Valve and Needle Jet holder
Step 7 : Reassemble Everything!
Ah, the bane of the DIYer. If it’s your first time, go slowly. I’ve done this 10 or so times over the decade I’ve had bikes and I invariably fail to remember to reattach a hose or put in a screw in a weird spot and only remember it was necessary AFTER I’ve put the gas tank back on. Don’t do that! Every part and every screw on these bikes is crucial. You can’t afford to leave anything out.
Once it’s all back together, it’ll take a little while for gas to get back into the carburetor while holding down the starter, so don’t panic when the bike doesn’t start. The vacuum will eventually fill the carburetor, but you don’t want to hold down the starter the whole time until it does. Run the starter for 10-15 seconds at a time, then give it 30 seconds to cool and rest. Then try again. Use your choke. Let the bike warm up and let gas flow for a few minutes before trying to throttle up. It might run rough for a minute while it’s getting out all the carburetor cleaner and moving to pure gas, but it should straighten out. Unless you’re like me and only cleaned the pilot jet, and not the main jet. Now mine runs and won’t throttle up! Looks like I’m doing this process all over again!
Good luck!
Support us on Patreon!
I hope you've enjoyed this tutorial! Please consider donating on our Patreon page! The more money we raise, the bigger and more elaborate project tutorials we can do for you!
Check out the Patreon Page
Comments
Hello , i have a 2009 hyosung GT250R and im havin a issue starting it and noticed a hose not hooked up . Its the one inbetween the 2 carbs and i dont know where it hooks up to. Can you help ?
The other end of that hose (the ones that connects to the top T on the carbs) goes to the fuel pump. Its located back towards the seat, kind of underneath where your right leg would be while sitting. One line goes into the fuel pump from the gas tank petcock. One line (smaller diameter) connects to the vacuum system so that it can activate. And this line connects to the carbs. This is your primary gas inlet for the carbs so you probably have some gas spraying out if youre trying to start it while thats not connected. Not much, but just be aware.
hi-
im working on a hyosung mirage250 – and I am unsure about a hose.
In the picture in your post I can see a line/ hose that joins the carb im between the two carb bodies- it attaches at a T- and then it goes sown to a joint, where another end of ot attaches to a nipple on the other side of the first carb.
snd then the whole thing just joins up into a single hose.
Of course I know where it attaches to the carb- but what about the other end? I didnt know if this goes back to the pump, is a vent or what! I am lost.
No problem J, its really hard to get a clear picture of whats going on here, but the hose coming in the top via the T comes from the fuel pump and is the gas inlet to the carbs. The T splits the gas into the two halves of the carbs.
Underneath that connection is a line that just connects one half of the carb to the other. Nothing fancy here.
Underneath all of that is an intersection of two smaller lines, 1/8″ i think, that come from near the bottom of the carbs. This is the one you are asking about? It connects very near the rubber boots on the bottom, and is underneath a screw. That screw is the carb drain screw and can be used to empty the carbs of gas before long term storage. You want those two small hoses to connect together, and then snake their way down the frame, under the frame clips, and be able to drain out underneath the motorcycle without pooling up in the fairings.
Hi, nice article. Working on son’s Hyosung GT 125R (fairing version) using an online manual for the 125 and 250 naked versions. Much is the same. Thought I would mention that the manual stated 17mm float setting appears to be a misprint and would not work. It looked so crazy way out to me that I ignored it and later came across others online who said at 17mm their bikes did not run at all.
Hii, Alastair here , I am working on a 2005 Hyosung that was sitting for a couple of years , had the gas tank and the carbs cleaned and fixed back bike starts and runs fine , but confused with the carb slide needle , one of the slide needle is more tapered and sharp … Does that go for the front cylinder carb or the rear cylinder carb …
I also feel that the engine is getting too hot .. kindly advice
Thanks in advance