

So you have an idea you’d like to tell the world about? Well, its easy to do, and you’re going to need a website. I’m gonna walk you through setting one up. I’m going to attempt to break down the technical stuff and have links setup so that you just have to follow this guide and you’ll be up and running with your own website in about an hour.
First off, whats it going to cost?
You’ll need to buy two things:
- A domain name (ie. your site address)
- Web Hosting (ie. a place for your site to live)
A domain name is cheap. About $10 a year. But you can always find sign up deals from web registrars (the places that dish out domain names) offering a year free or for a few bucks if you sign up for X amount of years. A little research here can save you a few bucks, but I’m going to show you the straightforward way to just get one now to save time.
Some of the most popular registrars are GoDaddy, NameCheap, and BlueHost.

Some tips for choosing a domain name:
- Keep it short and memorable. You want something people are willing to type in.
- Avoid number, hyphens, special characters. Stick to just words.
- Try to come up with something cleverly related to your blog topic.
Once you choose what you’d like for your name, go to your site of choice and just follow the prompts. Sign up with a new account, tell them what domain you’d like to buy, and then purchase it. Thats it! Step 1 down.
Step 2 is to setup your hosting. You can get a package from one place that is both hosting and a domain name, but I recommend using a different company for hosting. I have heard many great things from close computer nerd friends, and then I started an account in college with these folks and have had a great experience so far. They are about $10 a month for hosting services (and some other places can be cheaper) but you get more for your money here.
I’ve been using a company called DreamHost for about 10 years now. They have a lot of great features that make holding a website with them easy. Here are some of the better ones:
- They have a 1-click installer for WordPress and a handful of other background software suites. Just tell them which domain you’d like and click “install wordpress”.
- Free Ecommerce tools – if you want to sell something, you can easily setup a shop.
- Free SSL Certificates – generally $60 a year. These tell your viewers that your site is safe and protected.
- 1 free domain name for a year.
- Unlimited space, unlimited hosted domains, and unlimited email accounts.
Once you have your host provider and domain name, you’ll have to make them talk with each other. Your host space needs to actually know where the domain is located.
Setup for Hosting a Site on Dreamhost
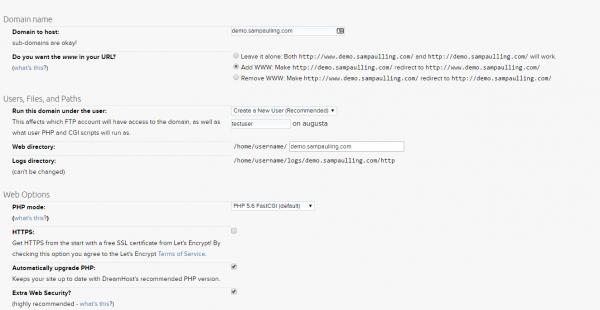
Open up your dreamhost panel. Under “domains”, click “manage domains”. Then click “add new domain”.
This page is where you will setup the site and create a user for managing the site. This is different than the user that will sign into wordpress and write content. But they can be the same to make it easier for you to remember.
Click “fully host this domain”
After it gets setup, you’ll be presented with this screen. This may be the trickiest part of the whole setup. In order for your hosting space to be able to communicate with your domain, it has to match “nameservers” with your domain host. Its easy if they are the same provider, but in my case, and likely yours if you follow this guide, you’ll get the following screen.
You need to take those three nameservers and tell your domain provider what they are. So, in my case, I sign into my GoDaddy account (where my domains were bought) and click on Domains –> Manage.
![]()
![]()
![]() Find the place where it says DNS (domain name servers) and manage. Type in the information provided by the hosting site.
Find the place where it says DNS (domain name servers) and manage. Type in the information provided by the hosting site.

Put this information in your domain registrars dashboard.
Now you’ve got all the backend stuff setup and you’re free to start working on building the site. So lets do that.
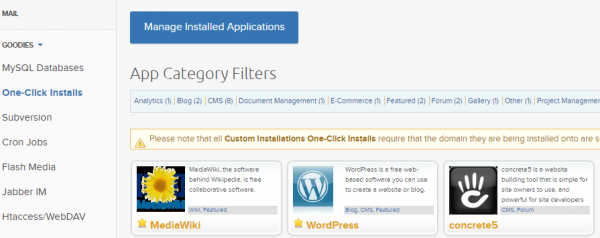
Under 1-Click Installs, choose wordpress.
Go back to your hosting dashboard (in this case DreamHost) and find the button that says “install wordpress”
It should be under Goodies–>One-click Installs.
Choose which site you’d like to install wordpress to. (It’s likely the only domain you have at this point.)
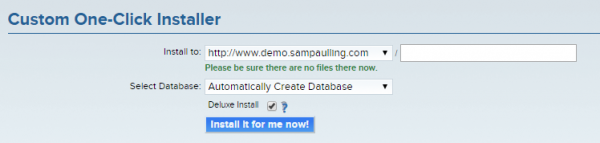
Select your site to install wordpress to and automatically create a new database.
It will generally take about 10-15 minutes to install on your server and then you’ll be sent an email with instructions to login.
Generally, when it comes time to login to your site, the address you’ll need to go to is:
www.yoursitedomainname.com/wp-admin
The crucial part is the wp-admin at the end. That tells the site that you’d like access to the writing portion of the site and are trying to change the site. You’ll be presented with a username/password box login screen and once you sign in you’ll see your wordpress dashboard. This is the final piece of the puzzle. Now all that you have to do is spend some time customizing the look of the site. And that’s the fun part!
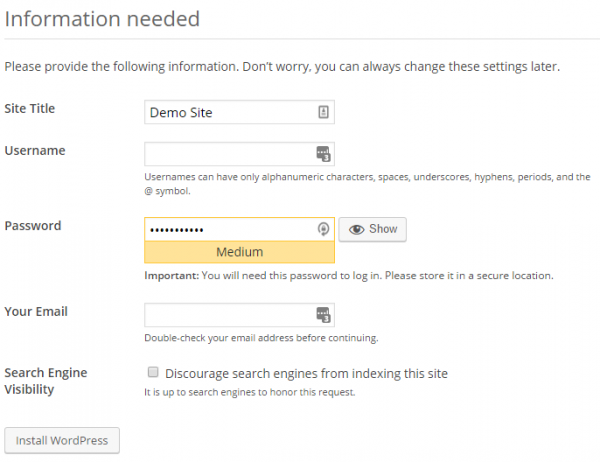
The email you will receive has a lot of links, but the ones that really matter are #1 and #4.
#1 sets up an admin account user. Lets do that now.
#4 takes you to www.yoursitedomainname.com/wp-admin (like we spoke about before). This is your new home for everything related to working on the site. The dashboards for your domain provider and hosting provider are now just something you should remember for a distant time in the future where you will want to create a new site.
There are a handful of things you are going to want to do. Likely in this order.
- Enable plugins that prevent spam comments and emails.
- Setup a “look” to your site with a theme.
- Setup stat tracking with Jetpack.
- Setup “cacheing” with WP Super Cache plugin.
Its ok if you don’t know what those are yet. We are gonna cover them now.
First thing, lets enable Akismet Spam Plugin. On the left of your dashboard, under plugins, go to “installed plugins”. You still have to activate the plugins after they are installed, and your default wordpress installation has a few we want to activate. Akismet is a funny name, but a very powerful spam prevention plugin. To set it up, click “activate”, and then click the link in the description of the plugin to create an akismet account (necessary) and then save your API key when they email you one. All that means is it is a specific setup of the program tailored to protecting your site.
Second, lets pick a theme. There are literally thousands of wordpress themes out there ranging from amazing to really, really bad. There are a handful of free ones already installed (kinda boring), there are thousands of free ones found with a simple google search, and there are even more “paid” ones (costing anywhere from $15-$100 per theme) called “premium themes“. Paying for a theme generally means you get some really cool, modern looking design and features and I’d recommend spending a good bit of time flipping through site theme templates before settling on one. If you’re just doing a simple blog or online journal, you likely don’t need to spend more money. The template that I bought for this site was $40. You can search for themes for specific needs, like one page landing sites, ecommerce themes, photojournalism themes, and mobile only.
Some major features may include:
- Responsive – this means that your website will scale content to fit on whatever sized screen you display it on. It will grow or shrink depending if its on a monitor, tablet, or phone. Try it out with this site. Load us up on your phone and see how our content automatically resizes to fit everything comfortably in your screen without having to scroll left and right.
- Visual Editor – Some basic wordpress themes require you edit site settings in a typical settings menu, but a visual editor allows you to live see what happens when you make changes to the site. If I change the setting for “Heading Background Color” to something else, I can see it change live on the site before I click save and make it for real.
- Preconfigured templates – even though you buy a theme, you still have to set it up. This can prove tricky for newcomers, so getting a theme that already has the basic design laid out is nice. It allows you replace their pictures with your pictures, and their words with your words. Its simple and nice.
- Live Demo – try the demo out and see what it looks like on a site already setup. Just click “live demo” and see what you can do with the site.
Once you pick a theme, buy it, download the zip file, and install it to your site. On your dashboard, go to appearance –> themes –> install. Once its installed, activate it and it will now be the official look of your site.
3rd step:Stat Tracking. You’ll probably want to see how many people your site is reaching, so setup site analytics with Jetpack. (you can also use google analytics, which has more stats, but its definitely more complicated to setup. If you feel adventurous, look up a tutorial and give that a crack. It’s definitely cool to be able to see what city your viewers hail from.)
 To setup Jetpack, go to the plugins–>Installed plugins and activate the jetpack plugin. You’ll get a popup at the top that says “your jetpack is almost ready” and click “Connect to WordPress.com”. This will sync the site with your wordpress account (which you may need to create if you dont have one) and allow the two to communicate.
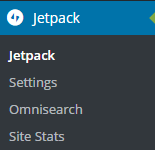
You can access your jetpack dashboard in your wordpress dashboard on the left in the new menu item “Jetpack”. Take a minute to get familiar with the different options here. After some time of collecting data, the site stats page will show you lots of information about how many people are coming and to what pages they are going to.
4th: Caching.
Caching drastically speeds up your sites loading time for the end users, especially if you are on a shared hosting plan. (Likely you are. They are the cheapest plans and generally where all blogs start.)
The basic premise is a user comes to the site for the first time, their computer “downloads” the site, and then the second time they come back to the site, they only have to download the “new” stuff, and their computer fills in the bits it already knows about. This means the user doesn’t have to re-download your whole site everytime they come and it makes it fast to load for them and it means less server resources spent serving them. So everybody wins.
There are lots of “caching plugins” out there, but you already have a basic one installed. WP Super Cache. Go to the plugins page and activate that plugin. Feel free to browse the wordpress plugin store for more advances plugins with additional capability. Get there by going to Plugins–>add new and browse around. A lot of these plugins are free, so take advantage of as many as you like.
So now your site is bought, setup, installed wordpress, configured to reject spam and to cache, and you’ve picked a look.
Now you get to create your content. There are two types: Posts and Pages
Pages are a static, never changing (usually) constant page. Generally, these will be your “about me” page, your “contact” page, and things like that. If you are running a business website, these are most likely what you will be making.
Posts are where you will likely spend the most of your time if you are writing a blog. This article here is a post, and it has a featured image, and it automatically appears on the blogroll (an always expanding homepage that puts the newest posts at the top. ie. my www.sampaulling.com homepage). Each post will have a title and then your content below. You’ll want to add a featured image and tags that tell search engines what the page is all about. You can even setup Categories to sort through posts so viewers can find what they need more easily. This post is tagged “OSX & Mac’s” and “Windows & PC’s” because it can be useful for both systems. So when you sort my site by either of those two tags, you’ll find this post. You should setup categories based on what type of information you will be providing.
Generally, your content is more compelling if you have pictures. You can take pictures with just about any cell phone, but I recommend putting at least a little bit of time into cleaning them up with editing and adjusting them so they look a little better. Even the default camera apps on your phone have these features, so take a minute to use them. Adjust lighting and clarity and color. Then upload the pictures by drag and dropping them in the Media –> add new page of your dashboard. Once they are there, you can insert them into any post or page with the “add media” button at the top of every post.
Other areas of your dashboard:
- Portfolio pages – these are specifically for setting up photo portfolios. Generally helpful for design artists and photographers to show off their work. You can setup these pages as slideshows or just scrolling pictures and some themes have really impressive visual additions for portfolio making, but I generally don’t use them.
- Comments – This area is where you can interact with people who post comments on your pages and either approve of them, reject them, or ban users who get past the spam filter. If you haven’t setup a spam filter, you’ll soon see thousands of spam messages from bots and you’ll feel overwhelmed, so definitely go back and do that step if you skipped it. You can also reply to comments and questions directly.
- Contact – you can setup contact forms so that people can email you directly. This can be fun but isn’t always necessary.
- Wordfence plugin – I recommend installing this plugin and getting it added to your dashboard. It allows you to add amazing security features to protect your site in this age of hacking.
Final Tips:
Now, keep writing. Don’t get discouraged. Don’t start the blog with best of intentions and then let it languish. People will get excited about your new venture, so don’t let them down by not posting for a month. You’re going to get fans and people are going to see your site. Persevere and keep writing! Be friendly and kind in your writing. People will be turned off if you are just ranting about things you hate (although some people will still read it). Pick a niche and try to write about things you love and know about. Write about things you learn or do or adventures you go on. Tell people how to do something or give them something that’s valuable. That gets people coming back. And, above all, have some fun. Don’t think of it as work, even though it will take a good bit of time. Getting everything looking like you want it takes the most, and if you are here and have stayed with me through all this, you’ve got it setup, but writing posts still takes a while. Putting this post together took about 2 hours. Most of my posts take around an hour.
Support us on Patreon!
I hope you've enjoyed this tutorial! Please consider donating on our Patreon page! The more money we raise, the bigger and more elaborate project tutorials we can do for you!
Check out the Patreon Page