
I had to buy a new garage door opener remote because my old remote’s button had disintegrated and no longer worked. I was curious if the board itself could still be activated and, sure enough, when I hit both pins on the board with a wire, the garage door opened. So now I wondered if we could make this board interact with a raspberry pi so that it could be activated over the network. Sure enough, you can! Here’s how.
The basics steps are: Turn the Raspberry Pi into a webserver, wire a basic circuit from the GPIO pins on the Pi to a relay, and then connect the relay to the pins on the old remote. If you already have a raspberry pi, this project is super cheap. You’ll only need a relay board, which is about $7, and some wire to connect things. I’m using a raspberry pi 3, since I already have one running the notification board, and that barely uses the resources available to the Pi, and I just attached this project to that one.
Required Parts
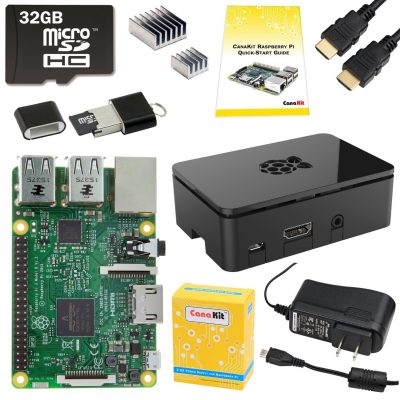 The Raspberry Pi 3 kit is a fantastic starting kit. You can get the board by itself, but unless you have an extra micro USB power supply, SD cards, and other accessories, you’re better off getting the kit for your first Raspberry Pi. As of this article publication, the raspberry pi 3 is the latest and greatest in micro computer technology. The kit comes with the RasPi 3, a 32GB microSD card preloaded with an operating system, a 2.5A power supply, a case, a HDMI cable, 2 heat sinks, and a quick start guide.
How to Build
Step 1: Setup the Raspberry Pi with an operating system
For my build, I used Raspbian. Since this has been covered a hundred times on the internet elsewhere, I recommend following the Raspberry Pi organizations official setup guide. Download the Raspbian OS image here and then follow the guide.
Step 2: Connect Via SSH
Once you have raspbian up, running, and connected to Wifi, we want to install the garage door software. If you’re connected to the pi directly with a screen and keyboard, skip to the next step. If you want to connect to the pi remotely from another computer, we are going to use SSH.
If you are using Ubuntu, Linux, or OSX, you can just open terminal and type
</span>ssh pi@ipaddressofpi<span style="line-height: 1.5;">
If you are using Windows, like I am, download Putty. And connect there.
Step 3: Install software
The first program we need to install is called wiringpi. This will allow us to access the GPIO pins on the Pi and plug things in and talk to them.
On your Pi, input each of the following lines one by one in the terminal.
sudo apt-get install git-core
sudo apt-get update sudo apt-get upgrade
git clone git://git.drogon.net/wiringPi
cd wiringPi git pull origin
cd wiringPi ./build
Once wiring pi is installed, you’ll need Apache and PHP. Use the following commands.
sudo apt-get update
sudo apt-get install apache2 php5 libapache2-mod-php5
When this is done, you have a working apache webserver. You can verify this by going to your Pi’s IP address in a browser and you will see the default webpage that says “it works!”
 Step 4: Upload your garage door opener website
Now we need to make that webserver have a website that can control your relay. This specific web design was created by an instructable user named quartarian, and its simple and great, so thanks to that guy.
Using Putty or another ssh terminal:
$ ssh pi@[YOUR PI’S IP ADDRESS]
$ sudo chown -R pi:root /var/www
This gives you acces to the /var/www folder so we can remotely copy files to it.
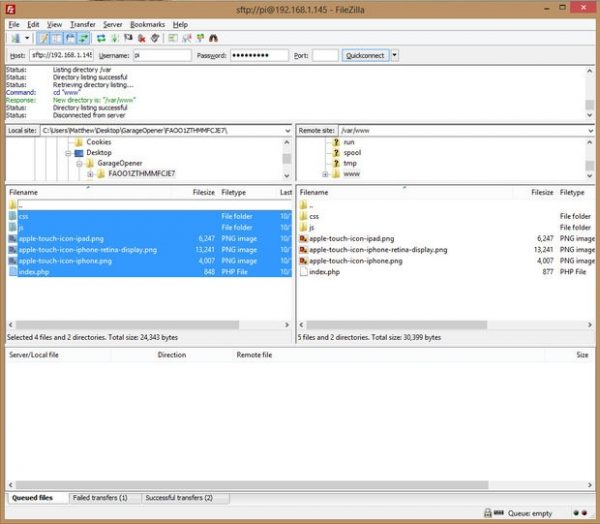
Download the webserver zip file here: GarageDoorOpener.zip
You’ll also need a program called Filezilla to control files from one computer to another: Filezilla download client
Start filezilla, and log in with these credentials:
- Host: sftp://your pi’s ip address
- Username: pi
- Password: raspberry
Unzip the files from garageopener.zip and copy them to /var/www/html filepath. Make sure to delete the exisitng index.html file.
iPhone Users
This website is designed so that if you open it on safari, click options, and save the site to your homescreen, it will open up like an app without needing the browser. It’ll have an icon of a remote and will load a big button that will control the relay.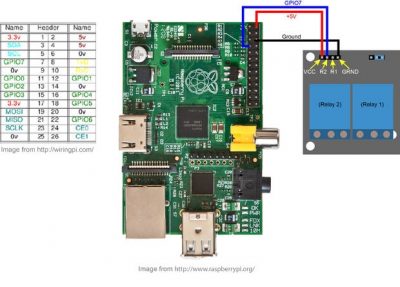
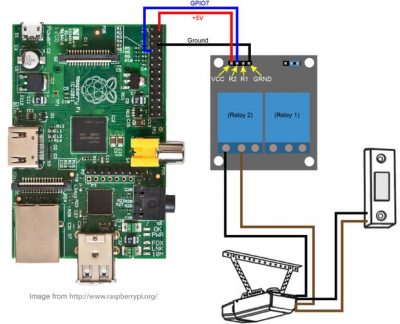
Raspberry Pi GPIO pin layout and connections to relay
Step 5: Wire up the relay
Follow the diagram to the left.
You need 3 wires: power, ground, and communication.
The easiest way to connect these is to use an old serial cable, which matches up perfectly with the pins on a pi, and then you can break out which wires you need, strip them, and connect them to the terminals of the relay. Other ways to do this include simple speaker wire stripped and then use heat shrink tubing to connect them to the pins, or use single jumper wire connectors for the easiest route.
Wires connecting garage door to relay
Step 6: Wire up the remote
Next, you’ll need to connect the garage door remote to the relay. Connect one wire to the left terminal on the relay and to one side of the remote button connection. Solder in place.
Then, connect another wire from the middle relay terminal to the other side of the remote button connection. Solder in place.
Step 6: Make the program start on boot
Natively, raspberry pi’s don’t start services on startup unless you tell them to. Now that we’ve got the webserver working, we want it to start automatically, in case you need to reboot or the power goes out. We need this to startup because if not, the relay will trigger on when it gets power from the pi after startup and it will trigger the open door command. We don’t want this to happen.
So open up putty and ssh in to your pi again.
sudo nano /etc/init.d/garagerelay Then paste the following script into the nano text editor:
#! /bin/bash
# /etc/init.d/garagerelay
# Carry out specific functions when asked to by the system
case "$1" in
start)
echo "Starting Relay"
# Turn 7 on which keeps relay off
/usr/local/bin/gpio write 7 1
#Start Gpio
/usr/local/bin/gpio mode 7 out
;;
stop)
echo "Stopping gpio"
;;
*)
echo "Usage: /etc/init.d/garagerelay {start|stop}"
exit 1
;;
esac

exit 0
Press ‘control+x’ to save and exit, press ‘y’ to save changes, and then ‘enter’ to exit.
Then make the file executable:
sudo chmod 777 /etc/init.d/garagerelayAnd then tell your pi to run this script at startup:
sudo update-rc.d -f garagerelay start 4Reboot the pi
sudo rebootStep 7: Connect to the pi and open the door
Everything is finished! Now just head to the ip address of the pi on your phone or tablet and click on the big button. You should hear a click come from the relay board and then, shortly after, the garage door should open!
For now, the functionality of this device is limited to your own personal wifi network and isn’t accessible over your phones 4G network. Ideally, your wifi should extend to your driveway so you can pull up the app and open the door from the car. It is possible to open up the webserver for internet access, but that has a whole host of complicated security issues that go along with, least among them allowing people to use the button to open your garage door from anywhere. So for now I’m restricting use to our local network.
This smart system allows you to give other people access to your garage door as well, without the need for more remotes. Anyone who has both access to your wifi network and knows the IP address of your pi can access the button and open the door. So have fun!
Parts featured in this article:
Support us on Patreon!
I hope you've enjoyed this tutorial! Please consider donating on our Patreon page! The more money we raise, the bigger and more elaborate project tutorials we can do for you!
Check out the Patreon Page