

A few years ago, my wife and I came across a board game in a toy store that was designed with an incredible balance of simplicity and complex thought processing, and we just loved it. I didn’t pull the trigger and buy it at the time, but it’s stuck with me as a project I’d like to put together, and today is finally that day when I get to share the designs with you!
Basically, this game is tic-tac-toe, but with some variation that makes it significantly more fun and complex. In short, there are 2-4 players, all taking turns clockwise around the board, and each person has 3 large rings, 3 medium rings, and 3 small rings. You can win in a number of ways. All three sized rings in the same spot on the board, or 3 in a row of any of the same sizes, or 3 in a row of each size sequentially (Small–>Medium–>Large).
Also, and this is VERY important: The number #1 rule of the game is NO TABLE TALK. You must absolutely adhere to this rule or it ceases to be fun. You cannot dictate moves for other players, pointing out that they need to block someone, even if that means you are going to lose. You cannot tell the person after you “hey block person #3 or we lose”. Kids have the hardest time with this one, and you have to be kind of strict on this one or the game will not be fun for anyone.
This game is easy enough to understand and we’ve played it with people of all ages. Babies love to just play with the rings, stacking them and throwing them, kids love to play and learn more complex strategy, and adults even have a good time because this game can, and does, get complicated fast! It can be surprisingly hard to win when you are playing with some intelligent people!
Required Parts
There are two ways to go about making this :
- Download the adobe files I provide here, copy them onto some 1/4″ plywood, and cut them out by hand with a scroll saw or jigsaw (This is hard) or
- Download the adobe files here, take them to a Makerspace, and use a laser cutter to cut them out exactly correct. (This is MUCH easier)
If you do this by hand, it’s going to take a while. These cut outs have to be perfectly circular, or the pieces we will make to fit in them will not slide easily. So feel free to use this as a guide to build these by hand, but I highly recommend attempting this project with a laser cutter.
Also, we have to decide how to make the player pieces. There are two options here as well:
- Use my CAD file to 3D print each person’s pieces in 4 different colors. Each size piece is 0.1″ taller than the previous (0.5″, 0.6″, 0.7″) and they have a slightly smaller diameter than the holes cut in the wood, so they fit really well, or
- Cut out wood rings from either scrap 1x wood, or turn them on a lathe.
In addition to that, you’ll need :
Wood:
- 1/4″ plywood – 2 sheets at least 18″ x 18″ – One piece is the top of the game board with all the cutouts, and one piece is the underneath sheet, which has the rules and to which everything is glued.
Essential Tools:
- Jigsaw – If cutting by hand
- Clamps – for gluing and holding the pieces together
- Sandpaper – Id recommend sanding by hand. Many pieces here are small and easily damaged with a power sander
Disposables:
- Glue – you can use regular wood glue here, but I like CA glue. (AKA. Superglue, but there are different kinds. I know. Mindblowing!)
- Wood stain
- Stain application brushes – I prefer foam
- Rags for wipe up
How to Build
Step 1: Get the files
Download the adobe illustrator files to use as templates or to import into your laser cutting system of choice, and the CAD files for 3D printed game pieces.
Get the Full Plans on Patreon!
This project has a full schematic and set of plans over on our Patreon page! Follow the link to download the whole set.
Get the PlansStep 2: Start cutting it out.
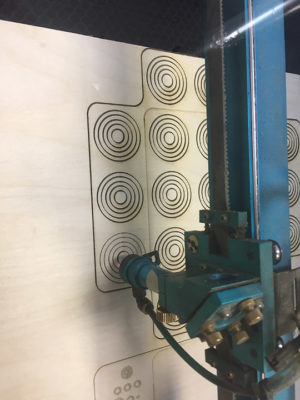
If you’re using the laser cutter, this part is easy, and really fun to watch.
Cut out the top and bottom boards, one of each, making sure that certain lines are cut all the way through, and certain lines are only engraved.
The engraved lines should be the following:
- On the top board, there is an engraved line around the 9 center spots to separate the game area from the individual storage areas
- On the bottom board, each of the four players has an engraved “conditions for winning” set facing them to the right of their pieces
- On the bottom board, there is an engraved outline for where the top board will line up when its time to glue them together.
Step 3 : Separate out the unnecessary pieces and sand the edges (and stain)
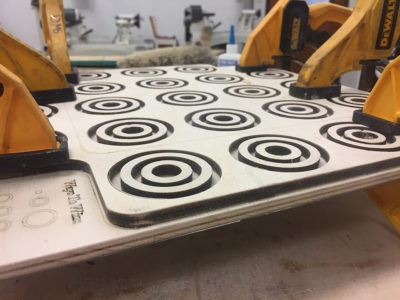
You’ll notice that some of the cutouts are needed for the game board, and some are just left over and can be thrown away, because that’s where the pieces will go. Look at the picture to the left to see what I mean. Each spot has two smaller inner circles that separate where the big, medium, and little pieces go.
Remove all the extra wood circles from the board and sand down any jagged edges left over from cutting.
Now is also a good time to make sure you still have all your pieces after cutting, because there are so many, it’s easy to lose one or two.
If you want, now is a good time to stain the board. I didn’t, because I like the natural look of the wood here, but feel free to choose a good color, or even just coat everything with a light finish. Be really careful with thick finishes, because I designed these parts with very specific tolerances between them and the pieces, so the 3D printed pieces won’t fit if you use a thick paint or something like that.
Step 4 : Glue everything together
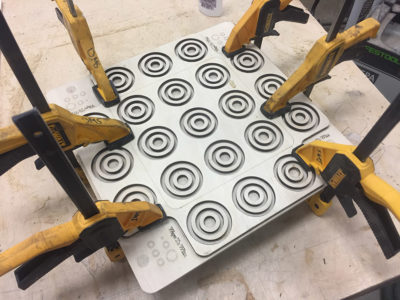
Carefully align your top and bottom boards and use a liberal amount of CA glue, then clamp the boards together. CA glue sets VERY quickly, so make sure its aligned before you press down.
Clamp all over the edges and into the middle, making sure no part of the board bows up while drying.
After a few minutes, you can start adding glue to the bottom of the inner circles and dropping them into their spots. I actually used the game pieces (I had them already 3D printed at the time) and that allowed me to drop in the game piece, then drop in the smaller wood circle, then quickly remove the game piece before it got stuck. Just repeat this process until all your spots are filled.
Step 5 : Make your game pieces
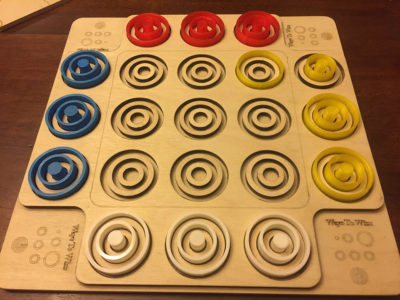
Like we mentioned before, you can either hand make your game pieces, or you can 3D print them. Both options take a while, but one is a lot less work on your part. 3D printing in 4 colors gives a really nice board game vibe, with vibrant plastic pieces.
Each set of 9 rings, for each player, took me about 1.5 hours to print. I used 10% infill to make them light, but you could go up or down depending on your preferences.
I don’t have any action shots of the 3D printer making them, because I was preoccupied with making the game board at the same time, but you can see how they ended up here on the left.
I ended up making 6 sets of game pieces, one extra set in black because my wife wanted a black set to be her “personal game pieces” and one extra green set just in case any of these got lost.
A quick strategy guide:
The basics are simple: get three of the same sized in a row, or three in sequential sizes in a row, or all three sizes in the same spot. That part is easy.
The hard part is being the first person to do it!
You have to watch out for a few things:
- You have to make sure the person going after you isn’t about to win. If they are, you HAVE to try to block them.
- If that person isn’t going to win, you have to make sure the person after that person isn’t going to win in two different ways. If they are, you have to block THAT person, AND the person after you has to block that person. It gets very difficult to see that many moves ahead in a long game.
- Ideally, on your turn, you don’t have to spend it blocking someone else.
- A normal move on your part is making progress towards three in a row.
- A good move on your part is making progress towards three in a row while not making an obvious move so hopefully people don’t catch on to what you are doing.
- A great move on your part is forcing someone else to spend their turn blocking someone else and not making progress towards their own goal. You don’t have to block a person who isn’t coming after you. You can rely on the next person to do that, as long as you are sure they will see it! I’ve lost many a game thinking I was making progress on my pieces and relying on the next person to block the third person, and we both lose because that second person didn’t see that they needed to block!
- A perfect move on your part is making progress towards your goal while not making it an obvious move, that also sets you up to win in more than one way so you can’t be blocked by just one person, forcing two people to have to spend their turns blocking you.
Support us on Patreon!
I hope you've enjoyed this tutorial! Please consider donating on our Patreon page! The more money we raise, the bigger and more elaborate project tutorials we can do for you!
Check out the Patreon Page
Comments
Brilliant! What a great explanation of how to play! Good job Sam!